Text Extractor
This activity allows you to capture image and perform actions on the captured image.
Prerequisites
OneNote OCR capabilities is added via configuration of Automation Studio and Robots. To use this feature following assembly file is required:
| Component | Version |
| Interop.Microsoft.Office. Interop.OneNote.dll | 1.1.10.0 |
To update assembly file:
- Download the assembly file from here on your system.
- Save the downloaded file at client-tools > AutomationStudio > bin > Plugins > OCR. If you download/access Automation Studio from the Admin module, you must save the required DLL at %localappdata% > EdgeVerve > AutomationStudio > bin > Plugins > OCR.
The assembly files are saved.
Using Text Extractor
- In the Canvas Tools pane, click Image to expand the tool and view the associated activities.
- Drag the Text Extractor activity and drop on to the Flowchart designer area on the Canvas.
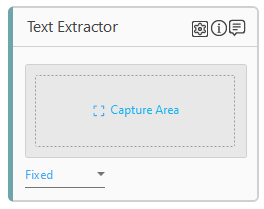
- Click Capture Area to capture the rectangle on screen on which OCR is to be performed.
- If OCR Target is set to Desktop in the properties pane of the Text Extractor activity, then the last focused application is captured and shown for OCR area selection.
If OCR Target is set to File in the properties pane of the Text Extractor activity, then configure the image or define the image path in the Image File property in the properties pane.
Additionally, you can use the (recapture image) icon and the
  (delete) icon in the image activity to recapture or delete the image. These icons are displayed once the image is captured in the activity window.
- In the Fixed list, select the usage mode as per your requirement.
- If OCR Target is set to Desktop, following usage modes are available
- Fixed: In fixed mode, when the image is captured, a rectangular area is selected. The coordinates of the selected area are stored; no image is captured in this mode. The grey area in the activity acts as the image placeholder.
- Reference: In the reference mode, two rectangular areas are selected to capture the image. The first selected rectangular area is stored as a template image which is used to perform search on screen during runtime. The second selected rectangular area is a region from where text is extracted using OCR. The coordinates of the selected area are stored for the second selection.
Additionally, you can capture the image using Browse local Image and browse the image on your local machine.
- If OCR Target is set to File, following usage modes are available
- Fixed: In fixed mode, when the image is captured, a rectangular area is selected from the given image file. The coordinates of the selected area are stored; no image is captured in this mode. The grey area in the activity acts as the image placeholder.
- Reference: In the reference mode, two rectangular areas are selected from the given image file to capture the image. The first selected rectangular area is stored as a template image which is used to perform search on screen during runtime. The second selected rectangular area is a region from where text is extracted using OCR. The coordinates of the selected area are stored for the second selection.
Additionally, you can capture the image using Browse Local Image and browse the image on your local machine. - Full Image: In Full Image mode, you can capture the full image to extract the text using OCR.
- If OCR Target is set to Desktop, following usage modes are available
- Click the
 (Settings) icon, a list appears. Click the required option from the list.
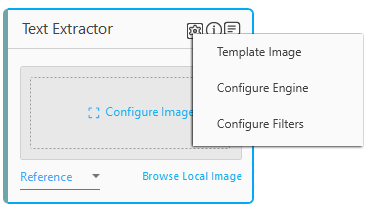
- Template Image: This option is available when usage mode is set as reference. It displays the template image which is used to perform search on screen during runtime.
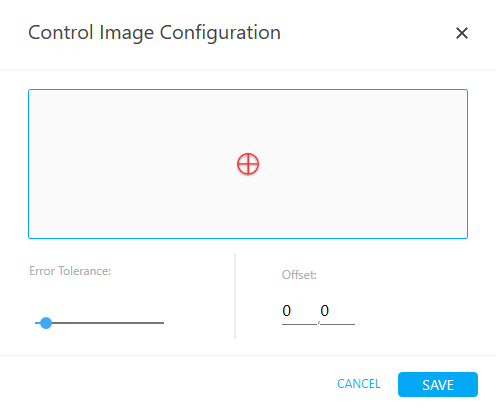
- Error Tolerance: Maximum acceptable error tolerance in the image matching while performing the image search during execution
- Offset: They are coordinates of the reference point selected during image capture with respect to the image. If required, alter the offset coordinates and save them from this screen.
- CANCEL: Click CANCEL to cancel the changes.
- SAVE: Click SAVE to save the changes.
- Configure Engine: Configure the OCR engine used for text extraction.
- OCR Engine: Select the required OCR Engine to convert the text into a machine-readable format. The configuration fields change as per the selected OCR Engine. Click any of the following link to know about the OCR Engine and their respective configuration details:
- Template Image: This option is available when usage mode is set as reference. It displays the template image which is used to perform search on screen during runtime.
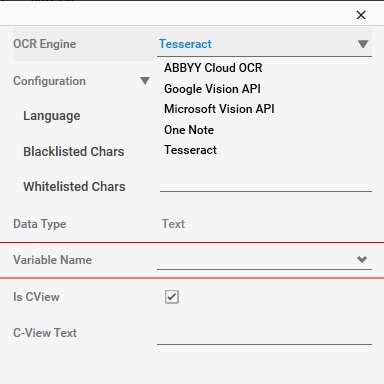
Tesseract
This is a free software for OCR engine and available for various operating systems.
_01.png)
The properties of Tesseract are listed in the following table:
|
Property Name |
Usage |
|
Configuration |
The selected OCR is displayed in this field. |
|
Language |
It Indicates the language of the targeted text. You can change or combine (two or more than two) languages, if required. For example, eng + Rus. Place the language data in the target data folder for any additional language for Tesseract engine. |
|
Blacklisted Chars |
The characters/digits that appears in the Blacklisted Chars field are ignored during the match, and other closest match are found. For example, 0123456789 are declared in the field than the mentioned characters are blacklisted, and O is not mistaken with 0. |
|
Whitelisted Chars |
This field is also configured as Blacklisted Chars field, but the functionality of Whitelisted Chars is opposite to Blacklisted Chars. For example, 0123456789 are declared in the field than the mentioned characters are whitelisted, and 0 is not mistaken with O. |
|
Data Type |
The type of data used for text extraction in OCR. By default, data type is set to Text. |
|
Variable Name |
User defined name of the variable that stores the captured value. You can define the variable name here itself or predefine it in the Parameter bar. |
|
Is CView |
Is applicable only for AssistEdge Engage. If selected, the field configuration captured in Automation Studio is visible in the Engage C-View tab. |
|
C-View Text |
Define the CView field caption for Engage. |
ABBY Cloud API
This is used to perform AI based image analysis. It is a third-party cognitive service. To consume this service, you need add a new application under CognitiveApps. See Cognitive Services for more details.
_01.png)
The properties of ABBY Cloud API are listed in the following table:
|
Property Name |
Usage |
|
Configuration |
The selected OCR is displayed in this field. |
|
ABBY Server URL |
Enter the API URL. |
|
Language |
Specify the language. |
|
Data Type |
The type of data used for text extraction in OCR. By default, data type is set to Text. |
|
Variable Name |
User defined name of the variable that stores the captured value. You can define the variable name here itself or predefine it in the Parameter bar. |
|
Is CView |
Is applicable only for AssistEdge Engage. If selected, the field configuration captured in Automation Studio is visible in the Engage C-View tab. |
|
C-View Text |
Define the CView field caption for Engage. |
Google Vision API
This is used to perform AI based image analysis. It is a third-party cognitive service. To consume this service, you need add a new application under CognitiveApps. See cognitive services for more details.
_01.png)
The properties of Google Vision API are listed in the following table:
|
Property Name |
Usage |
|
Configuration |
The selected OCR is displayed in this field. |
|
URL Of API |
Enter the API URL. |
|
Data Type |
The type of data used for text extraction in OCR. By default, data type is set to Text. |
|
Variable Name |
User defined name of the variable that stores the captured value. You can define the variable name here itself or predefine it in the Parameter bar. |
|
Is CView |
Is applicable only for AssistEdge Engage. If selected, the field configuration captured in Automation Studio is visible in the Engage C-View tab. |
|
C-View Text |
Define the CView field caption for Engage. |
Microsoft Vision API
This is used to perform AI based image analysis. It is a third-party cognitive service. To consume this service, you need add a new application under CognitiveApps. See cognitive services for more details.
_01.png)
The properties of Microsoft Vision API are listed in the following table:
|
Property Name |
Usage |
|
Configuration |
The selected OCR is displayed in this field. |
|
URL |
Enter the API URL. |
|
Version |
Enter the version of the API. |
|
Is Handwritten |
Select this option, if the image read is a handwritten image. |
|
Data Type |
The type of data used for text extraction in OCR. By default, data type is set to Text. |
|
Variable Name |
User defined name of the variable that stores the captured value. You can define the variable name here itself or predefine it in the Parameter bar. |
|
Is CView |
Is applicable only for AssistEdge Engage. If selected, the field configuration captured in Automation Studio is visible in the Engage C-View tab. |
|
C-View Text |
Define the CView field caption for Engage. |
One Note
OneNote OCR is a Microsoft OCR, and OneNote application installation is required to consume One Note OCR Engine.
To consume OneNote:
- Download OneNote Interop dll as per prerequisite document.
- Locate the following folder in your local machine “AutomationStudio\Plugins\OCR” where the Automation Studio is installed.
- Place the downloaded DLL at this location.
_01.png)
The properties of One Note are listed in the following table:
|
Property Name |
Usage |
|
Configuration |
The selected OCR is displayed in this field. |
|
Data Type |
The type of data used for text extraction in OCR. By default, data type is set to Text. |
|
Variable Name |
User defined name of the variable that stores the captured value. You can define the variable name here itself or predefine it in the Parameter bar. |
|
Is CView |
Is applicable only for AssistEdge Engage. If selected, the field configuration captured in Automation Studio is visible in the Engage C-View tab. |
|
C-View Text |
Define the CView field caption for Engage. |
|
NOTE: |
A valid subscription is required to run third party cognitive services, such as, ABBYY, Google, Microsoft. |
- Configure Filters: Apply preprocessing image filters to improve the accuracy of text extraction and test the correction of the OCR output. Following are the list of OCR filters used for text extraction.

- Filters: Configure the filters as per your requirement. Following are the list of available filters.
- Scale – Use this filter to adjust the image/text in the right size. This filter scales the image by a factor of 2. The parameter to define the image is DPI.
- GrayScale – Use this filter to convert the image in grayscale
- Contrast – Use this filter to adjust the contrast of the image. Contrast provides clarity in the image/text.
- Unskew – Use this filter to correct the orientation of slightly skewed images to the horizontal or vertical axis, whichever is closet.
- Rotate +90 – Use this filter to rotate the image/text clockwise to 90 degree.
- Rotate -90 – Use this filter to rotate the image/text anti-clockwise to 90 degree.
- Dilate – Use this filter to fill the holes and broken areas of the image.
- Erode – Use this filter to reduce the brightness if the image
- Exponential – Use this filter to apply the System.Math.Exp function for each pixel in the image, clipping values as needed
- Remove Noise – Use this filter to remove noise from the background, such as, random variation of color and brightness.
- Invert – Use this filter to reverse the saturation, brightness and hue values. The image is converted into photo negative.
- Sharpen – Use this filter to define the edges.
- Smooth – Use this filter to remove high spatial frequency noise.
- Sepia – Use this filter to convert the image in a brownish grey to dark yellowish-brown tone.
- Applied Filters: In this section, the list of applied filters is displayed
- Undo: Click Undo to cancel the selected filter.
- Reset: Click Reset to unselect the applied filters.
- Sample: The selected image is displayed in this section. You can test the configured filters for correctness with maximum three sample. Below fields may vary as per your OCR Engine selected.
- Application Id – Provide the Application Id to run the third-party cognitive service. This field is applicable if the selected OCR Engine is ABBYY Cloud Service.
- Password – Provide the password for the mentioned Application ID to run the third-party cognitive service. This field is applicable if the selected OCR Engine is ABBYY Cloud Service.
- #NA# - This field is not editable and not applicable.
- Subscription Key – Provide the subscription key to run third-party cognitive service.
- Extract – Click Extract to view the extracted text or OCR output after preprocessing of the image.
- Extracted Text: Click Extract. The OCR output is displayed in this section.
Text Extractor Properties
The properties of Text Extractor activity are listed in the following table and can be edited in the Properties grid on the right pane.
|
Property Name |
Usage |
|
Control Execution |
|
|
Ignore Error |
When this option is set to Yes, the application ignores any error while executing the activity. If set to NA, it bypasses the exception (if any) to let the automation flow continue; however, it marks the automation status as failure, in case of an exception. By default, this option is set to No. |
|
Delay |
|
|
Wait After (ms) |
Specify the time delay that must occur after the activity is executed. The value must be in milliseconds. |
|
Wait Before (ms) |
Specify the time delay that must occur before the activity is executed. The value must be in milliseconds. |
|
Misc |
|
|
Breakpoint |
Select this option to mark this activity as the pause point while debugging the process. At this point, the process freezes during execution allowing you to examine if the process is functioning as expected. In large or complex processes, breakpoints help in identifying the error, if any. |
|
Commented |
Select this option to mark this activity as inactive in the entire process. When an activity is commented, it is ignored during the process execution. |
|
CurrentWindowHandler |
This property is used internally by the activities. No action required. |
|
DisplayName |
The display name of the activity in the flowchart designer area. By default, the name is set as Text Extractor. You can change the name as required. |
|
Use Fuzzy Matching |
Select this option to turn fuzzy matching of the image. This matching ignores the aspect ratio, background color and resolution change. Use this flag, when basic image matching fails. |
|
Target |
|
|
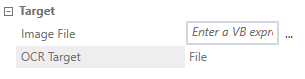
Image File |
Define the image path to perform the image OCR. The image file path is defined in string. For example: “D:\imageautomation\image1.jpeg” |
|
OCR Target |
Select OCR Target from the list to define how the image OCR is performed in the process. By default, this option is set to Desktop. |
|
|