PDF to Image
It helps you to automate converting an entire PDF file or a section of it, into an image format. The extracted image can then be sent to the OCR engine for better extraction results.
Though PDF files are widely preferred and supported format to store data in files, yet an image may be more relevant in certain scenarios. They can be easily added to videos and other documents, particularly if you want to share only certain pages of the PDF or only some content of it. Automating this task lets you save the manual time and effort required in the conversion. It allows you to convert the required pages or area to the most common and supported image formats such as JPEG, PNG, GIF and others.
Using PDF to Image Activity
- In the Canvas Tools pane, click File to expand the tool and view the associated activities.
- Drag the PDF to image activity and drop on to the Flowchart designer on the Canvas. The validation error symbol disappears when required inputs are provided.
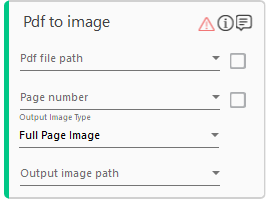
- In the Pdf file path list, select the parameter holding the PDF file path along with the file name and file extension. Alternatively, select the Is Default Value check box beside the Pdf file path field and enter the PDF file path along with the file name and file extension to set it as the default value.
- In the Page Number list, select the parameter holding the page number of the PDF file that you want to convert into image.
- In the Output Image Type list, indicate if you want to convert the entire PDF file or specific area to an image. Available options are- Full Page Image and Specific Image Area.
Full Page Image
- In the Output image path list, select a parameter holding the document destination file path, along with the file name and file extension of the image.
Specific Image Area
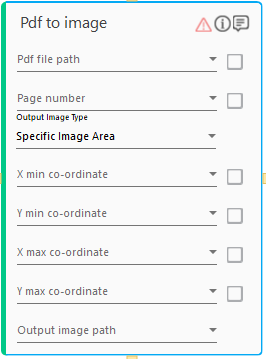
- In the X min co-ordinate list, select the parameter holding the minimum value of the horizontal axis of the area that you want to convert into an image. Alternatively, select the Is Default Value check box beside the X min co-ordinate field and enter the default minimum value of the horizontal axis of the area that you want to convert into an image. The value of the x-axis must be an integer.
- In the Y min co-ordinate list, select the parameter holding the minimum value of the vertical axis of the area that you want to convert into an image. Alternatively, select the Is Default Value check box beside the Y min co-ordinate field and enter the default minimum value of the vertical axis of the area that you want to convert into an image. The value of the y-axis must be an integer.
- In the X max co-ordinate list, select the parameter holding the maximum value of the horizontal axis of the area that you want to convert into an image. Alternatively, select the Is Default Value check box beside the X max co-ordinate field and enter the default maximum value of the horizontal axis of the area that you want to convert into an image. The value of the x-axis must be an integer.
- In the Y min co-ordinate list, select the parameter holding the maximum value of the vertical axis of the area that you want to convert into an image. Alternatively, select the Is Default Value check box beside the Y min co-ordinate field and enter the default maximum value of the vertical axis of the area that you want to convert into an image. The value of the y-axis must be an integer.
- In the Output image path list, select a parameter holding the document destination file path, along with the file name and the file extension of the image.
Pdf to image Properties
The properties of Pdf to image activity are listed in the following table and can be edited in the Properties grid on the right pane.
|
Property Name |
Usage |
|
Control Execution |
|
|
Ignore Error |
When this option is set to Yes, the application ignores any error while executing the activity. If set to NA, it bypasses the exception (if any) to let the automation flow continue; however, it marks the automation status as failure, in case of an exception. By default, this option is set to No. |
|
Delay |
|
|
Wait After |
Specify the time delay that must occur after the activity is executed. The value must be in milliseconds. |
|
Wait Before |
Specify the time delay that must occur before the activity is executed. The value must be in milliseconds. |
|
Misc |
|
|
Breakpoint |
Select this option to mark this activity as a pause point while debugging the process. At this point, the process freezes during execution allowing you to examine if the process is functioning as expected. In large or complex processes, breakpoints help in identifying the error, if any. |
|
Commented |
Select this option to mark this activity as inactive in the entire process. When an activity is commented, it is ignored during the process execution. |
|
DisplayName |
The display name of the activity in the flowchart designer area. By default, the name is set as Pdf to image. You can change the name as required. |
|
DPI |
Signifies the Dot Per Inch (DPI) value of the image. It is the number of pixels rendered per inch of the image. The default value is set to 300. |