Installation of Client-Side Components
Installation of client-side components is a single step procedure where you need to save the folder containing client-side components on the system you wish to run AssistEdge.
|
CAUTION: |
Before installation of client-side components are done, successfully configure and install the server-side components first else you would receive errors. |
To Install the Client-Side Components:
As part of installation process of client-side components, perform below actions on the system where you wish to run the client-side components:
- Save Client-Side Components
- Install Proctor
Save Client-Side Component
As part of installation of client-side components, save the folder on the system/s you wish to run the client-side components.
The client-side components are available within AssistEdgeAutomation > client-tools folder. You can select and save only that folder that are relevant to you.
The client-side components are:
- AutomationRuntime
- EnterprisePersonalAssistant
- Engage
- Robot
- AutomationStudio
Installing Proctor
This section is applicable only if you want automated Robot Farm management via ControlTower.
Prerequisite
- Install Microsoft .Net framework (v 4.8) on the machine where Proctor needs to be installed.
- Install Microsoft Visual C++ 2015 Redistributable (x86) or Install Microsoft Visual C++ 2017 Redistributable (x86) or Microsoft Visual C++ 2015-2019 Redistributable (x86) .Net framework (v 4.8) on the machine where Proctor will be installed. You can download it from the below link:
https://support.microsoft.com/en-in/help/2977003/the-latest-supported-visual-c-downloads.
To install Proctor:
- Access client-tools > AutomationRuntime > Robot folder.
- Copy the Robot folder on your system.
|
NOTE: |
Proctor should be copied and installed at a shorter path. For example, D:\Robot\Proctor. |
- Access Robot > Proctor > EV.AE.Proctor.exe.config file to set configurations that are specific to your system, double click and open the file. The EV.AE.Proctor.exe.config file opens.
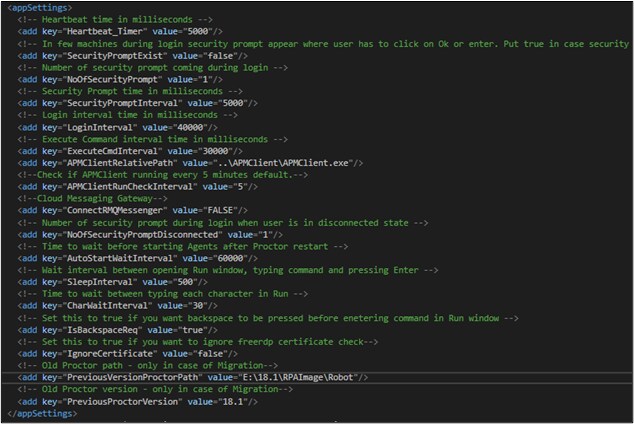
4. Update the below mentions parameters:
| Configuration | Description | ||
| Heartbeat_Timer | The time interval in which Proctor sends its heartbeat. It is recommended not to change the default value. |
||
| SecurityPromptExist |
Since Proctor creates remote login, any security prompts that are specific to your system during login needs to be mentioned in the configurations to enable Proctor to perform its actions. Default value is set to ‘false’.
|
||
|
NoOfSecurityPrompt |
It signifies the number of prompts that appears when you login to the system where Proctor runs.
|
||
| SecurityPromptInterval | It signifies the interval of security prompts specified in milliseconds. | ||
| LoginInterval | It signifies the time interval that is required for user session to get created i.e. time required for you to login to your system. | ||
| ExecuteCmdInterval |
It signifies the time interval required by the Proctor to complete the actions and then start the agent. When a new agent is added, Proctor has to perform certain actions on the system such as, making a new copy of the Robot Agent folder for the particular user. |
||
| APMClientRelativePath | It signifies the folder path of the APM client along with the APMClinet.exe file name. | ||
| APMClinetRunCheckInterval | Signifies the time interval to check if the APM client is running. By default, this value is set to 5 minutes. | ||
| ConnectRMQMessenger | Signifies if the cloud messaging gateway is connected. By default, it is set to FALSE. | ||
| NoOfSecurityPromptDisconnected |
It signifies the number of security prompts that appears when user is in disconnected mode.
|
||
| AutoStartWaitInterval | It signifies the time interval to wait before the agents start after Proctor restart. It must be specified in milliseconds. By default, it is set to 60000 milliseconds. | ||
| SleepInterval | It signifies the wait time until the Run window is open, command is written and the Enter key is pressed. | ||
| CharWaitInterval | It signifies the wait time while typing each character in the Run window. | ||
| IsBackspaceReq | It signifies if backspace must be provided prior to writing command in the Run window. By default, it is set to true. | ||
| IgnoreCertificate | It signifies if the freerdp certificate check must be ignored or not. By default, it is set to false. Change this value to true if you want to apply the check. | ||
| PreviousVersionProctorPath | It signifies the Proctor installation path. This property is used in the migration. |

5. Save and close the file.
- Perform below mentioned steps:
- For Windows: Open the command prompt with administrator rights and change the directory to Robot folder.
- For Linux: Connect with the Linux system using Putty and change the directory to the Robot folder.
- Run ae install to install Proctor.
<Build Directory>\<ClientTools Folder>\Robot>ae install .Net framework 4.8 and Microsoft Visual C++ 2015 Redistributable (x86) or Micros oft Visual C++ 2017 Redistributable (x86) or Microsoft Visual C++ 2019 Redistributable (x86) is pre-requisite to run Proctor. Please confirm if it is installed and proceed further (y/n) : y Proctor Installed. Proctor status is: START_PENDING |
- Run ae status to check the current status of Proctor. Command line returns to the base directory.
<Build Directory>\<ClientTools Folder>\Robot>ae status Proctor status is: RUNNING |
The Proctor is installed.
|
NOTE: |
|