Installing Citrix Package
This section is application only for a Windows based system.
As part of the installation of Citrix components perform the following in sequence as listed below:
- Pre-Install Preparations
- Install and Start the Citrix Components
- Publish Citrix Launcher to Citrix Studio
|
NOTE: |
Availability of Citrix Studio is the prerequisite for CitrixPackage installation |
Pre-Install Preparations
As part of installation of Citrix components, extract product package- AssistEdgeAutomation-citrix.zip and access the installation folder CitrixPackage. You also need to update the configuration files stored within the installation folder as per the deployment you wish to achieve.
To extract CitrixPackage.zip:
- Save the product package AssistEdgeAutomation-citrix.zip on local drive of your system.
- Right-click AssistEdgeAutomation-citrix.zip, point to 7-zip and then click Extract to “CitrixPackage\”.
The CitrixPackage.zip is extracted.
|
CAUTION: |
Product package is extracted using 7-zip as the default decompression of Windows fails to properly unzip the files. Incorrect extraction leads to failure of installation of Citrix. |
To Update Configuration Files:
In the CitrixPackage folder, access the scripts folder and then update the following:
- Deployment Properties - you need to update the UI (web) and Database component with the details of the system where you wish to install Citrix package.
- Component Properties - you can update only the ControlTower component, if required
Deployment Properties.
Refer Pre-Install Preparations of the Server-Side Installation section for details related to the above files and properties.
Installing and Starting the Citrix Server Side Components
To install CitrixPackage:
- Place the license file (*.dat) at CitrixPackage > data > License folder.
- Open command prompt with the Administrator rights and change the directory to CitrixPackage > scripts folder.
- Run ae install to initiate the installation. The component properties and sever properties from component.properties and server.properties files are displayed. It also displays the port numbers assigned to the UI and the Control Tower component. Validate the details displayed.
- Do you want to continue with Installation? (Y/N): appears. Do one of the following:
*************************************************************************************************
AssistEdge Installation
*************************************************************************************************Following components are marked for installation on this system.
Please validate component and Port Numbers.
-----------------------------------------------------------------------------------------
Web server: Port: 8443
ControlTower Port: 3860NOTE: Database will not be installed by this utility.
Do you want to continue with Installation? (Y/N):
- Enter y to continue with the installation. The installation moves to the next step of enabling the SSL.
- Enter n to exit the installation if you wish to change the properties in the respective files at this stage. The Command Prompt returns to the base directory.
|
************************************************************************************************* Installing AssistEdge ************************************************************************************************* Do you want to enable SSL?(Y/N):
|
- Do you want to enable SSL? (Y/N), appears. Do one of the following:
- Enter y to continue the installation with SSL enablement. You can enable SSL by:
- Enabling commercial certificates
OR - Generating self-signed certificate
- Enabling commercial certificates
- Enter n to continue the installation without SSL enablement. You can enable the SSL once the installation is done. To enable SSL, save the commercial certificates in CitrixPackage > data > Certificates folder and enter ‘y’, Enter AssistEdge Site Name: appears and the SSL is enabled.
- Enter y to continue the installation with SSL enablement. You can enable SSL by:
|
NOTE: |
|
a. If you do not have commercial SSL certificates saved in the installation folder, you can proceed with the SSL enablement by generating a self-signed certificate.
b. Do you want to generate self-signed certificate. (Y/N): appears. Do one of the following:
|
*************************************************************************************** Do you want to enable SSL?(Y/N): y |
- Enter y to generate a self-signed certificate. Self-signed certificate gets generated and is saved in the Windows Trust Store.
- Enter n to continue without generating a self-signed certificate. The SSL is enabled.
|
NOTE: |
|
- Enter details related to database and other components as mentioned below:
- For SQL: If you are using SQL database, enter the below details:
- Is the SQL Server configured for Windows Authentication? (Y/N): appears.
- Enter y, if windows authentication was set for logging into the database while creating the database.
Is the SQL Server configured for Windows Authentication?(Y/N): y
Enter Domain: xyzdomian
Enter Domain Username: robin.waltson
Enter Domain Password (HIDDEN):
Enter Database Name: AEDB
- Enter y, if windows authentication was set for logging into the database while creating the database.
- Is the SQL Server configured for Windows Authentication? (Y/N): appears.
- Enter Domain: appears; provide the domain name of your enterprise and then press <Enter>8 .
- Enter Domain Username: appears; provide the windows domain username and then press <Enter>8 .
- Enter Domain Password <HIDDEN>: appears; provide windows password for the above domain user and then press <Enter>8
- Enter Database Name: appears; provide name of the database that you have configured for AssistEdge and then press <Enter>8
- Enter n if Windows authentication was not set for logging into the database while creating the database
Is the SQL Server configured for Windows Authentication?(Y/N): y
Enter Domain: xyzdomian
Enter Domain Username: robin.waltson
Enter Domain Password (HIDDEN):Enter Database Name: AEDB
- Enter n if Windows authentication was not set for logging into the database while creating the database
- Enter Database Username: appears; provide the username of the database that you created for AssistEdge and then press <Enter>8 .
- Enter Database Password <HIDDEN>: appears; provide password of the above database user and then press <Enter>8 .
- Enter Database Name: appears; provide name of the database that you have configured for AssistEdge and then press <Enter>8
- For SQL: If you are using SQL database, enter the below details:
- For Oracle: If you are using Oracle database, enter the below details:
|
Enter Domain Username: aeuser
|
a. Enter Database Username: appears; provide the username of the database that you created for AssistEdge and then press <Enter>8 .
b. Enter Database Password: appears; provide password of the above database user and then press <Enter>8
c. Enter Oracle Database Service Name: appears; provide service name of the Oracle database and then press <Enter>8
- Press y to continue with installation.
|
Do you want to continue with Installation? (Y/N): y Updating AutomationStudio configuration........... [SUCCESS] |
- Once successful installation is done you need to start just one component, ControlTower related to Citrix installation. Run ae start controltower to start the ControlTower component.
The Citrix components are installed and started.
Publishing Citrix Launcher to Citrix Studio
To publish Citrix Launcher to Citrix Studio:
- Open Citrix Studio on the system where you have installed Citrix components.
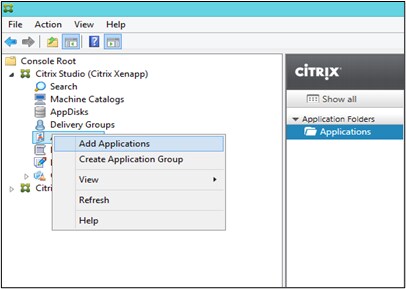
- Right click Applications and then click Add Applications.
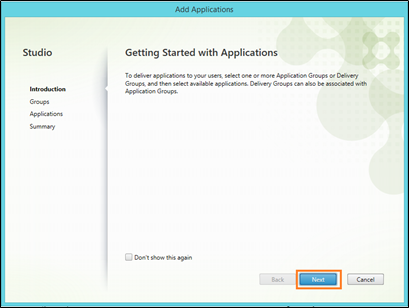
The Application window opens.
- Click Next.
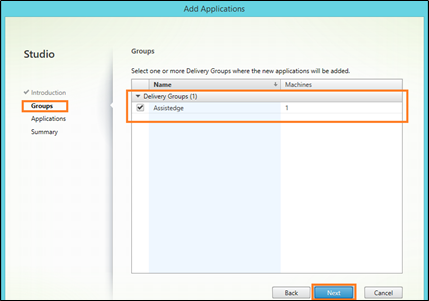
- In the left navigation pane, select Groups and then select Delivery Groups for the application.
- Click Next.
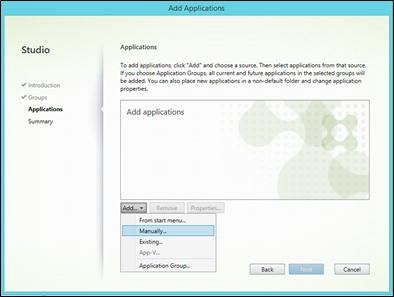
- In the Applications section click Add and select Manually from the dropdown.
- Click Next.
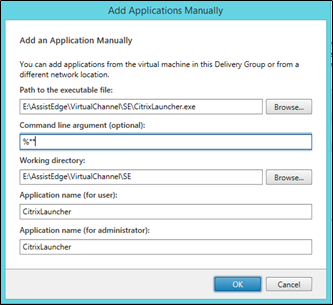
The Add Applications Manually window appears.
- In Add Applications Manually window, browse for the path to the CitrixLauncher.exe (CitrixPackage > client-tools > AssistCtxRuntime) file and provide command line parameters as ‘%**’.
- Click OK to add application.
The Citrix Launcher is published.