Input Dialog
This activity is applicable only for an attended automation process. It displays a message box and prompts you to provide input that lets you add parameters dynamically.
Using Input Dialog Activity
- In the Canvas Tools pane, click Assign and Write to expand the tool and view the associated activities.
-
Drag the Input Dialog activity and drop on to the Flowchart designer on the Canvas.
-
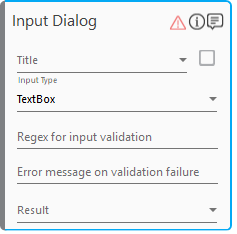
In the Title field, enter a title of the input dialog box and select the checkbox to set it as the default title.
- Alternatively, in the Title list, select a parameter to display the default value entered. You must define the parameter in the Parameter bar to use this option.
- In the Input Type list, select the type of input you want to provide. By default, Input Type is set as TextBox.
- If the Input Type selected is TextBox:
- In the Regex for input validation field, enter the regex or the regular expression to match and validate user inputs.
- In the Error message on validation failure field, enter the message to display if the regex validations fails.
-
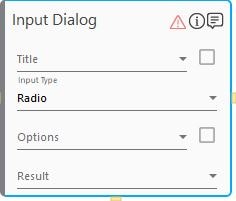
If the Input Type selected is Radio, in the Options field, enter values of string datatype separated by semicolon and select the check box to set it as the default value. Alternatively, in the Option drop down list, select a parameter of type string with semi colon separated values. You must define the parameter in the Parameter bar to use this option.
-
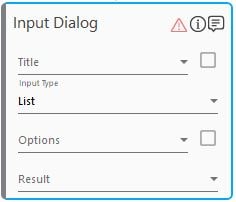
If the Input Type selected is List, in the Options field, enter values of string datatype separated by semicolon and select the check box to set it as the default values. Alternatively, in the Option list, select a parameter of type string with semi colon separated values. You must define the parameter in the Parameter bar to use this option.
- If the Input Type selected is TextBox:
- In the Result list, select the parameter in which you want to store the output. You must define the output parameter in the Parameter bar to use this option.
The Input Dialog activity is created.
Input Dialog Properties
The properties of Input Dialog activity are listed in the following table and can be edited in the Properties grid on the right pane.
|
Property Name |
Usage |
|
Control Execution |
|
|
Ignore Error |
When this option is set to Yes, the application ignores any error while executing the activity. If set to NA, it bypasses the exception (if any) to let the automation flow continue; however, it marks the automation status as failure, in case of an exception. By default, this option is set to No. |
|
Delay |
|
|
Wait After |
Specify the time delay that must occur after the activity is executed. The value must be in milliseconds. |
|
Wait Before |
Specify the time delay that must occur before the activity is executed. The value must be in milliseconds. |
|
Misc |
|
|
Breakpoint |
Select this option to mark this activity as the pause point while debugging the process. At this point, the process freezes during execution allowing you to examine if the process is functioning as expected. In large or complex processes, breakpoints help in identifying the error, if any. |
|
Commented |
Select this option to mark this activity as inactive in the entire process. When an activity is commented, it is ignored during the process execution. |
|
DisplayName |
The display name of the activity in the flowchart designer area. By default, the name is set as Input Dialog. You can change the name as required. |
|
Is Top Most |
Select this option to display the added dialog box on top of an application window. |
|
Result |
The result of the action performed in the Input Dialog activity. Store the result in an argument or variable that must be defined in the Variable or Argument panel in the Parameter bar. |
|
Title |
The title displayed in the tile bar of the Input Dialog activity. |