Manage Entity Hierarchy
After the hierarchy configuration is completed, all the added entities appears in the Manage Entity Hierarchy page. On the Manage Entity Hierarchy page, you can add entity data values in the system.
After the Hierarchy Configuration is set, all the entity added appears in the Manage Entity Hierarchy window. Manage Entity Hierarchy enables system administrator to add entity data values in the system.
Manage Entity Hierarchy is comprised of two tabs, which includes:
To access manage entity hierarchy:
Go to Configuration > Manage Entity Hierarchy.
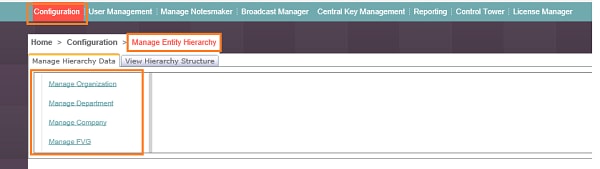
Manage Hierarchy Data
In the Manage Hierarchy Data tab, all the available entities are listed on the left panel. You can view, add, and manage hierarchy data in the system.
For example, you can add new entity to the existing hierarchy (organization and enterprise). Below procedure will explain you how to add hierarchy data in the system.
To add new entity in the hierarchy data:
1. Select Manage <Entity Name>, the list of data values for that entity is displayed.
2. Click Add New.
3. In the Add New field, specify the name of hierarchy data value.
4. Then, click Add, the new entity is added to the database and a message appears as Information updated successfully.
NOTE: |
· Every Hierarchy Data row has edit/delete action links. · Entity/Hierarchy data table equals the number of properties of the entity. |
The different fields available for entity are explained in the following table:
Entity Name |
Description |
<Entity Name> field |
Indicates the name of the entity in the hierarchy |
Actions |
Following actions can be performed: Edit: Click Edit to edit the hierarchy data value. Delete: Click Delete to delete the hierarchy data value. |
Add New |
Allows to add new hierarchy in the system. |
Update |
Use this to update the new hierarchy data value |
Cancel |
Use this to abort the operation and discard the changes. |
Editing or Deleting Hierarchy Data
System administrator can edit the hierarchy data. Each Hierarchy Data except the level 1 entity is associated with the hierarchy data of its parent entity. Every Hierarchy data row contains Edit and Delete links.
To edit the hierarchy data:
1. Select Manage <Entity Name>. The list of data values associated with the entity is displayed.
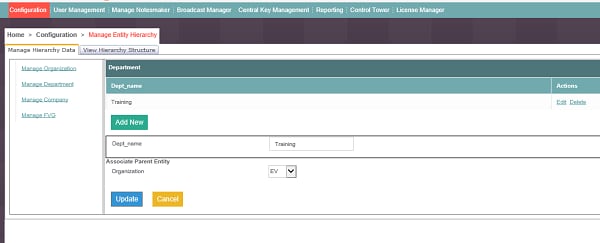
2. Click the Edit link corresponding to the entity. The data panel auto-populates all the controls with the corresponding property values.
3. From the Associate Parent Entity drop-down, select the parent entity.
4. Click Update to save the changes. If required, click Cancel to discard the changes.
To delete the hierarchy data:
1. Select Manage <Entity Name>. The list of data values associated with that entity is displayed.
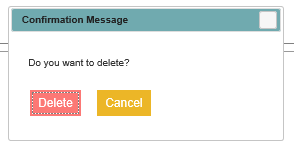
2. Click the Delete link corresponding to the entity for which you want to delete the hierarchy data.
3. A confirmation window is displayed. Click Delete.
View Hierarchy Structure
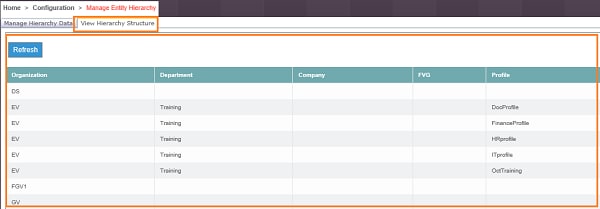
View Hierarchy Structure tab displays the entire structure of the entities and their corresponding data. Each column indicates the available entities in the system. The entities on the left side is level 1 and the entities on the right side (except Profile column) is the last level of an entity.
Rows represent the entity data according to their parent-child association. Mapped profiles are also a part of this structure.
To view hierarchy structure:
1. Click View Hierarchy Structure. The entire structure of the entities and their corresponding data is displayed.
· <Organization>: Displays the name of the entity in the hierarchy
· <Department>: Displays the name of the entity in the hierarchy
· <Company>: Displays the name of the entity in the hierarchy
· Profile: Displays the mapped profile to the entity in the hierarchy
2. Click Refresh to view the latest changes in table.
Related Topics