Step-by-Step Guide to Use Mainframe Application to Extract the Access Details
Let's see an example of signing in to the Rumba and extracting the access details once login is done.
Prerequisite:
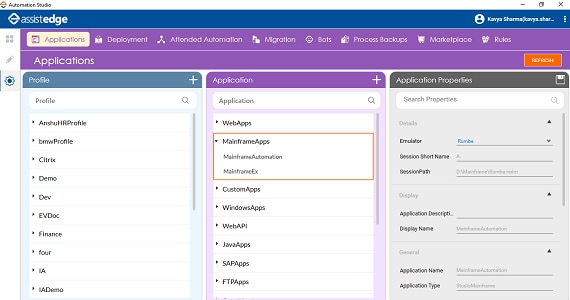
1. In the Admin menu, add an application of Application Type- MainframeApps.
2. In the Applications Properties panel:
· Select the Rumba emulator in the Emulator list.
· Enter the short name of the session of the Rumba emulator in the Session Short Name field.
· Enter the path of the session file in the SessionPath field.
· In the Display Name field, enter MainframeAutomation as the display name of the configured Mainframe application.
3. Click
the  (Save Properties) icon
to save the application. The Mainframe application is configured.
(Save Properties) icon
to save the application. The Mainframe application is configured.
To automate the Mainframe application:
1. In the Studio menu, create a new process.
2. In the Parameter bar, create In arguments, UserName and Password of String type to pass the user-name and the required password to login. Define the values of the user name and the password as per your requirement.
3. In the Parameter bar, create an Out argument, GetAccessDetails to store the extracted access details respectively.

4. In the Canvas Tools pane, click Process Components to expand the tool and view the associated activities.
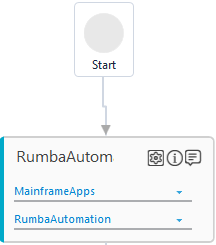
5. Drag the Application activity and drop on to the Flowchart designer on the Canvas.
6. In the Application Type list, select MainframeApps.
7. In the Select An Application list, select the MainframeAutomation configured above.
8. Click
the  (Settings) icon to launch the MAINFRAME MODE interface. The configured
Rumba emulator appears along with MAINFRAME
MODE interface.
(Settings) icon to launch the MAINFRAME MODE interface. The configured
Rumba emulator appears along with MAINFRAME
MODE interface.
9. Place
the cursor where the user-name must be entered and then click
the  (Play) icon.
The Field Properties panel of the Mainframe Field
Properties appears. The
fields that are mandatory are highlighted with red box.
(Play) icon.
The Field Properties panel of the Mainframe Field
Properties appears. The
fields that are mandatory are highlighted with red box.
10. In Action list, select the Set Text action.
11. In the Text list, select the UserName argument created above.
12. In the Display Name field, enter a name of your choice. In this example we have entered, SetText_TSO_Id.

13. Click
the (Save) icon to configure
the fields.
(Save) icon to configure
the fields.
14. Click
the (Settings) icon to launch the MAINFRAME MODE interface.
15. Place the cursor where the return
action (clicking of Enter
button from the keyboard) must
be performed and then click the (Play) icon. The Field
Properties panel of the Mainframe
Field Properties
appears. The fields that are mandatory are highlighted with red
box.
16. In the Action list, select the Fire Event action.
17. In the Event Name field, select the Enter action.
18. In the Display Name field, enter a name of your choice. In this example we have entered, PressEnter.

19. Click
the (Save) icon to configure
the fields.
20. Click
the (Settings) icon to launch the MAINFRAME MODE interface.
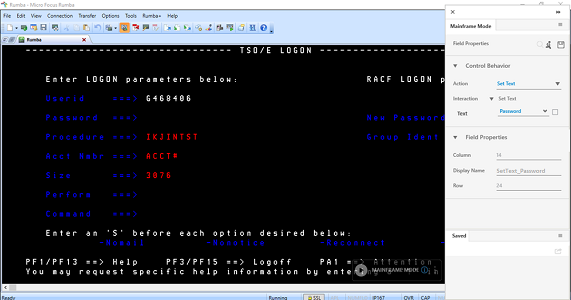
21. Place the cursor where the password
must be entered and then click the (Play) icon and configure the action to
enter the password. The
Field Properties panel of the Mainframe
Field
Properties
appears. The fields that are
mandatory are highlighted with red box.
22. In Action list, select the Set Text action.
23. In the Text list, select the Password argument created above.
24. In the Display Name field, enter a name of your choice. In this example we have entered, SetText_Password.
25. Click
the (Save) icon to configure
the fields.
26. Click
the (Settings) icon to launch the MAINFRAME MODE interface.
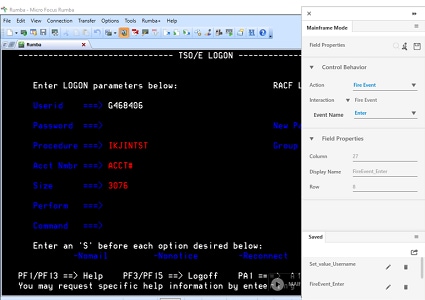
27. Place the cursor where the return
action (clicking of Enter
button from the keyboard) must
be performed and then click the (Play) icon. The Field
Properties panel of the Mainframe
Field Properties
appears. The fields that are mandatory are highlighted with red
box.
28. In the Action list, select the Fire Event action.
29. In the Event Name field, select the Enter action.
30. In the Display Name field, enter a name of your choice. In this example we have entered, FireEventEnter.
31. Click
the (Settings) icon to launch the MAINFRAME MODE interface.
32. Select the access details area and
then click the (Play) icon
to extract the required details.
The Field Properties panel of the Mainframe Field
Properties appears. The
fields that are mandatory are highlighted with red box.
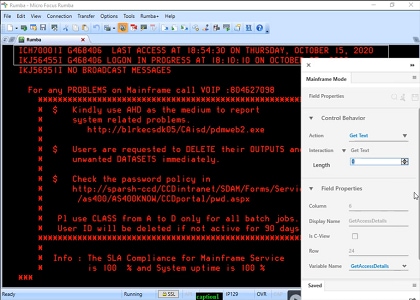
33. In the Action list, select the Get Text action.
34. In the Display Name field, enter a name of your choice. In this example we have entered, GetAccessDetails.
35. In the Variable Name field, select the GetAccessDetails argument created above.
To view the output in Automation Studio, let's add WriteLine activity. You can publish, deploy and assign this process to a robot, if you want to execute the process outside Automation Studio.
36. Add Writeline activity and in the Text field, enter the AccessDetails argument.
37. Save the process. Below is the sample automation process workflow:
38. Setup the environment and perform test run.
Observe that the configured Rumba emulator gets signed in automatically and the access details are displayed in the Output console of Automation Studio. Below is the sample of the displayed details:
Related Topics