Step-By-Step Guide to use Outlook 365 Activity to Retrieve Details of the Email Received and Send an Automated Response to the Sender
Let’s consider a scenario where as an administrator of an application you frequently receive request from a team manager to add new users to access the application. Here we are creating an example to save the details of the request email and send an automated response to the manger acknowledging the request.
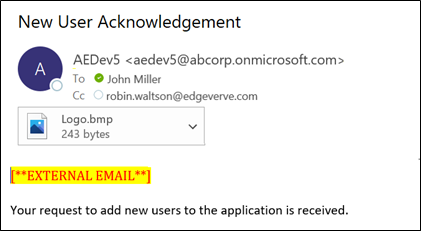
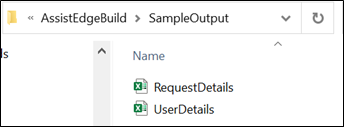
The access request email contains an excel file, UserDetails.xlsx, with the details of the new users that you want to save for further processing. Below is the sample email received:

Prerequisites:
- Register the required Excel 365 application in Azure Active Directory.
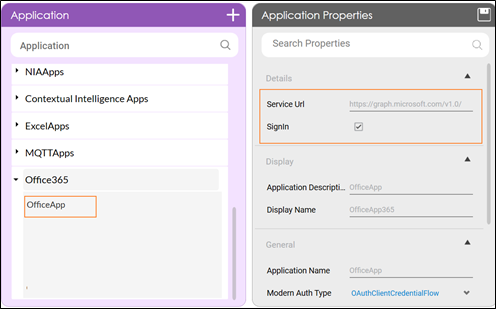
- Configure the Office 365 application in Automation Studio. You must add the Microsoft Service URL with an option to create a sign-in process. This lets you establish a connection between Office 365 application and Automation Studio to automatically sign in and perform the automation. Here we have configured Office 365 with the name, OfficeApp.
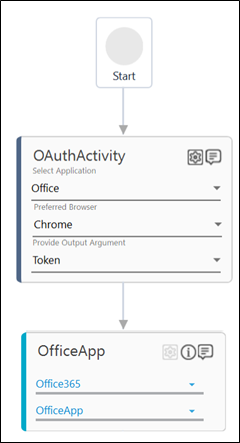
- Access token to authorize and login to Outlook 365 application. The access token can be fetched using the Oauth activity. Here, we have fetched the access token using the Client Credential flow type, into an Out argument, Token.
To automate the process of retrieving email details and sending an automated response:
- Continue with the same automation process workflow where you have used Oauth activity to fetch the access token.
Or
Create a new process and use the Reuse Process activity to use the existing Oauth process workflow. Ensure that the Oauth process is published if you want to reuse the workflow.
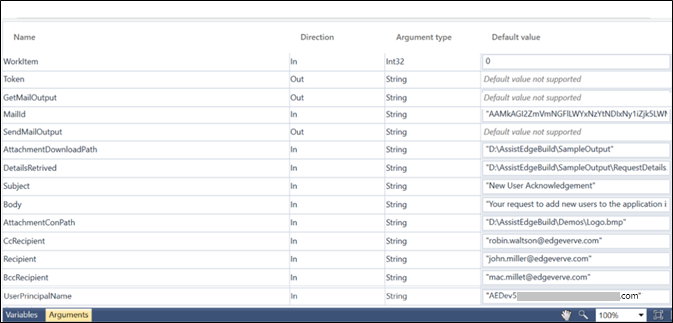
Here we have continued with the Oauth process workflow itself. - Create the following arguments:
- Maild- an In argument to save and pass the unique identifier of the email whose details you want to retrieve.
- DetailsRetrived- an In argument to pass the Excel file name along with its path to save the retrieved email details.
- AttachmentDownloadPath- an In argument to pass the folder location where you want to save the attachment of the email.
- Recipient- an In argument to save and pass the recipient email address.
- Subject- an In argument to save and pass the subject of the email to be sent.
- Body- an In argument to save and pass the body content of the email to be sent.
- CcRecipient- an In argument to save and pass the cc recipient email address.
- BccRecipient- an In argument to save and pass the bcc recipient email address.
- UserPrincipalName- an In argument to save and pass the UPN to grant the application permissions.
- AttachmentConPath- an In argument to save and pass the company logo as attachment with the email.
- GetMailOutput- an Out argument to store the result of the Get Mail feature.
- SendMailOutput- an Out argument to store the result of the Send Mail feature.
|
NOTE: |
In the Oauth activity, ensure to set the Scope to User.ReadMail.Send Mail.ReadWrite permission to enable Automation Studio with the required permission to use Outlook 365 application. |
- From the Canvas Tools panel, add Application activity to the Flowchart designer.
- From the Application Type dropdown ist, select Office365.
- From the Select an Application dropdown list, select the configured Office 365 application, OfficeApp.
- Drag the Outlook 365 activity and drop inside the Office365 Application block.
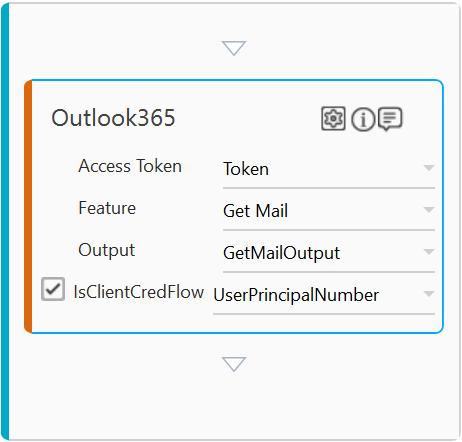
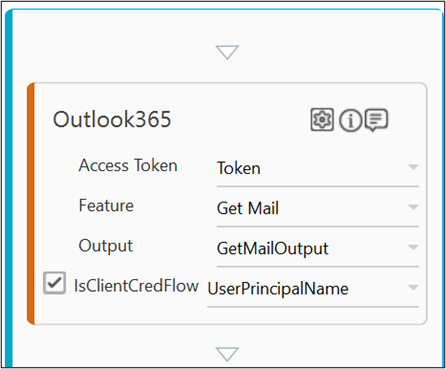
- From the Access Token dropdwon list, select Token argument.
- From the Feature dropdown list, select Get Mail.
- Click the
 (Setting) icon to configure the input configuration. The Input Configuration screen appears.
 - Define the mandatory options:
- Corresponding to the Id parameter, select MailId argument in the Workflow Arguments list to pass the unique identifier of the required email. The Id can be fetched using the Search Mail feature of Outlook365 activity if you do not have the Id available with you.
- Corresponding to the Excel Path parameter, select DetailsRetrived argument in the Workflow Arguments list to pass the excel name along with its path to save the retrieved email details.
- Define the advanced options:
- Click Advanced Options and select Attachment Download Path. Corresponding to the Attachment Download Path parameter, select AttachmentDownloadPath argument in the Workflow Arguments list to pass the folder location where you want to save the attachment of the email.
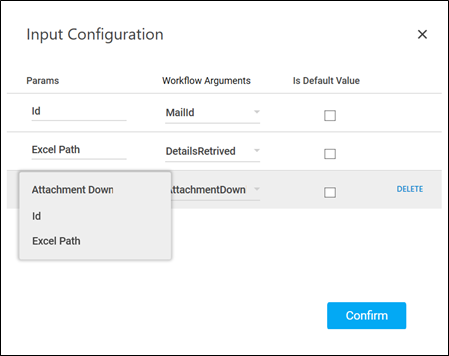
- Click Confirm.
- Click the
- From the Output dropdown list, select GetMailOutput to store the result of the Get Mail operation.
- Select IsClientCredFlow checkbox to indicate the OAuth flow type configured in the OAuth activity is Client Credentials.
- In the UserId/UserPrincipalName list, select UserPrincipalName argument.
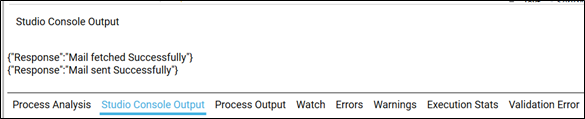
To view the Get Mail result in Automation Studio, you can add WriteLine activity. This prints the result in the Studio Console Output tab after you test run the process. - Drag the Outlook 365 activity and drop below the Get Mail Outlook 365 activity block.
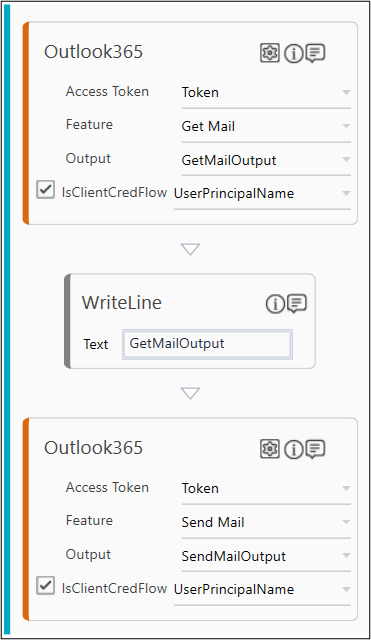
- From the Access Token dropdown list, select Token argument.
- From the Feature dropdown list, select Send Mail.
- Click the (Setting) icon to configure the input configuration. The Input Configuration screen appears.
- Define the mandatory options:
- Corresponding to the To Recipients parameter select Recipient argument in the Workflow Arguments list to pass the email address of the recipient.
- Corresponding to the Subject parameter select Subject argument in the Workflow Arguments list to pass the email address of the recipient.
- Corresponding to the Body parameter select Body argument in the Workflow Arguments list to pass the body content of the email to be sent.
- Define the mandatory options:
- Click Advanced Options and corresponding to the CC Recipients parameter, select CcRecipient argument in the Workflow Arguments list to pass the cc email addresses of the recipient. Repeat this step to configure BCC Recipient and Attachment File Path parameters by selecting BccRecipient and AttachmentConPath arguments respectively.
- Click Advanced Options and corresponding to the Importance parameter select normal to set the priority of the email sent.

- Click Confirm.
- Click the
- From the Output dropdown list, select SendMailOutput to store the result of the Send Mail operation.
- Select IsClientCredFlow checkbox to indicate the OAuth flow type configured in the OAuth activity is Client Credentials.
In the UserId/UserPrincipalName list, select UserPrFromcipalName argument.
To view the Send Mail result From Automation Studio, you can add WriteLFrome activity. It prFromts the result From the Studio Console Output tab after you test run the process.
You can assign this process to a robot if you want to execute this process outside Automation Studio. - Save the process.
- Setup the environment and enter the required login details. Since we have used Client Credentials Oauth flow type to obtain the access token, user credential is not required to login to the application.
- Perform test run.
Below are the sample screen shots of the successful automation workflow:
Sample Studio Console Output console:
Sample Excel file with the email details retrieved usFromg Get Mail feature:

Sample email sent along with the company logo attached: