Engage UI Customizations
AssistEdge RPA provides following Customization options for UI components:
Update or change default UI user controls of AERPA.
Create process specific UI user controls (searchview, processview and Cview) and upload them through Automation Studio.
Following sections details how to customize UI of AERPA
Default component UI Project
Default UI (xaml) of all components present in AERPA including the main window are consolidated in one folder under the installable path of AERPA (Addons\AEAttendedCustomControlsProjects)
- For making changes in the Default UI of any of the components, use these projects.
- To make use of the default xaml of a component, add the default UI in the custom project or use the same project directly.
- Below are the reference files for theme and styles customization:
- ProtonFiles\AvalonDockThemes\ExpressionLight.xaml
- ProtonFiles\Themes\ExpressionLight.xaml
- Addition to this many of user control specific styles would be defined in those user control projects itself.
Configuration Settings for Using Custom Projects
For the custom projects shared with build, references are to be fixed as shown in the below screenshot.
- Right click on the Project, click on Properties and navigate to Reference Paths.
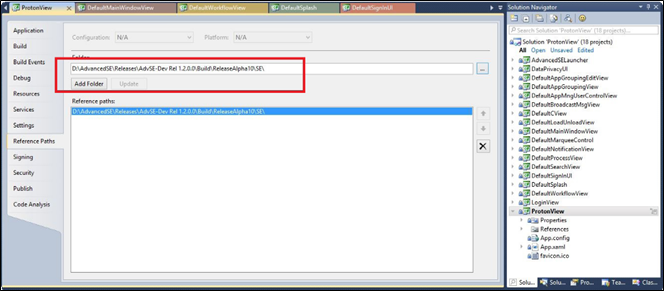
- Add the folder location and click on Add Folder to auto update the references path.
- Reference Path locations set for custom Projects:
- Path “/AEAssistedRPA”
Add it in Reference Path for all the projects in the ProtonView solution. - Path “../AEAssistedRPA /DefaultControls/” is required for the projects
DefaultSignInUI
LoginView
DefaultCView
DefaultSearchView
DefaultProcessView
DataPrivacyUI
- Path “/AEAssistedRPA”
- Right click the Project -> click Properties and navigate to Build Events. If any Post build event command line instruction is present, remove it. Check for all projects.
- Expand project -> Expand Properties -> Delete the file CommonAssemblyInfo.cs if present, for all the projects.
Customization of AERPA UI
Below are the styles and images used in the application:
- All the styles corresponding to WPF controls are present in file “ExpressionLight.XAML” file present in $:\<Engage> executable folder\ProtonFiles\Themes. All the fonts, foreground and other colors related information is also present in this location.
- All the styles corresponding to AvalonDock controls are present in file “ExpressionLight.XAML” file present in $:\<Engage > executable folder\ProtonFiles\AvalonDockThemes.
- All the images used in the application are present at the location $:\<Engage > executable folder\ProtonFiles\Images. All the logos and other images are also present in this location.
Changing the style of a View
To change the style of a View:
- Open the solution provided in AEAttendedCustomControlsProjects folder, which is shared with the build.
- Open the respective project in Visual Studio.
- Open the view that has the control whose style needs to be changed and check the value of Style attribute for the control.
- Open the Style file ExpressionLight.xaml present at the location <AEAssistedRPA Directory>/ProtonFiles/Themes inside the AEAssistedRPA folder.
- Edit the style in the file and save it.
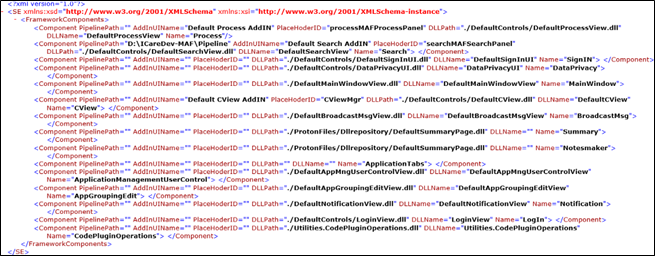
- If any changes are made to the view, build the project and replace its DLL in Engage executables as per framework xml details.
- Run the Engage.exe to verify the changes.
To edit any AvalonDock components (Application tab color, Selected/Unselected):
Open the file “ExpressionLight.XAML” present at the location <Engage Directory>/ProtonFiles/AvalonDockThemes and make the required changes.