Customization in Automation Studio
This section provides steps to configure various automations which are not configurable through studio. It includes Custom plugin, Code Editor, Summary, Notesmaker, Custom CView, Custom Search and ISEHelper.
Creating DLL for Custom Application
- In Visual Studio, create a new project with the output type as Class Library using .NET framework 4.6. Validate that the DLL is build using x86 platform and DLL name is the same as Namespace.
- Add Proton.Utilities.CodePluginInterfaces, PROTON.Utilities.Interfaces, and Proton.Miscellaneous.Framework DLLs (present in AERPA Build) references in the project. From any of the following locations:
- AERPA\client-tools\AutomationStudio\bin
- AERPA\c lient-tools\AutomationRuntime\Engage
- Add reference to PresentationFramework, System.Windows.Forms and WindowsBase to use the Dispatcher to access the main thread when required.
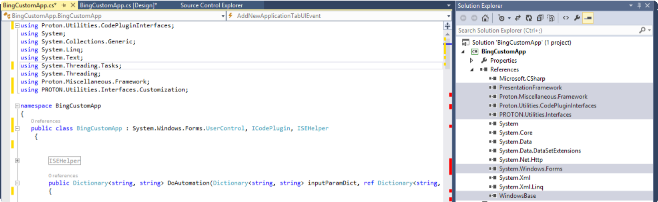
- Implement ICodePlugin and ISEHelper interfaces. Also extend System.Windows.Forms.UserControl class in order to resize this custom application in AERPA.
- On implementing the ICodeplugin interface, following methods can be used.
- Launch: used to launch a custom application.
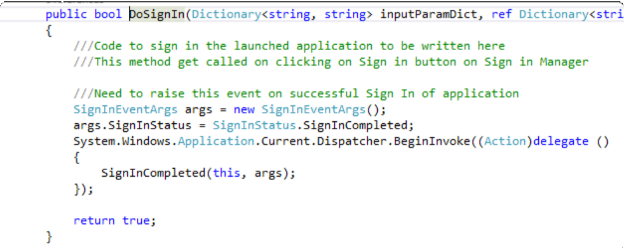
- DoSignIn: used to perform sign-in for custom applications. DoAutomation – used to perform an automation in custom applications. DoReset – used to perform reset automation in custom applications.
- DoDispose: used to dispose a custom application.
- Launch the application (using implementation written for Launch method of ICodeplugin interface). Pass the application name (name is same as entered in Studio Application Management) and the class handle as input parameters to this above mentioned event. Use Dispatcher to call this event.
NOTE:
See Customization APIs for further information on usage of ISEHelper APIs.
- Raise the LaunchCompleted event when the launch is complete. Pass the code plugin object as sender. Set the application object in the appContext InstanceObject, set IsLaunched as True and pass the appContext object in the LaunchEventArgs in the Launch- Completed event. All the events must be raised in the main thread, using Dispatcher.
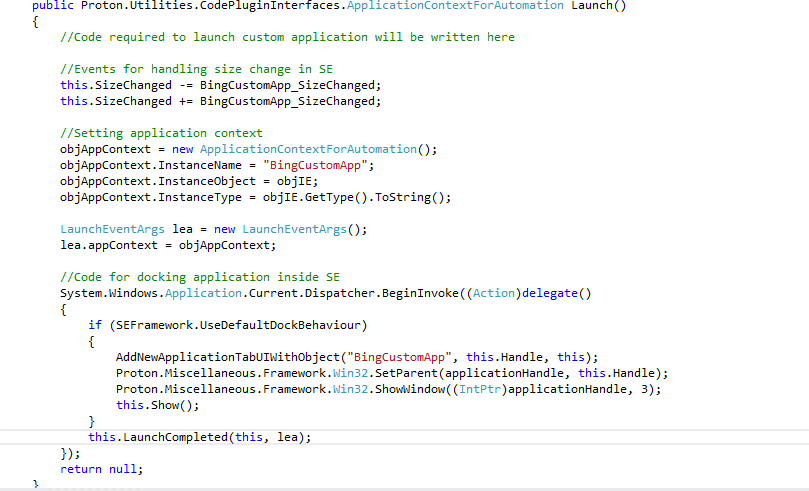
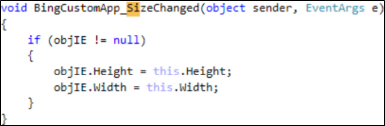
- In the generated SizeChanged event, set the height and width of the application equal to that of usercontrol.
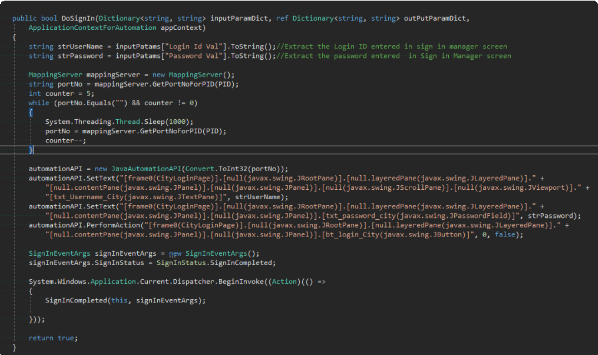
- After LaunchCompleted event is raised, AERPA calls the DoSignIn method of the code plugin, if SignIn is configured for the Custom Application. Raise the SignInCompleted event once the signin is done with SignInEventArgs having either SignInStatus as Completed or Failed using SignInStatus Enum. If this method takes more time than the value configured in the sign in manager in IDE for the code plugin then AERPA marks the sign-in as ‘failed’ for this custom application. UserId and password is present in inputParamDict.
- Application automation logic is implemented in DoAutomation method. InputParamDict which contains all inputs parameters configured for this custom application in the format of KeyValuePair. Here, key corresponds to Field names and value corresponds to its value. OutPutParamDict contains KeyValuePair of all the output parameters where key corresponds to Field name and value corresponds to its value which is modified or assigned depending upon the output from the custom application. To return the extracted fields to AERPA, raise FillExtractedFieldsEvent with ExtactedFieldsEventArgs having dictionary containing extractedFields assigned to outputPutParamDict. This event is raised using Dispatcher.
- To mark the search as completed or failed, raise SearchStatusEvent with SearchStatusEventArgs having either searchCompleted or SearchFailed as enum in eventArgs.

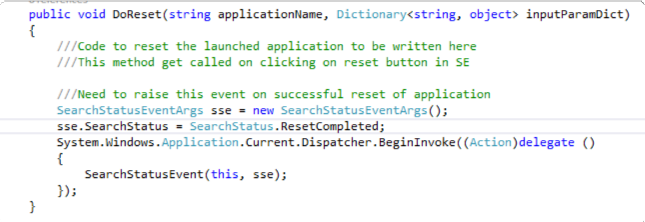
- Reset the Custom Application whenever the process in AERPA is reset by implementing the DoReset method. After the reset, raise SearchStatusEvent as ResetCompleted or ResetFailed using SearchStatus Enum. This event is raised using Dispatcher as displayed.
|
NOTE: |
Current supported dot net framework version is 4.6. All custom plugin DLL are built using .Net 4.6 framework. If an application is marked as ‘Is Sequential SignIn’ or ‘Is Sequential Reset’, then in case of a custom application, it is mandatory to raise the launch, signin and reset status event. In case these events are not raised, sequential sign in and reset fails for all the other applications. |
Creating Custom Application DLL for Java Application
- To create custom application DLL for a Java application, follow the steps as mentioned in the section 20.1 and use the below steps to perform sign in and other automation for the Java application.
- To perform sign in for Java application, Create the MappingServer object and call the method getPortNoForPID(String pid) to get the unique port number assigned to the java application. PID is the process Id of the java application launched. This port no. is used to create JavaAutomationAPI object, which is further used to automate Java Form Controls.
- See Customization APIs for more information regarding usage of ISEHelper APIs.
For application automation, use the JavaAutomationAPI object created at the time of SignIn for calling rest of the exposed Java APIs. Each Java API takes searchpath of the control as one of the input parameters which can be obtained by calling the startScrapingUSP API. Use these APIs to write the automation logic as done for the SignIn logic. All the automation logic should be written inside the task to avoid blocking the UI thread.
|
NOTE: |
All the events must be raised in the main thread, using Dispatcher as mentioned in section Creating DLL for Custom Application. |
Creating Custom Application DLL for Oracle Forms Application
- To create custom application DLL for an Oracle Forms application, follow the steps as mentioned in the section 18.1 and use the below steps to perform automation for the Oracle Forms application.
- Application automation logic is implemented in the DoAutomation method. After successful signin in Oracle application, a web page is displayed with different web links. These links are clicked using .Net, just like any other web application. These links download the Oracle forms and use the Utilities.JavaAutomationWrapper DLL to automate the Oracle form controls.
- Once the oracle form is downloaded, get its PID using user32.DLL. Create the MappingServer object and call the method getPortNoForPID to get the unique port no. assigned to the Oracle form.
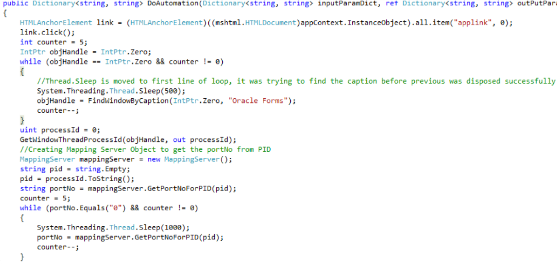
- This port no. is used for further communication between .Net and Java. Create the JavaAutomaionAPI object passing the portNo as a parameter to the constructor. The JavaAutomationAPI object is used for calling rest of the exposed Oracle APIs. Each Oracle API takes searchpath of the control as one of the input parameters which is obtained by calling the startScrapingUSP API. Use these APIs to write the automation logic.

|
NOTE: |
All the events must be raised in the main thread, using Dispatcher as mentioned in section 13.1 Creating DLL for Custom Application. |
Code editor
Code editor is used to write custom code for particular steps which cannot be automated.
To create Code Editor DLL
- In Visual Studio, create new project with output type as Class Library using dot net framework 4.6.
- Add SE.Core.Automation.Interfaces DLL and SE.Core.Automation.Models DLL references in the project.
- Implement ICodeEditor using SE.Core.Automation.Interfaces.Common.
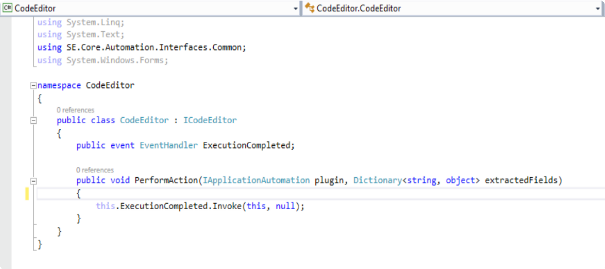
- On implementation of ICodeEditor, PerformAction method and Execution completed event are fetched.
- In perform action, IApplicationAutomation contains the instance of plugin on which a user can perform the required automation.
- In extractedfields, a dictionary of input and output arguments is fetched that are in scope of flow chart from which data is extracted as well as set back to dictionary for further processing.
- After code editor operations are completed, raise the execution completed event.
NOTE:
To typecast IApplicationAutomation instance into specific application plugin add reference of Plugin from $RootFolder\SE\Plugins\ApplicationType\*.dll
- In case of Web Applications for Firefox and chrome, ApplicationType is Selenium and for Internet explorer, ApplicationType is WatIn
- In order to access IE instance in code editor from the Web IE plugin, follow the below mentioned steps:
- Typecast IAppicationAutomation into IEPlugin.
- Call the method InternetExplorerObject of IEPlugin which returns the instance of IE.
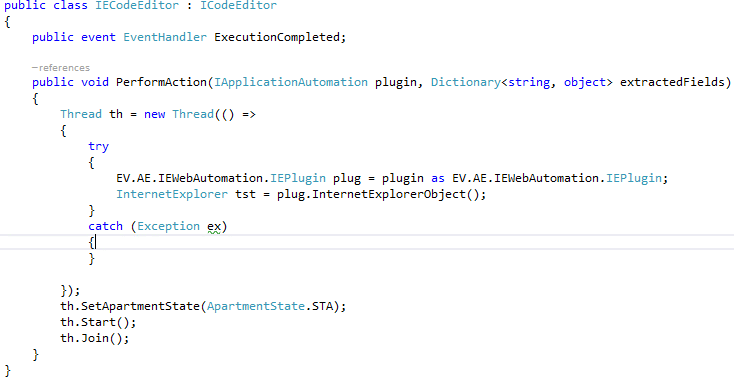
Refer to the code snippet below:
Microbots
Microbots are used to write code for reusable components. This is a feature to extend the product boundary by creating reusable components which can be inserted anywhere in a process to perform a custom logic.
To create a Microbot:
- In Visual Studio, create a new project with output type as Class Library using .Net framework 4.6.
- Add SE.Core.Automation.Interfaces DLL and SE.Core.Automation.Models DLL references in the project.
- Implement IAECodePackage using SE.Core.Automation.Interfaces.
- Execute method and Execution completed event is fetched on implementing the IAECodePackage.

- Map input and output parameters: To set or get values from output and input of microbot, use the defined custom attributes set on the .Net class properties.

- Once execution is complete, an execution complete event is raised.
|
NOTE: |
Each microbot must have a distinct main DLL. |
ISEHelper Changes
In ISEHelper, IApplicationPlugin instance is used in various methods exposed, and it was used for customization. For backward compatibility, it remains the same for application configured through old ACE. For all applications configured through Automation Studio, the IApplicationAutomation instance is a property inside IApplicationPlugin and can be used for customization.