Create DataTable
This activity allows you to create a data table. By using this activity, you can create a new customized data table in the Automation Studio without having dependency on any application such as, excel.
Using Create DataTable Activity
- In the Canvas Tools pane, click DataTable to expand the tool and view the associated activities.
- Drag the Create DataTable activity and drop on to the Flowchart designer area on the Canvas.
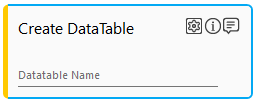
- Enter a name for the datatable in the Datatable Name field. A datatable is created with the name provided in DataTable Name field.
|
NOTE: |
Special characters and space(s) are not allowed in the data table name except underscore. You can define the data table name in one single word or use underscore to separate two words, for example, Attendance, Data_Table_1, Demo_file. |
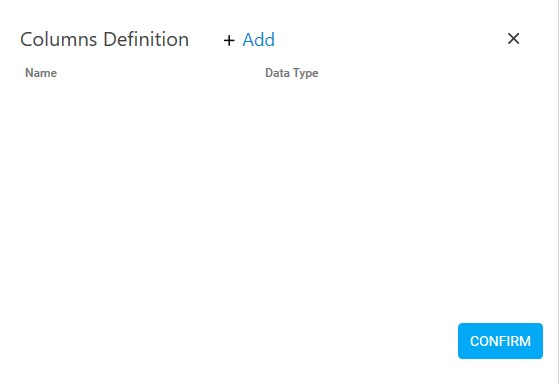
- Click the
 (Settings) icon to add and define the columns in the Datatable. The Columns Definition window appears.
|
NOTE: |
At least one column is required in the data table. |
- Click Add to add column headers and its associated Data Type in the Datatable.
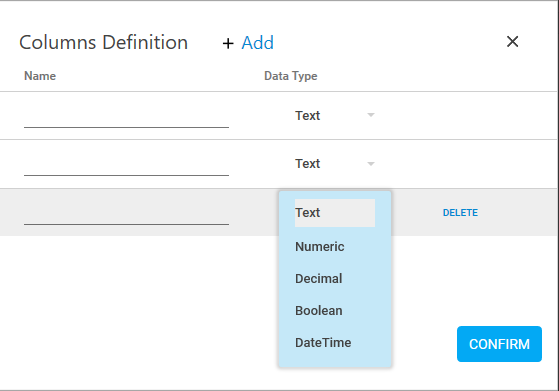
It helps you create and customize each new column you want to add to the data table. You can define the columns and select the type of values that the new column is going to accept.- Text – Select this if column input is in string/text. For example, Student Name, Applicant Name.
- Numeric – Select this if column input is in whole number. For example, 6, 45.
- Decimal – Select this if column input is in decimal number. For example, 7.89, 1.34.
- Boolean – Select this if column input is either true or false.
- DateTime – Select this if column input is in date and time format.
- Click CONFIRM to save the datatable.
Create DataTable Properties
The properties of Create DataTable activity are listed in the following table and can be edited in the Properties grid on the right pane.
|
Property Name |
Usage |
|
Control Execution |
|
|
Ignore Error |
When this option is set to Yes, the application ignores any error while executing the activity. If set to NA, it bypasses the exception (if any) to let the automation flow continue; however, it marks the automation status as failure, in case of an exception. By default, this option is set to No. |
|
Delay |
|
|
Wait After (ms) |
Specify the time delay that must occur after the activity is executed. The value must be in milliseconds. |
|
Wait Before (ms) |
Specify the time delay that must occur before the activity is executed. The value must be in milliseconds. |
|
Misc |
|
|
Breakpoint |
Select this option to mark this activity as the pause point while debugging the process. At this point, the process freezes during execution allowing you to examine if the process is functioning as expected. In large or complex processes, breakpoints help in identifying the error, if any. |
|
Commented |
Select this option to mark this activity as inactive in the entire process. When an activity is commented, it is ignored during the process execution. |
|
DisplayName |
The display name of the activity in the flowchart designer area. By default, the name is set as Create DataTable. You can change the name as required. |
|
IsExtracted |
Select this option to mark the activity as transferring the information to the bot in control tower, to check the data is extracted successfully from DataTable before proceeding with subsequent process. |