Process Orchestrator – Recommendations and Best Practices
Functional recommendations
It is recommended to create one business process per app for ease of use and segregation of users and responsibilities.
User accesses in Process Orchestrator App
- A user with “Low Code Orchestrator Designer” access in AssistEdge can create and edit a new App in the Low Code Orchestrator application. Provide access to user cautiously as the Designer can create, edit, test, and delete the Process Orchestrator apps.
- A user with “Low Code Orchestrator” access can only consume the Process Orchestrator apps.
Calling AssistEdge bots
In Process Orchestrator, bots are called in unattended mode.
To call a bot, the process must be deployed and available for execution in the Control Tower. The user-profile-process mapping should also be completed for bot creation.
To call AssistEdge bots from the Process Orchestrator application, developer must use the Automation Orchestrator plugin.
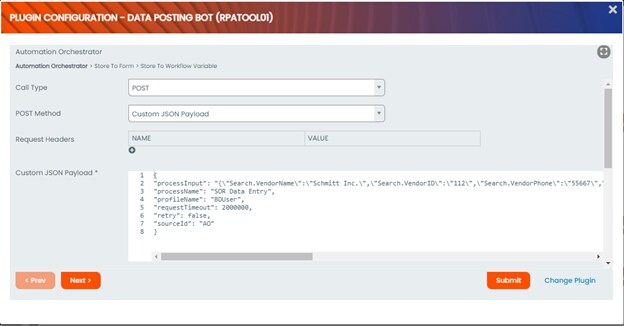
Following are the details of the configurations needed to call the bot:
- Call Type: This will always be POST
- POST Method: This will always be Custom JSON payload
- Request Headers: The Automation Orchestrator plugin gets a new bearer token for the logged in user and then calls the bot. Hence Authorization does not have to be specified in the Request Headers.
- Custom JSON payload: The payload to call AssistEdge bot. Sample below:
{
"processInput": "{\"Search.VendorName\":\"Schmitt Inc.\",\"Search.VendorID\":\"112\",\"Search.VendorPhone\":\"55667\",\"Search.VendorAddress\":\"Bleecker Street MA\",\"Search.ApprovedStatus\":\"Approved\",\"Search.Performer\":\"Cat Grant\",\"Search.Region\":\"Middle-East\",\"Search.RiskCategory\":\"High\",\"Search.PaydexScore\":\"76\"}",
"processName": "SOR Data Entry",
"profileName": "BDUser",
"requestTimeout": 2000000,
"retry": false,
"sourceId": "AO"
} - Call Sync Type : You can call the bot in synchronous or asynchronous mode. This can be selected here.
- bypassSSLVerification: In testing environments, when a valid, public SSL certificate is not available, use this option to bypass SSL verification.
- No Response Expected: Select the checkbox if you do not expect a response after call.
- Debug mode: Select this option if you want to enable debug mode for logging.
Form configuration
- The response from the bot can be configured in the form.
- A form should only be used to display data.
- If the process requires different scenarios in case of successful or unsuccessful execution of bots, please use the Workflow Variable configuration given in the next screen of the Automation Orchestrator plugin.
- A form is also used to map grid data from RPA process. For more information see Mapping a grid to the output of RPA process section.
- Form and workflow variables can be used in conjunction to deliver grid + normal fields scenarios.
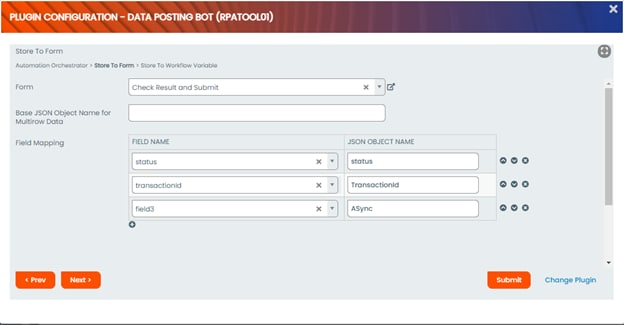
- Form: To show the data output from the bot in a form, select the form here.
- Base JSON Object Name for Multirow Data – leave blank in case of normal fields.
- Field Mapping: Select the form field from the drop down on the left and put the JSON path of the response in the JSON object name field.
The bots are called by calling the Listener API. Two modes of calling the bots are available:
Synchronous Mode
- This will call the bot in synchronous mode.
- This will also cause the main thread to freeze till the response of the bot comes back.
- It is recommended to use this method only for bot processes that take very little time to execute.
Sample response from the API Listener for Synchronous mode will be as below:
|
{"transactionId":"69e8979a-3f94-4c3e-95df-8157a77b9edf","status":"success","response": {"response":"{\"AutomationOutputData\":[{\"AppName\":\"SAP\",\"CviewDictionary\": {\"Output\":\"TestOutput\"}}],\"HttpStatus\":\"\",\"ParentRequest\": {\"AutomationInputDictionary\": {\"Search.VendorName\":\"Damro\"},\"MaskedAutomationInputDictionary\": {\"Search.VendorName\":\"Damro\"},\"AnonymizedAutomationInputDictionary\":null,\"DataProtec tionErrors\": {},\"ProcessName\":\"SAP_Posting\",\"ProfileName\":\"APProfile1\",\"RetryFlag\":false,\"Retry\": {\"NoOfTimesRetry\":0,\"RetryCoolOffInterval\":10000,\"PreviousRequestIds\": []},\"APIVersion\":\"\",\"AppId\":\"\",\"CommandExecutionWindow\":\"\",\"CommandGenerationSource\":\"\",\"Country\":\"\",\"Instance\":\"\",\" PartnerId\":\"\",\"ReferenceCode\":\"\",\"Timestamp\":\"2021-09- 03T13:41:14.165Z\",\"UserName\":\"Rupa.Maity01\",\"VID\":null,\"SENodeId\":null,\"RequestExpir ation\":\"2000000\",\"wait_for_completion\":\"true\",\"Impersonation\":null,\"IfExternalVaultType\" :false},\"ReferenceCode\":\"\",\"RequestExecutionTime\":\"00:00:18.2503801\",\"SEReferenceCod e\":\"\",\"SpareParam1\":\"\",\"SpareParam2\":\"\",\"UserName\":\"Rupa.Maity01\",\"CommandResul tEnum\":0,\"CommandResultDescription\":\"SearchSuccessful\",\"ErrorDetailObject\": [],\"SENodeId\":null,\"RequestReceivedTime\":\"2021-09- 03T13:41:14.1918917Z\",\"RequestProcessedTime\":\"2021-09- 03T13:41:32.4422718Z\",\"TransactionDescription\":\"SearchSuccessful\"}"},"error":{}}
|
Sample JSON paths for the above response are:
| Parameter | JSON path to be configured |
| Status | Status |
| Transaction Id | transactionId |
| Error Details -> Error Priority | response.response.ErrorDetailObject[0].Priority |
| Error Details -> Error Description | response.response.ErrorDetailObject[0].Description |
| Process Input -> Employee ID | response.response.ParentRequest.AutomationInputDictionary.{Search.empid} |
| Process Output -> Designation | response.response.AutomationOutputData[0].CviewDictionary.Designation |
Asynchronus mode
- This will call the bot in asynchronous mode and will return with the Listener API acknowledgement result.
- This will also cause the main thread to be released immediately and the workflow will immediately move to the next step.
- The Automation Orchestrator will query the RabbitMQ response to get the response once it is available
- To check for the response, design your process as defined in the ‘Designing a process with Asynchronous bot call’ below.
Sample response for Asynchronous mode from RabbitMQ is given below:
|
{"Request":"PerformAutomation","Response":{"AutomationOutputData": [{"AppName":"SAP","CviewDictionary": {"Output":"TestOutput"}}],"HttpStatus":"","ParentRequest":{"AutomationInputDictionary": {"Search.VendorName":"Ernst & Young"},"MaskedAutomationInputDictionary": {"Search.VendorName":"Ernst & Young"},"AnonymizedAutomationInputDictionary":null,"DataProtectionErrors": {},"ProcessName":"SAP_Posting","ProfileName":"APProfile1","RetryFlag":false,"Retry": {"NoOfTimesRetry":0,"RetryCoolOffInterval":10000,"PreviousRequestIds": []},"APIVersion":"","AppId":"","CommandExecutionWindow":"","CommandGenerationSource":"","C ountry":"","Instance":"","PartnerId":"","ReferenceCode":"","Timestamp":"2021-09- 03T10:20:39.290Z","UserName":"Rupa.Maity01","VID":null,"SENodeId":null,"RequestExpiration": "2000000","wait_for_completion":"false","Impersonation":null,"IfExternalVaultType":false},"Refere eCode":"","RequestExecutionTime":"00:00:22.2614778","SEReferenceCode":"","SpareParam1": nc"","SpareParam2":"","UserName":"Rupa.Maity01","CommandResultEnum":0,"CommandResultD escription":"SearchSuccessful","ErrorDetailObject": [],"SENodeId":null,"RequestReceivedTime":"2021-09- 03T10:20:48.8056381Z","RequestProcessedTime":"2021-09- 03T10:21:11.0671159Z","TransactionDescription":"SearchSuccessful"},"RobotId":"743c8f36- 8f36-4b40-af44-8bb9f530f1aa","ScheduleName":"Default Schedule","TransactionId":"0d1f08e2- 651b-4434-9829-15164b96a2cd","RobotName":"Robot 2","MachineName":"BLREQX162024L","RobotAssignee":"Rupa.Maity01","RobotUserName":"rupa .maity01","AutomationQueueType":"successqueue","PerformAutomation": {"AutomationInputDictionary":{"Search.VendorName":"Ernst & Young"},"MaskedAutomationInputDictionary":{"Search.VendorName":"Ernst & Young"}},"RequestExecutionTime":22.261477799999998
|
Sample JSON paths for the above response are:
| Parameter | JSON path to be configured |
| Status | NA |
| Transaction Id | TransactionId |
| Error Details -> Error Priority | Response.ErrorDetailObject[0].Priority |
| Error Details -> Error Description | Response.ErrorDetailObject[0].Description |
| Process Input -> Employee ID | Response.ParentRequest.AutomationInputDictionary.{Search.empid} |
| Process Output -> Designation | Response.AutomationOutputData[0].CviewDictionary.Designation |
Workflow Variable Mapping <link to Workflow variable joget documentation>
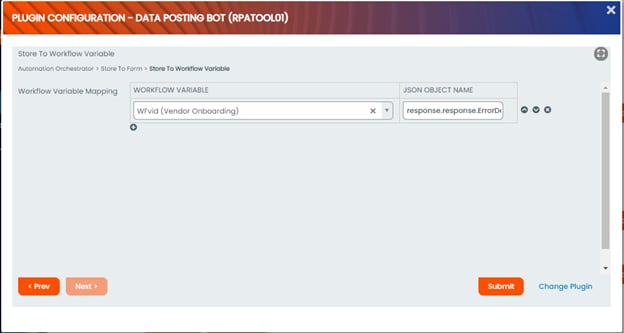
- Workflow Variable – select from the workflow variables defined in the Process Builder.
- JSON Object Name – provide the path of the response.
The same configuration as given in Form Configuration can be used to parse the JSON responses for both sync and async modes.
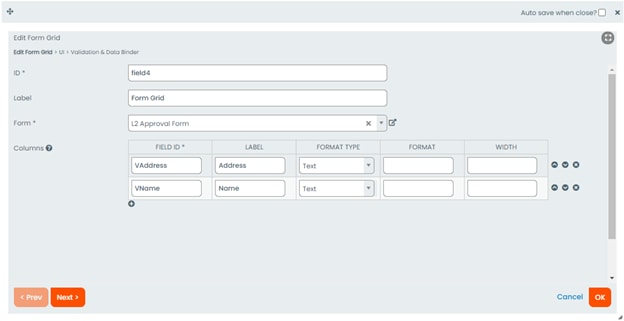
Mapping a grid to the output of RPA process
Synchronous calls
The listener API response which returns an array looks like this for a synchronous call:
|
{ "processInput": "{}", "processName": "Datatest", "profileName": "HR", "sourceId": "PostMan", "retry": false, "retryConfigurations": { "previousRequestIds": [], "noOfTimesRetry": 0, "retryCoolOffInterval": 10000 }, "requestTimeout": 2000000, "isSync": true, "transactionId": "b90da904-a143-4a45-89e9-a9ee39dd9a3f", "status": "success", "response": { "response": "{\"AutomationOutputData\":[{\"AppName\":\"DataTables\",\"CviewDictionary\":{\"datatable1\":\"[{\\\"Sno\\\":\\\"1\\\",\\\"Version\\\":\\\"17.6\\\"},{\\\"Sno\\\":\\\"2\\\",\\\"Version\\\":\\\"18.0\\\"},{\\\"Sno\\\":\\\"2\\\",\\\"Version\\\":\\\"18.0\\\"}]\",\"datatable2\":\"[{\\\"Name\\\":\\\"RD\\\",\\\"ID\\\":\\\"123\\\"},{\\\"Name\\\":\\\"Vishal\\\",\\\"ID\\\":\\\"567\\\"}]\"}}],\"HttpStatus\":\"\",\"ParentRequest\":{\"AutomationInputDictionary\":{},\"MaskedAutomationInputDictionary\":{},\"AnonymizedAutomationInputDictionary\":null,\"DataProtectionErrors\":{},\"ProcessName\":\"Datatest\",\"ProfileName\":\"HR\",\"RetryFlag\":false,\"Retry\":{\"NoOfTimesRetry\":0,\"RetryCoolOffInterval\":10000,\"PreviousRequestIds\":[]},\"APIVersion\":\"\",\"AppId\":\"\",\"CommandExecutionWindow\":\"\",\"CommandGenerationSource\":\"\",\"Country\":\"\",\"Instance\":\"\",\"PartnerId\":\"\",\"ReferenceCode\":\"\",\"Timestamp\":\"2021-09-29T10:10:38.475Z\",\"UserName\":\"Rupa.Maity01\",\"VID\":null,\"SENodeId\":null,\"RequestExpiration\":\"2000000\",\"wait_for_completion\":\"true\",\"Impersonation\":null,\"IfExternalVaultType\":false},\"ReferenceCode\":\"\",\"RequestExecutionTime\":\"00:00:01.2652594\",\"SEReferenceCode\":\"\",\"SpareParam1\":\"\",\"SpareParam2\":\"\",\"UserName\":\"Rupa.Maity01\",\"CommandResultEnum\":0,\"CommandResultDescription\":\"SearchSuccessful\",\"ErrorDetailObject\":[],\"SENodeId\":null,\"RequestReceivedTime\":\"2021-09-29T10:10:38.6496638Z\",\"RequestProcessedTime\":\"2021-09-29T10:10:39.9149232Z\",\"TransactionDescription\":\"SearchSuccessful\"}" }, "error": {}} |
- To map datatable1 output to a grid, 3 steps are needed:
- Create a form which will define the structure of the grid
- Drag and drop a Form Grid on the form where the grid has to be shown. Select the newly created form in the Form name field and configure the fields.
- Configure the grid form to get data from the RPA process.
- Step a –
- The developer must first create a new form. This form will form the basis for the grid mapping.
- The form should contain all the columns of the array. For datatable1, the form should contain 2 fields – Sno and Version.
- Add a hidden field to the form and call it RecordId
- Step b –
- Once the form has been created, it should be mapped in the ‘Store to Form’ page of Automation Orchestrator.
- To configure the grid, configure the following:
- Form – select the newly created form
- Base JSON Object Name for Multirow Data - Specify Base JSON Object Name. It will be: response.response.AutomationOutputData[0].CviewDictionary.datatable
- Field Mapping – Select the form field from the drop down on the left and put the JSON path of the response in the JSON object name field.
- For sno. - response.response.AutomationOutputData[0].CviewDictionary.datatable1.Sno
- For Version - response.response.AutomationOutputData[0].CviewDictionary.datatable1.Version
- For RecordId - #process.recordId#
- Step c –
- Next, drag and drop a Form Grid on the main form where you want to display a grid.
- Select the newly created Form in the Form name column and configure the form fields.
Asynchronous calls
The listener API response which returns an array looks like this for an asynchronous call:
|
{"Request":"PerformAutomation","Response":{""{\"AutomationOutputData\":[{\"AppName\":\"DataTables\",\"CviewDictionary\":{\"datatable1\":\"[{"Sno":"1","Version":"17.6"},{"Sno":"2","Version":"18.0"},{"Sno":"2","Version":"18.0"}]\",\"datatable2\":\"[{"Name":"RD","ID":"123"},{"Name":"Vishal","ID":"567"}]\"}}],\"}}],”HttpStatus":"","ParentRequest":{"AutomationInputDictionary":{"Search.VendorName":"Ernst & Young"},"MaskedAutomationInputDictionary":{"Search.VendorName":"Ernst & Young"},"AnonymizedAutomationInputDictionary":null,"DataProtectionErrors":{},"ProcessName":"SAP_Posting","ProfileName":"APProfile1","RetryFlag":false,"Retry":{"NoOfTimesRetry":0,"RetryCoolOffInterval":10000,"PreviousRequestIds":[]},"APIVersion":"","AppId":"","CommandExecutionWindow":"","CommandGenerationSource":"","Country":"","Instance":"","PartnerId":"","ReferenceCode":"","Timestamp":"2021-09-03T10:20:39.290Z","UserName":"Rupa.Maity01","VID":null,"SENodeId":null,"RequestExpiration":"2000000","wait_for_completion":"false","Impersonation":null,"IfExternalVaultType":false},"ReferenceCode":"","RequestExecutionTime":"00:00:22.2614778","SEReferenceCode":"","SpareParam1":"","SpareParam2":"","UserName":"Rupa.Maity01","CommandResultEnum":0,"CommandResultDescription":"SearchSuccessful","ErrorDetailObject":[],"SENodeId":null,"RequestReceivedTime":"2021-09-03T10:20:48.8056381Z","RequestProcessedTime":"2021-09-03T10:21:11.0671159Z","TransactionDescription":"SearchSuccessful"},"RobotId":"743c8f36-8f36-4b40-af44-8bb9f530f1aa","ScheduleName":"Default Schedule","TransactionId":"0d1f08e2-651b-4434-9829-15164b96a2cd","RobotName":"Robot 2","MachineName":"BLREQX162024L","RobotAssignee":"Rupa.Maity01","RobotUserName":"rupa.maity01","AutomationQueueType":"successqueue","PerformAutomation":{"AutomationInputDictionary":{"Search.VendorName":"Ernst & Young"},"MaskedAutomationInputDictionary":{"Search.VendorName":"Ernst & Young"}},"RequestExecutionTime":22.261477799999998 |
- To map datatable1 output to a grid, 3 steps are needed:
- Create a form which will define the structure of the grid
- Drag and drop a Form Grid on the form where the grid has to be shown. Select the newly created form in the Form name field and configure the fields.
- Configure the grid form to get data from the RPA process.
- Step a –
- the developer must first create a new form. This form will form the basis for the grid mapping.
- The form should contain all the columns of the array. For datatable1, the form should contain 2 fields – Sno and Version.
- Add a hidden field to the form and call it RecordId
- Step b –
- Once the form has been created, it should be mapped in the ‘Store to Form’ page of Automation Orchestrator.
- To configure the grid, configure the following:
- Form – select the newly created form
- Base JSON Object Name for Multirow Data - Specify Base JSON Object Name. Here it will be: Response.AutomationOutputData[0].CviewDictionary.datatable1
- Field Mapping – Select the form field from the drop down on the left and put the JSON path of the response in the JSON object name field.
- For sno. - Response.AutomationOutputData[0].CviewDictionary.datatable1.Sno
- For Version - Response.AutomationOutputData[0].CviewDictionary.datatable1.Version
- For RecordId - #process.recordId#
- Step c –
- Then, drag and drop a Form Grid on the main form where you want to display a grid.
- In the Form Name Column, select the newly created Form and configure the form fields.

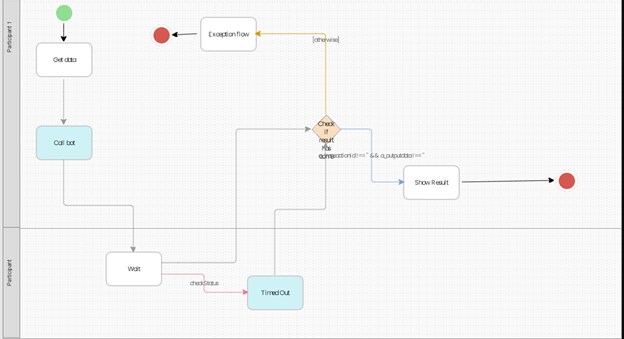
Design a process to call Async bot
To call a bot in asynchronous mode from Low Code Orchestrator, the developer must configure the plugin as described above.
Additionally, the developer must perform following:
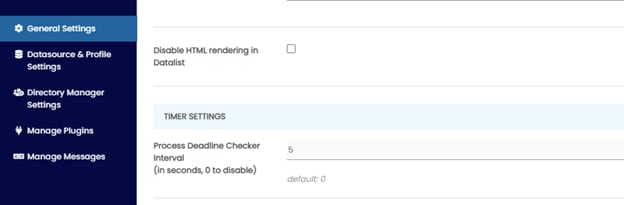
- Go to Setting > General Settings > Process Deadline Checker Interval to 10 seconds (This setting will check for the expiry of any deadlines across the platform) .
- Add a human activity right after the Bot Activity and call it ‘Wait’ in the process design.
- The Wait activity should be mapped to a participant lane that is not mapped to any participant.
- The process will pause on this activity till the response of the asynchronous bot call is received by the plugin.
- The developer can also configure a deadline which will denote the maximum wait time for which the process should wait for the response, after which it can be considered an exception.
- Once the response is received by the plugin, the process will automatically move from ‘Wait’ to the next step.
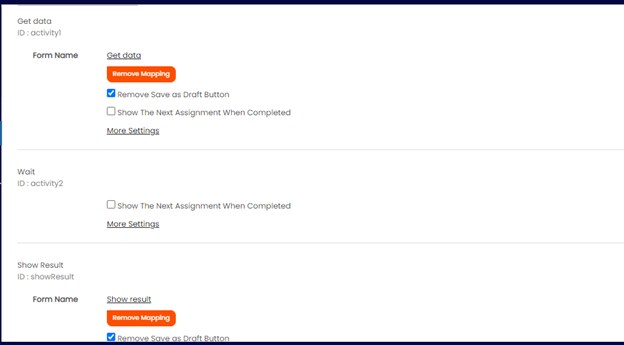
- Additionally, under the Map Activities to Form section, the Activity preceding the bot call (and Wait) should not have the “Show the next Assignment when completed” checkbox ticked.
Sample process app:

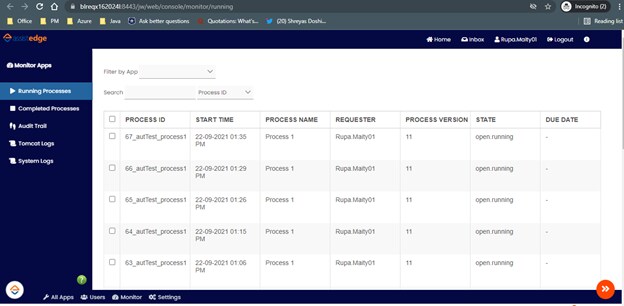
Monitoring
To see where a running process instance is, you can go to the Monitor section and see the Running Processes, Completed Processes, etc.
These screens also provide a drilldown of the processes.