System Settings
The system settings page enables system administrator to control and update the system settings for different modules.
System settings can be managed by users with the following role access only:
- Super_Admin
- Admin role
Accessing the System Settings
To access the system settings:
Go to Configuration > System Settings.
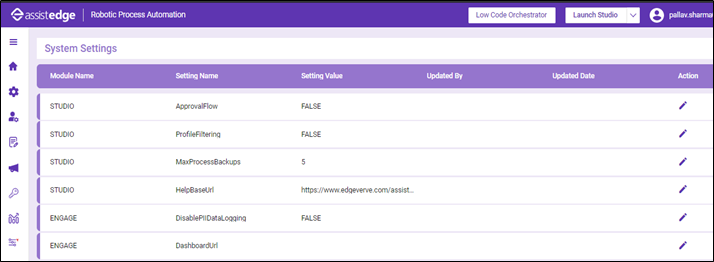
The system settings page is displayed.
| Settings | Description |
| Approval Flow | When this setting is set to TRUE, Automation Studio users can view the following tabs in Admin menu:
|
| Profile Filtering | When the Profile Filtering Setting is set to True, Automation studio user can view processes in different tabs of automation studio only from the assigned profile. |
| MaxProcess Backups | Setting Controls, the number of process backup versions to be maintained. Values range from 0-5 with the default value as:
|
| Engage PII data logging | If this is set to TRUE process inputs will be captured in engage. |
| DashboardUrl | DashboardUrl enables user to actually navigate to the engage web dashboard, this is the final link where user is navigated. This URL will not be linked with engage client deployment. For example, if URL is given as https:// environment.com/ engage user will be navigated to this URL post setting up attended automation on the particular machine. |
|
WebEngageAccessAlert |
When the WebEngageAccessAlert is set to TRUE, engage sends an email notification is triggered on the specific email ID mentioned in the configuration file. For performing this setting, user must possess web engage user role access. |
| Edit | Click Edit to change the previous system settings. |
Editing the System Settings
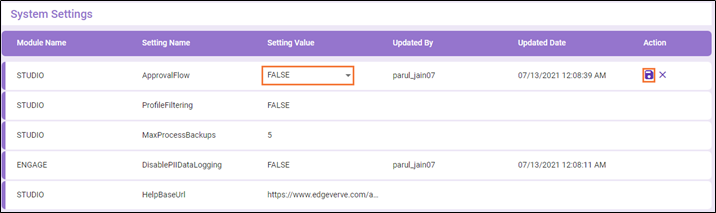
Only the user with Admin or Super_Admin access can edit the system settings.
To edit system settings:
- Go to Configuration > System Settings. System Settings page with Module Name, Setting Name, Setting Value, Updated by, Updated Date and action column is displayed.
- Click
 (Edit) icon to edit the setting value for any of the previous <module> setting.
 - From the Setting Value, select the value from the available option such as TRUE or FALSE.
- Click the
 (Update) icon. The new settings are modified according to the updated by and updated date details of the user who has updated the settings.
| Name | Description |
| Module Name | Indicates the name of module for which the settings are done |
| Setting Name | Indicates the settings done for the module name. |
| Setting Value | Indicates the values of setting for the particular module. |
| Updated By | Displays the last updated by details of the user |
| Updated Date | Displays the last updated details of the user |
| Update | Using this option, you can update the new settings |
| Cancel | Using this option, you can discard the changes. |
|
NOTE: |
Tracking logs will be always base64 encoded. |
Updating the Help Base URL
Only the user with Admin or Super_Admin access can update the help base URL in the system settings.
To update help base URL:
- Click the Configuration menu and select System Settings.
- Click the
 (Edit) icon next to HelpBaseUrl.
 - In the Setting Value column, update the base URL by changing the IP address of the server where RPA is deployed. For example, replace https://www.edgeverve.com/assistedge/ with the https://<IpAddressOrServerName>/Ui/ where the help file is placed.
- Click the
 (Update) icon.