Database Creation – Oracle Server
This page helps you with the prerequisites and the process to setup database in Oracle Server.
- Prerequisites for Database Creation
- There are two ways to setup database. Click any of the below link as per your preferred method:
- AssistEdge Database Installer: AssistEdge Database Installer is a graphical tool that enables you to create database, and create objects in existing database.
- Database Creation Scripts: Database Creation Scripts enables you to create database manually using Oracle scripts.
|
NOTE: |
Before proceeding further, ensure that you have AssistEdge RPA compatible Oracle Server version installed on your system and along with that you have access privileges for the database creation. |
Creating Database using AssistEdge Database Installer
This section describes the step by step instructions to create the database using AssistEdge Database Installer in the Oracle Server.
To create database in Oracle Server:
- Navigate to $ > Database > Installer folder.
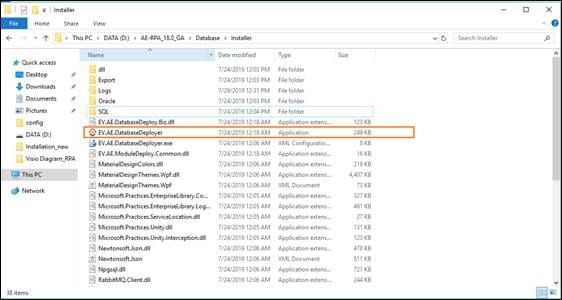
- Find EV.AE.DatabaseDeployer.exe file and double click to launch AssistEdge Database Installer. The AssistEdge Database Installer dialog box appears.
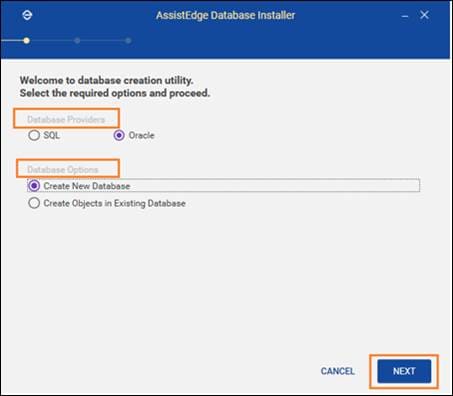
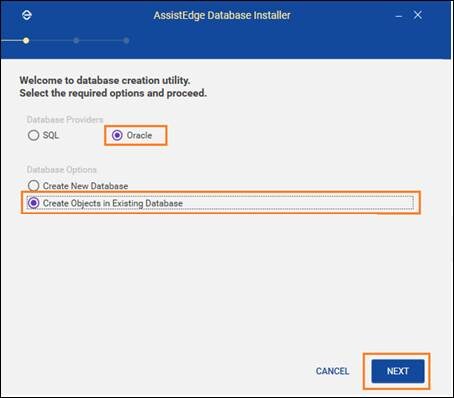
- In the Database Providers section, select Oracle.
- In the Database Options section, you have three choices available. Click any of the below link to choose the preferred option based upon your requirement:
-
Create New Database: Select this option, if you want to setup a new AssistEdge database in Oracle server.
- Create Objects in Existing Database: Select this option, only if oracle database administrator has already created a tablespace explicitly for AssistEdge database creation along with schema user credentials and database permissions.
Creating New Database
This section explains you about how to create a new database in Oracle Server.
|
NOTE: |
Before proceeding, ensure that you have admin privileges to create a new database.
|
To create new database:
- In the AssistEdge Database Installer dialog box:
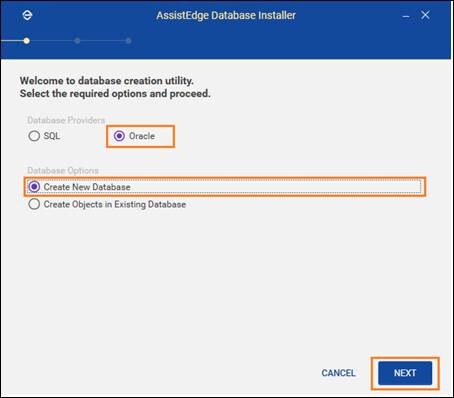
- In the Database Providers section, select Oracle.
- In the Database Options section, select Create New Database.
- Click NEXT. The Oracle Server page appears as shown below.
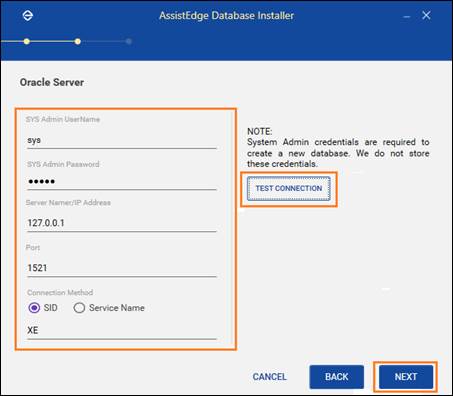
- In the SYS Admin UserName, enter database Username with SYS Admin privileges for a new user.
|
NOTE: |
Enter the details of the database SYS Admin user. The database name should be unique. |
- In the SYS Admin Password, enter database Password with SYS Admin privileges to be used to access the database.
- In the Server Name/IP Address, enter Server Name or IP Address of the Oracle server.
- In the Port, enter Port number to connect to the database. The default port is 1521; if required, change the port.
- In the Connection Method, select the preferred Connection method.
- SID: Enter the instance name (SID) on which the user schema is to be created to connect the database.
- Service Name: Enter Service Name on which the user schema is to be created to connect the database.
- Click TEST CONNECTION to validate, if the connection to the specified Oracle server is established.
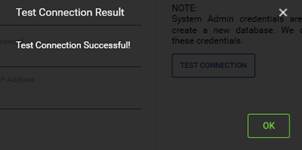
- If the connection to the specified Oracle server is established then, a popup message appears as Test connection established successfully.
- If the test connection to the specified Oracle server fails, check your entries, make any needed corrections, and try again.
- Then, click OK. The pop-up message closes.
|
NOTE: |
Do not proceed unless the test connection is successful. |
- Click NEXT to proceed. A New Database Details page appears as shown below.
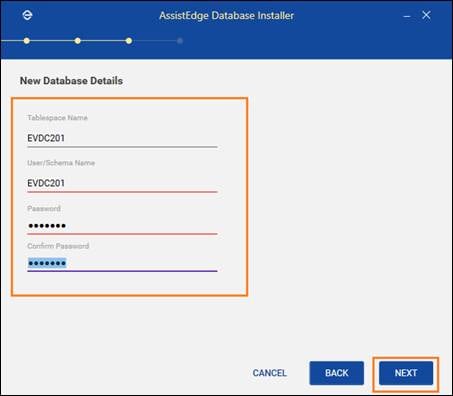
This page enables you to create a new database user where details of the new tablespace are required to enter. These details exist in the Oracle server under the earlier specified service name.
- In the Tablespace Name, enter the name of the new tablespace being created under the specified Service/SID.
- In the User/Schema Name, enter User or Schema Name with DBA privileges on the schema.
- In the Password, enter the Password of the mentioned user.
- In the Confirm Password, re-enter the Password to confirm.
- Click NEXT. Admin User Details page appears as shown below.
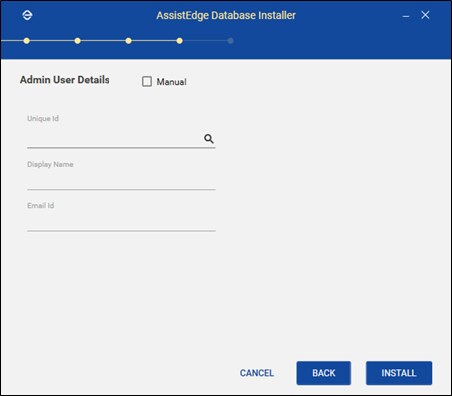
- In the Admin User Details page, you can create a super admin user who will have Admin access to AE Site Admin module and client tools of AE RPA Module. There are two ways to create Admin user, you can choose any of the option as per your preference.
Default: By default, you can select an existing user from the active directory and assign the user as Admin user.- In Unique ID field, enter the active directory username and then click
 Search . The details in this field are auto-filled. On selecting active directory username, a “Success Message” appears next to the search icon.
 - System auto fills the Display Name and Email ID details of the Admin user.
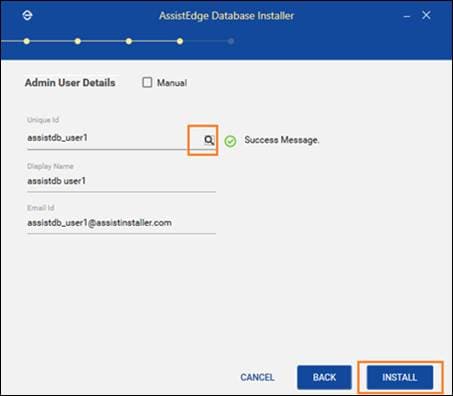
- In Unique ID field, enter the active directory username and then click
Manual: Select Manual checkbox, if you can create super admin user manually. Enter the required details manually in the following fields.
- In the Unique ID field, enter a unique identifier for the AssistEdge Admin user.
- In the First Name field, enter the first name for the AssistEdge Admin user.
- In the Last Name field, enter the last name for the AssistEdge Admin user.
- In the Display Name field, enter the name that you wish to display for the AssistEdge Admin user.
- In the Email ID field, enter a valid email ID of the AssistEdge Admin user.

- Click INSTALL. The progress page appears that shows the database creation progress.

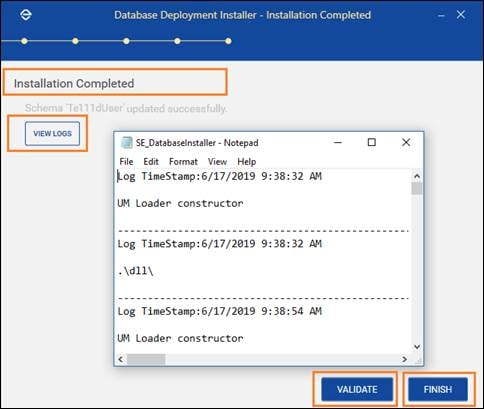
- The Installation Completed page appears. Upon successful set-up of database, a success message as “Schema <name of the database> created successfully” appears. You can also check the logs and perform validation of database created before finishing the process:
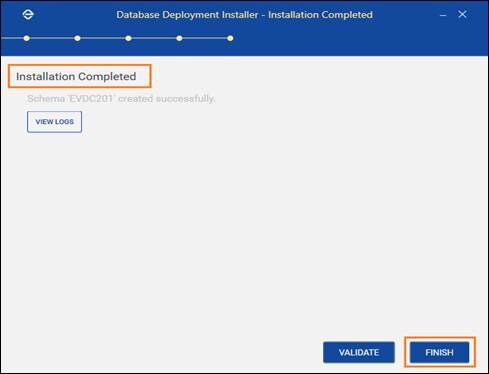
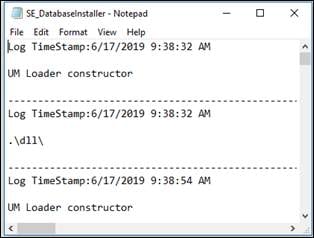
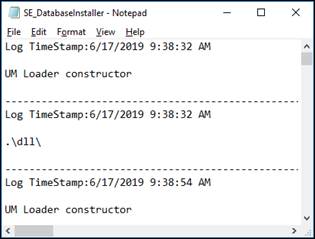
- Click VIEW LOGS to view the application log details. The log details contain information such as Log Time Stamp, UM Loader Constructor, dll, and so on.
- Click VALIDATE to view the validation results after completion of the installation process.
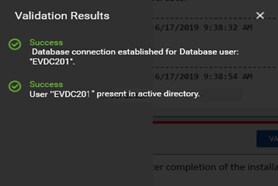
A popup window with Validation Results appears. Ensure that you get a success message for both listed items and close the dialog box.
- Click VIEW LOGS to view the application log details. The log details contain information such as Log Time Stamp, UM Loader Constructor, dll, and so on.
- Click FINISH to exit the application.

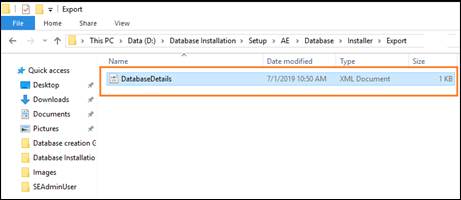
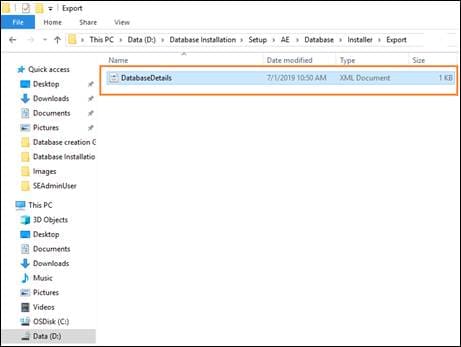
A popup window with DatabaseDetails.xml file appears. Click OK. - An export file is created at $\Database\Installer\Export\DatabaseDetails.xml in the installer’s folder.
The New Database - Oracle is created successfully and you can start utilizing database for AE RPA /Engage installation process.
Creating Objects in Existing Database
This section describes how to use an existing empty database already available in the Oracle server.
|
NOTE: |
|
To create objects in existing database:
- In the AssistEdge Database Installer dialog box:
- In the Database Providers section, select Oracle.
- In the Database Options section, select Create Objects in Existing Database.
- Click NEXT to proceed.
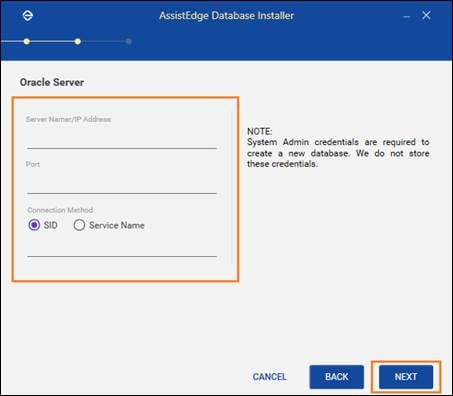
The Oracle Server page appears.
- In the Server Name/IP Address field, enter name of the server or IP Address of the Oracle server.
- In the Port field, enter port number to connect the database.
- In the Connection Method section, select the preferred connection method. Possible values are:
SID: Enter SID name to connect to the database.
Service Name: Enter Service Name used to connect to the database. - Click NEXT to proceed. The Database Details page appears.
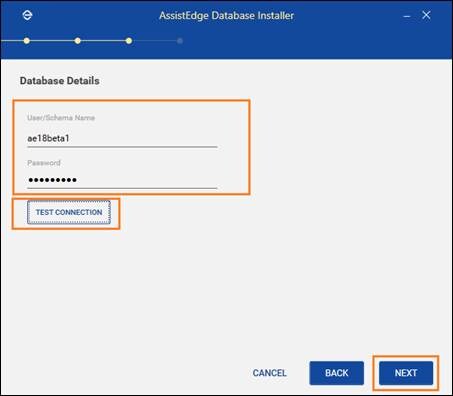
- In the User/Schema Name field, enter the name of the existing user or name of the existing schema created for the tablespace user.
- In the Password field, enter the password created for the tablespace user.
- Click TEST CONNECTION to validate if the connection to the specified Oracle server instance is established.
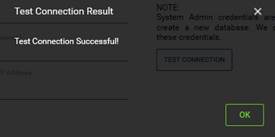
- If the connection is established a popup message appears as “Test Connection Successful”.
- If the connection fails, make sure you are entering the right credentials and try again.
- Click OK. The pop-up message closes.
- Click NEXT. The Admin User Details page appears as shown below.
- In the Admin User Details page, you can create a super admin user who will have Admin access to AE Site Admin module and client tools of AE RPA /Engage Module. There are two ways to create Admin user, you can choose any of the option as per your preference.
Default: By default, you can select an existing user from the active directory and assign the user as Admin user.- In Unique ID field, enter the active directory username and then click Search . The details in this field are auto-filled. On selecting active directory username, a “Success Message” appears next to the search icon.
- System auto fills the Display Name and Email ID details of the Admin user.

- In Unique ID field, enter the active directory username and then click
Manual: Select Manual checkbox, if you can create super admin user manually. Enter the required details manually in the following fields.
- In the Unique ID field, enter a unique identifier for the AssistEdge Admin user.
- In the First Name field, enter the first name for the AssistEdge Admin user.
- In the Last Name field, enter the last name for the AssistEdge Admin user.
- In the Display Name field, enter the name that you wish to display for the AssistEdge Admin user.
- In the Email ID field, enter a valid email ID of the AssistEdge Admin user.

- Click INSTALL to finish the database installation process. The progress page appears which shows the database installation progress.

- The Installation Completed page appears. Upon successful set-up of database, a success message as “Schema ‘<name of the schema>’ updated successfully” appears. You can also check the logs and perform validation of database created before finishing the process:
Click VIEW LOGS to view the application log details. The log details contain information such as Log Time Stamp, UM Loader Constructor, dll, and so on.
Click VALIDATE to view the validation results after completion of the database creation process.
A popup window with Validation Results appears. Ensure that you get a success message for both listed items and close the dialog box.
- Click FINISH to exit the application.
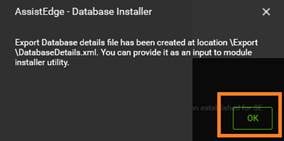
A popup window with DatabaseDetails.xml file appears.
Click OK.
- An export file is created at $\Database\Installer\Export\DatabaseDetails.xml in the installer’s folder.
The objects for AE RPA database are successfully created in the selected database.
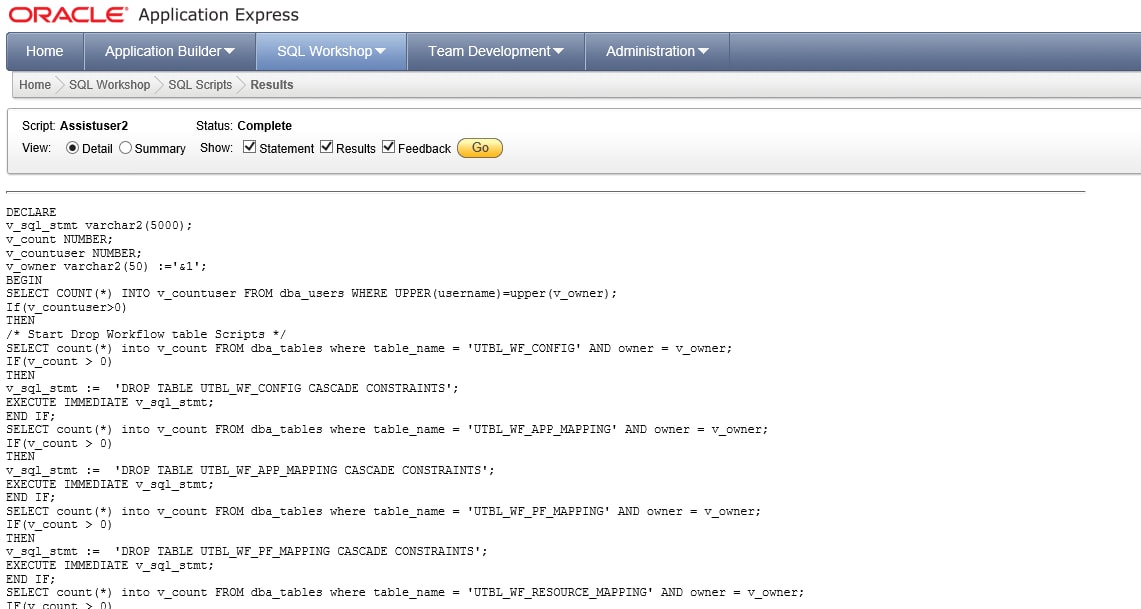
Creating Database Manually using Scripts – Oracle Server
This section describes how to create database manually by running prepared scripts in the Oracle server. In order to start creating database manually, you are required to first locate the database script folder location and then execute the scripts.
|
NOTE: |
Before proceeding with the creating database manually using scripts, ensure that you have following:
|
Creating New Database using Scripts
![]() This sections explains you about creating a new database manually using scripts in the Oracle Server. You are required to execute the Oracle scripts mentioned in the below table for a successful deployment.
This sections explains you about creating a new database manually using scripts in the Oracle Server. You are required to execute the Oracle scripts mentioned in the below table for a successful deployment.
To create database manually using scripts:
- Navigate to
Product Package > Database > Installer > Scripts > SQL > SQLScripts > New_Database. - Open New_Database folder.
In the New_Database folder, you can access the following scripts in the respective folders.
|
Name of Scripts |
Path |
|
Create Database user for Oracle Server |
DatabaseUser\Create_DBUser.sql |
|
Create SQL tables for Oracle database |
Tables\Create_Oracle.sql |
|
Create Tables for Oracle Studio |
Tables\Create_Oracle_Studio.sql |
|
Insert Data |
Tables\Insert_Data.sql |
|
Insert Oracle Studio |
Tables\Insert_Oracle_Studio.sql |
|
Create Oracle Audit Trigger |
Tables\Create_Oracle_AuditTrigger.sql |
|
Create Admin User for Oracle |
SEAdminUser\CreateSEAdminUser_Oracle.sql |
- Connect to database.
- Access New_Database folder and navigate to OracleScripts > New_Database > DatabaseUSer > Create_DBUser .sql and open the script in Oracle Application express.
|
Name of Value |
Description |
|
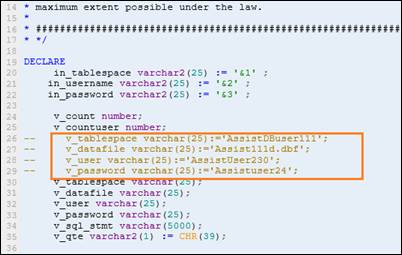
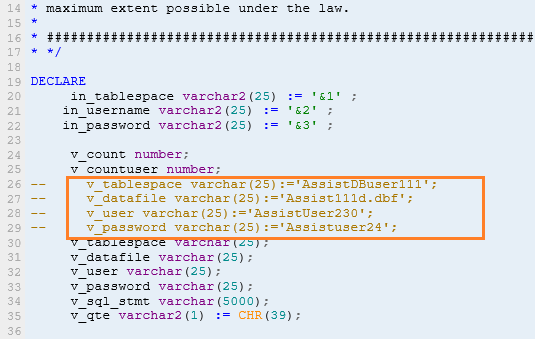
@v_tablespace varchar |
Signifies the name of the new tablespace created where the database objects are added. |
|
@datafile |
Signifies the name of the datafile. |
|
@user varchar |
Signifies the name of the database user. |
|
@password |
Signifies the password for the database user. |
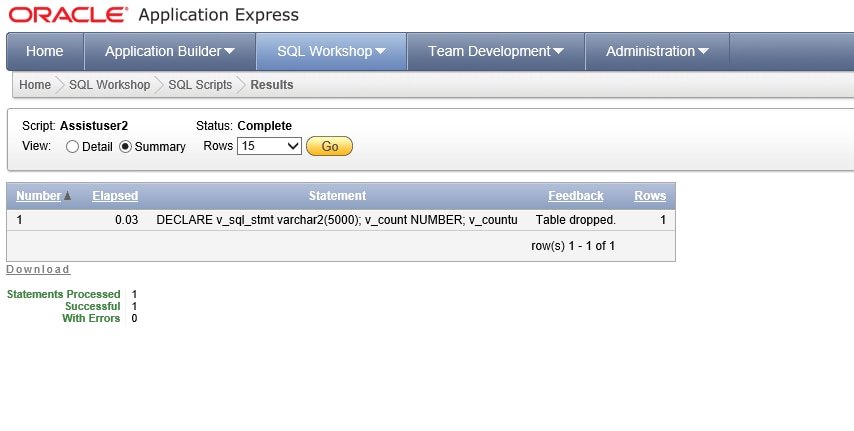
- Click Run.
- Upon successful execution of the script, disconnect from the database and establish a new databaseconnection using the username and password created in the above Step 4.
- Then, open the following scripts in Oracle Application express and Run them in sequence as mentioned below.
- Access “New_Database” folder and navigate to “OracleScripts > New_Database> Tables > Create_Oracle.sql” and open the script in Oracle Application express.
- Access “New_Database” folder and navigate to “OracleScripts > New_Database> Tables > Create_Oracle_Studio.sql” and open the script in Oracle Application express.
- Access “New_Database” folder and navigate to “OracleScripts > New_Database> Tables> Insert_Data.sql” and open the script in Oracle Application express.
- Access “New_Database” folder and navigate to “OracleScripts > New_Database> Tables> Insert_Oracle_Studio.sql” and open the script in Oracle Application express.
- Access “New_Database” folder and navigate to “OracleScripts > New_Database> Tables> Create_Oracle_AuditTrigger.sql” and open the script in Oracle Application express.
- After successful execution of above scripts, access “New_Database” folder and navigate to “OracleScripts > New_Database> SEAdminUser> CreateSEAdminUser_Oracle.sql” and open the script in Oracle Application express.
- Update the highlighted parameters in the script file with correct admin user details as described below:
|
Name of Value |
Description |
|
@unique_id |
Signifies the Unique ID of the AssistEdge admin user |
|
@first_name |
Signifies the first name of the AssistEdge admin user |
|
@last_name |
Signifies the last name of the AssistEdge admin user |
|
@display_name |
Signifies the display name of the AssistEdge admin user |
|
@email ID |
Signifies the Email ID of the AssistEdge admin user |
|
NOTE: |
|
- Click Run.
- Upon successful execution of the script, admin user is created for Oracle server.
For example, to create database manually using “Oracle Application Express”, refer Database Creation using Oracle Application Express.NOTE:
Database backup and restore are not in scope of the product. Third party tools can be used for performing DBA functions of backup and restore of DB.
Database Creation using Oracle Application Express
This section describes how to create and upgrade the database using scripts in Oracle Server using Oracle Application express by following below steps:
Creating database user for Oracle Server
![]() To create a database user for Oracle Server:
To create a database user for Oracle Server:
- Login to Oracle database using the SYSDBArole.
- Connect to the database.
- Access “New_Database” folder and navigate to “OracleScripts > New_Database> DatabaseUSer > Create_DBUser.sql”and open the script in Oracle Application express.
|
Name of Value |
Description |
|
@v_tablespace varchar |
Signifies the name of the new tablespace created where the database objects are added. |
|
@datafile |
Signifies the name of the data file. |
|
@user varchar |
Signifies the name of the database user. |
|
@password |
Signifies the password for the database user. |
- Click Run.
- Upon successful execution of the script, Oracle Server Database setup is finished.
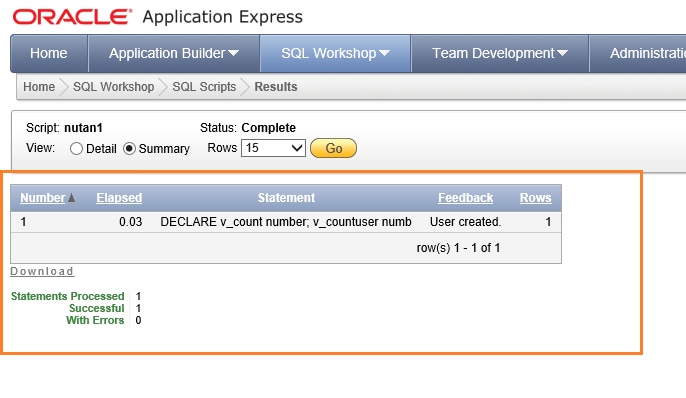
You can start using AssistEdge database for further installation process.
Creating Tables in Oracle
![]() To create tables in oracle:
To create tables in oracle:
- Login to Oracle database using the SYSDBArole.
- Connect to the database.
- Access New_Database folder and navigate to OracleScripts > New_Database> Tables > Create_Oracle.sql and open the script in Oracle Application express.

- Click Run.
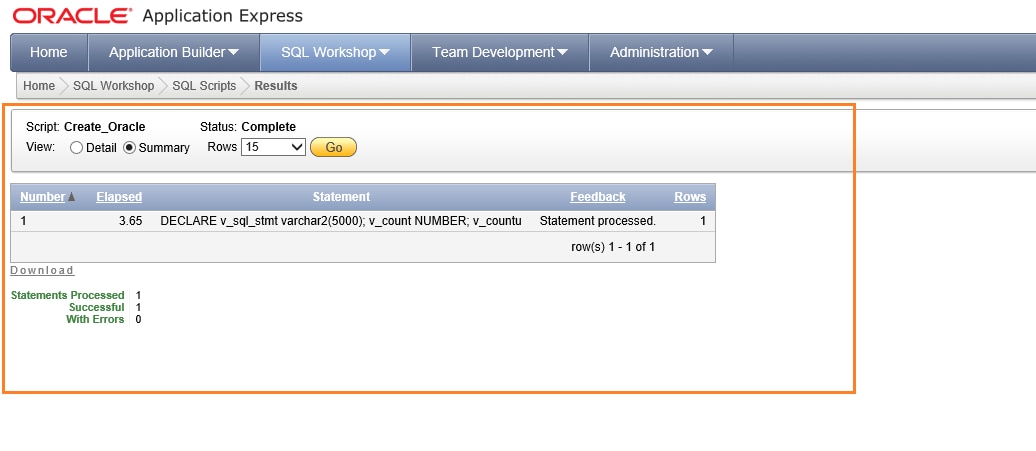
- Upon successful execution of the script, required tables are created in the Oracle Server.
- Access New_Database folder and navigate to OracleScripts > New_Database> Tables > Create_Oracle_Studio.sql and open the script in Oracle Application express.
- Click Run.
- Upon successful execution of the script, required tables are created in the Oracle studio.
Inserting data in tables for Oracle Server
![]() To insert data in table for Oracle Server:
To insert data in table for Oracle Server:
- Login to Oracle database using the SYSDBArole.
- Connect to the database.
- Access New_Database folder and navigate to OracleScripts > New_Database> Tables> Insert_Data.sql and open the script in Oracle Application express.
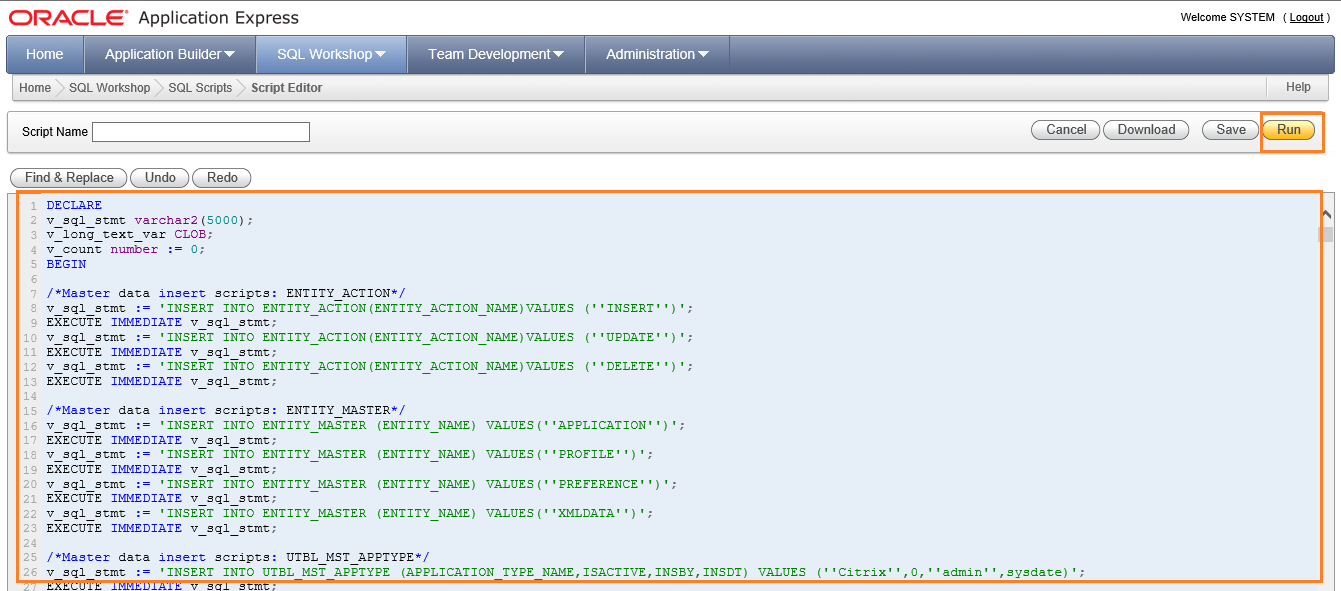
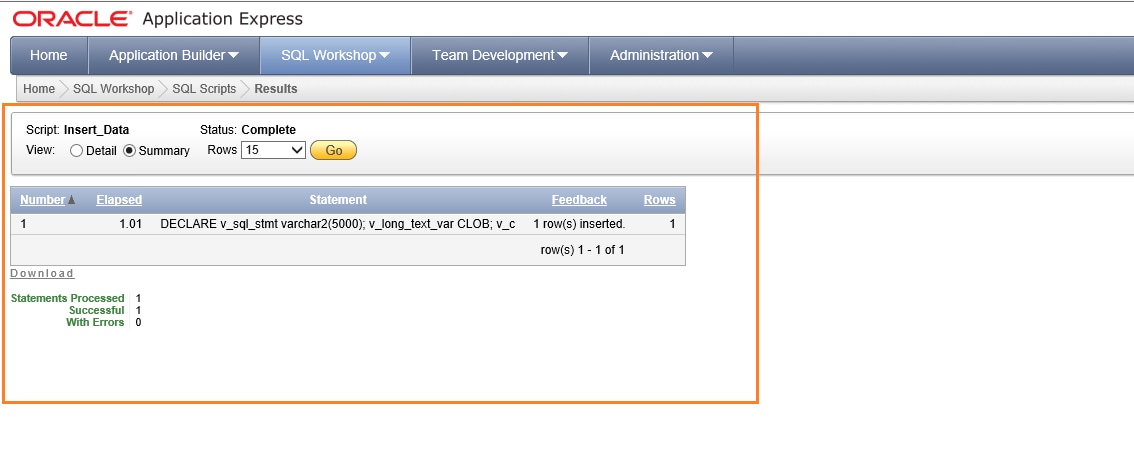
- Click Run.
- Upon successful execution of the script, required data is inserted in the tables for oracle server.
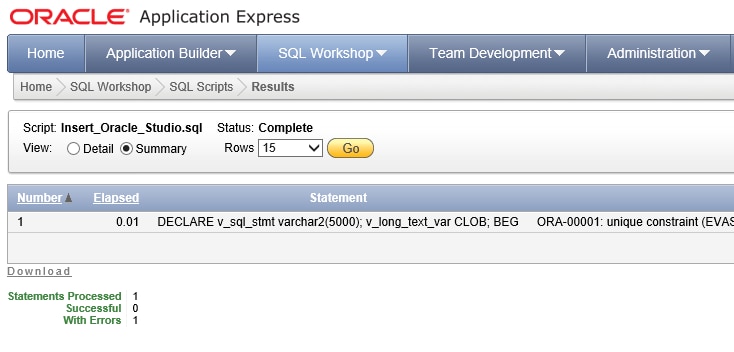
- Access New_Database folder and navigate to OracleScripts > New_Database> Tables> Insert_Oracle_Studio.sql and open the script in Oracle Application express.
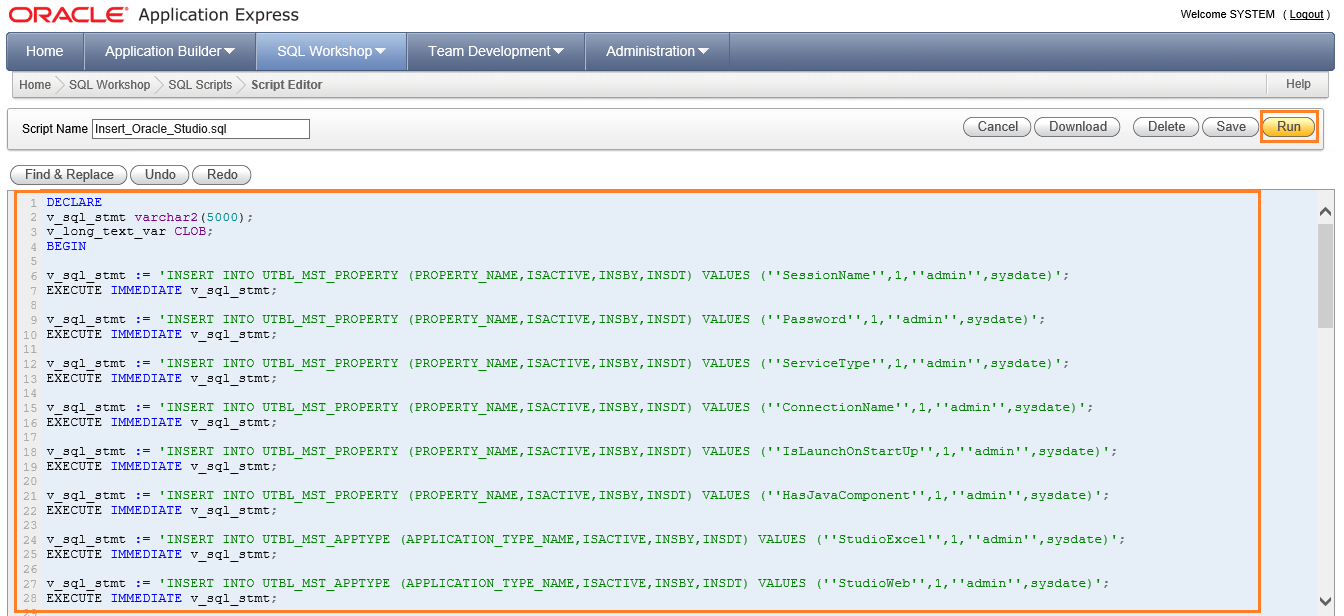
- Click Run.
- Upon successful execution of the script, required data is inserted in the tables for Oracle Server.
Creating Oracle Audit Trigger
![]() To create audit trigger for Oracle Server:
To create audit trigger for Oracle Server:
- Login to Oracle database using the SYSDBArole.
- Connect to the database.
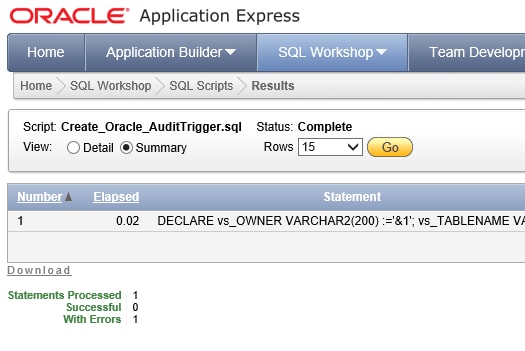
- Access New_Database folder and navigate to OracleScripts > New_Database> Tables> Create_Oracle_AuditTrigger.sql and open the script in Oracle Application express.
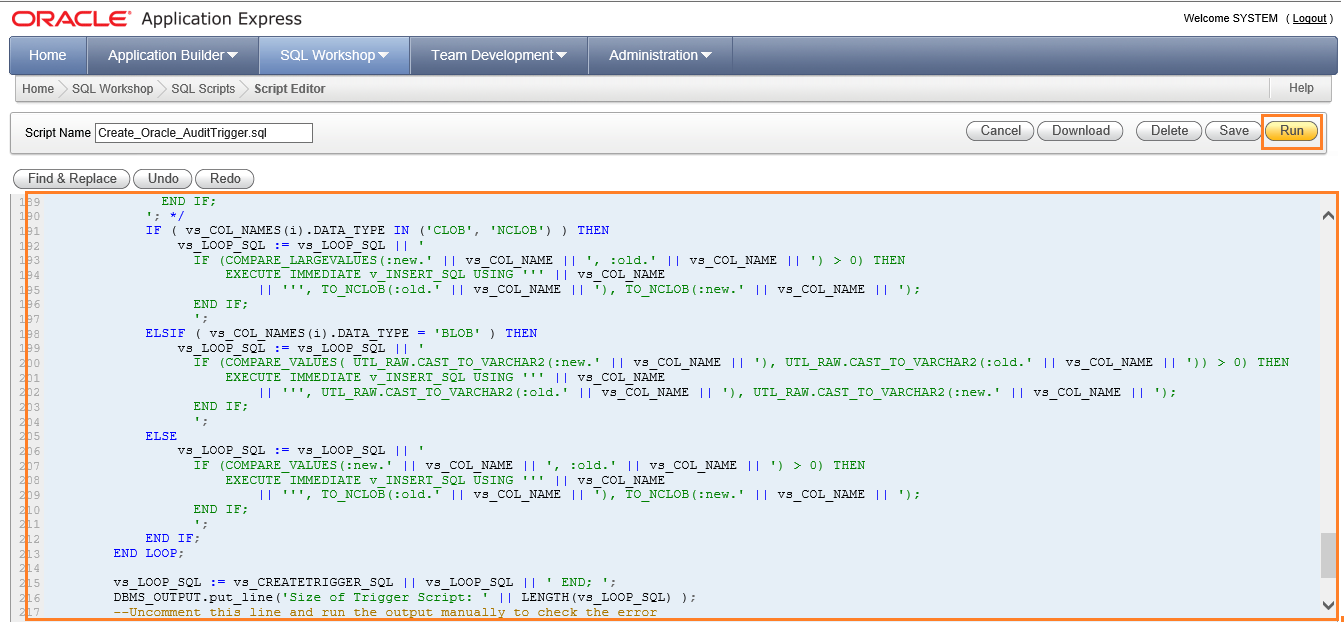
- Click Run.
- Upon successful execution of the script, required audit triggers are created in the oracle server.
Creating AssistEdge Admin user for Oracle Server
![]() To create AssistEdge Admin user for Oracle Server:
To create AssistEdge Admin user for Oracle Server:
- Login to Oracle database using the SYSDBArole.
- Connect to the database.
- Access New_Database folder and navigate to “OracleScripts > New_Database> SEAdminUser> CreateSEAdminUser_Oracle.sql”and open the script in Oracle Application express.
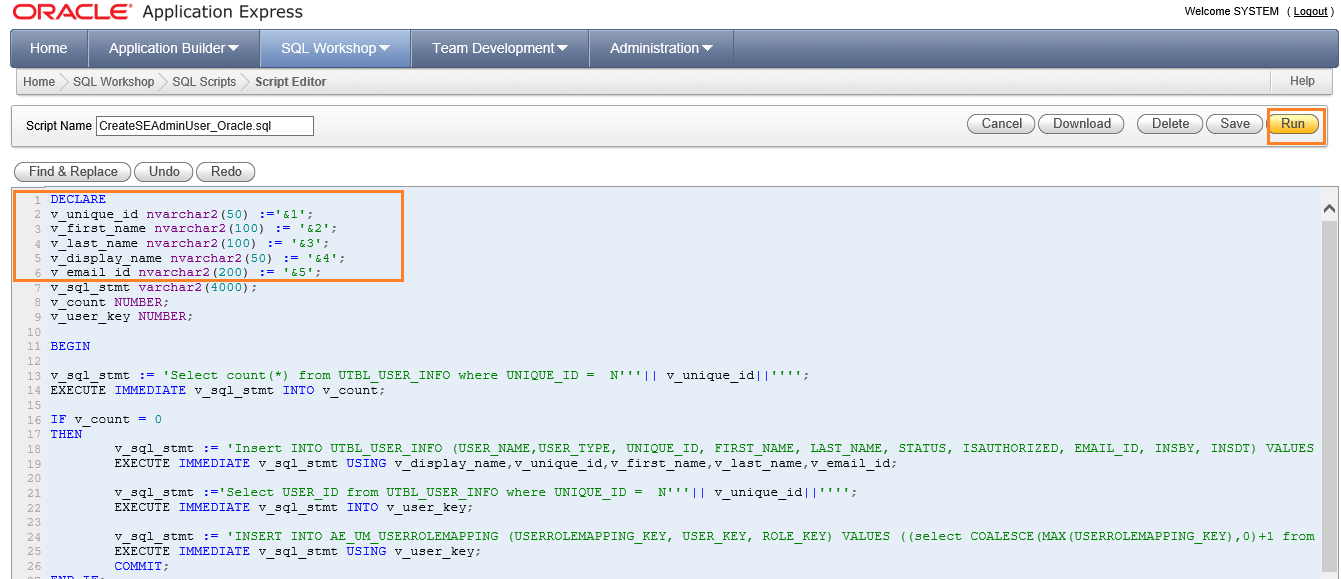
- Update the highlighted parameters in the script file with correct admin user details as described below:

|
Name of Value |
Description |
|
@unique_id |
Signifies the Unique ID of the AssistEdge admin user |
|
@first_name |
Signifies the first name of the AssistEdge admin user |
|
@last_name |
Signifies the last name of the AssistEdge admin user |
|
@display_name |
Signifies the display name of the AssistEdge admin user |
|
@email ID |
Signifies the Email ID of the AssistEdge admin user |
|
NOTE: |
In case of LDAP Authentication, ensure the values provided are of a valid user account from LDAP. In case of Custom authentication, create a valid user as per the custom authentication logic. |
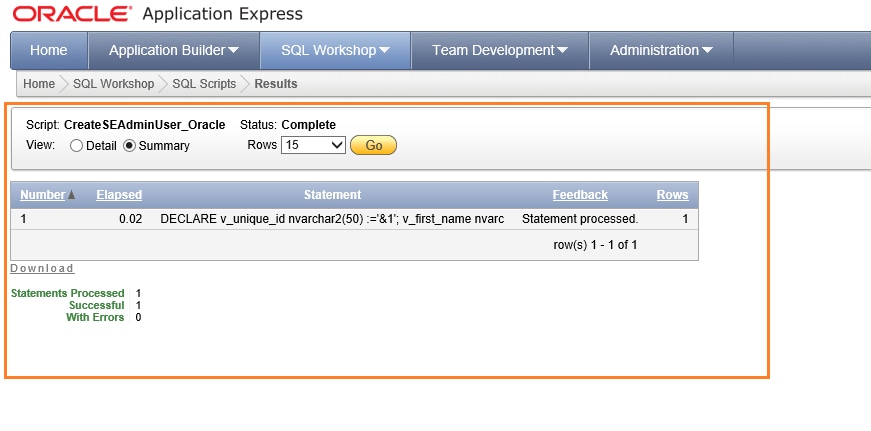
- Click Run.
- Upon successful execution of the script, AssistEdge admin user is created for Oracle server.
Prerequisite Validation - Oracle Server
This section guides you with prerequisite validations of the Oracle server. A successful installation of the Oracle Server Database installs files to the file system, creates entries in the registry, and also install several tools.
To verify whether Oracle server is installed on your system:
- From the Start menu, select Programs, then Oracle - HOME_NAME.
- In the Welcome window, click Installed Products to display the Inventory dialog box.
- To check the installed contents, find the Oracle Database product in the list. Also, you can find the Oracle database icon on the desktop.