Configure NIAApps
It allows you to configure NIA Vision application .
To configure a NIA application:
- In the Admin menu, click the
 (Add Application) icon to add an application. The Add Application dialog box appears.
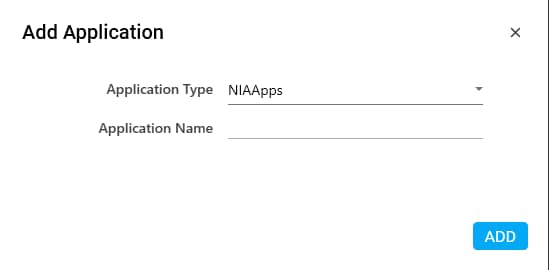
- In the Application Type list, select NIAApps.
- In the Application Name field, enter a desired name of the NIA application you want to add. The name must not contain any special character or space.
- Click ADD. A message for successful addition of the application is displayed.
- Close the displayed message and enter the following details in the Application Properties pane. Mandatory fields are highlighted in a red box.
|
Property Name |
Usage |
|
Details |
|
|
Url |
Edgeverve hosted URL where API is called to use the NIA services. |
|
Display |
|
|
Application Description |
A small description of the NIA Vision application added. |
|
Display Name |
The desired name of the application entered by the user. This is a mandatory field. |
|
General |
|
|
Application Name |
Name of the application entered at the time of adding the application. It auto populates as per the name of the application entered while configuring the application. |
|
Application Type |
Type of the application selected at the time of adding the application. It auto populates as per the application type selected while configuring the application. |
|
Misc |
|
|
Is Application Tracked |
Is applicable only for AssistEdge Engage. Signifies if the application is tracked for time spent by Engage during the process execution. It used for activity tracking report and tracking time spent on each application in the execution dashboard reports. By default, the check box is selected and can be edited. |
- Click the
 (Save Properties) icon to save the application.
The NIA Vision application is configured.