Code Editor
A code editor is a piece of code built in Visual Basic to do specific tasks related to certain fields or perform operations associated with the extracted fields of an application that could not be automated using out-of-box activities available in Automation Studio.
You can use an existing code editor DLL or create a new code editor using an in-built script editor available with the Code Editor activity.
NOTE: |
This activity must be used inside an Application activity or the system displays an error. This lets you establish a connection between Automation Studio and the configured application. |
Using Code Editor Activity
1. Within an automation process workflow, click Process Components in the Canvas Tools pane to expand the tool and view the associated activities.
2. Drag the Application activity and drop on to the Flowchart designer on the Canvas.
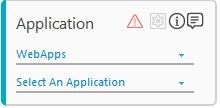
3. In the Application Type list, select WebApps. You must have at least one application added for it to appear in the list.
4. In the Select An Application list, select the application where you want to perform automation. Alternatively, you can add a new web application at this point of time. To add web application:
a. In the Select An Application list, click Add New Application. The Add New Application dialog box appears.
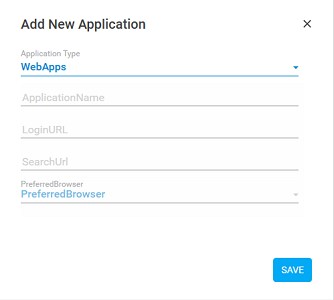
b. In the Application Name field, enter a desired name of the web application.
c. In the LoginURL field, enter the login URL of the web application you want to access.
d. In the SearchURL field, enter the URL of the page that appears immediately post login.
e. In the PreferredBrowser list, select the browser you prefer to launch the web application. By default, preference is set to InternetExplorer. Available options are:
§ InternetExplorer
§ FireFox
§ Chrome
§ InternetExplorerSelenuim
§ MicrosoftEdge
f. Click SAVE. The web application is added.
5. Capture steps that you want to automate. If you want to perform specific tasks related to certain fields or perform operations associated with the extracted fields of the application that could not be automated using the out-of-box activity then follow the below steps to for configuring Code Editor activity in the automation process workflow.
6. Double click the Application activity, drag the Code Editor activity and drop inside the Application activity.
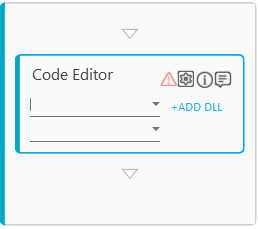
You can do one of the following:
§ Add an existing code editor DLL created in Visual Basic
§ Create a code editor DLL in Automaton Studio
Add an Existing Code Editor DLL
Prerequisite
Create the custom code in Visual Studio and add the ICodeEditor interface of Automation Studio to your project. Refer AE-RPA-Customization Guide.pdf / AE-Engage-Customization Guide.pdf to know the steps to create a code editor DLL file.
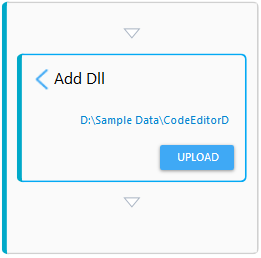
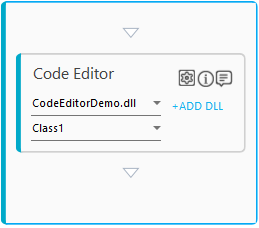
a. Click +ADD DLL and then click File Location to browse and select an existing code editor DLL file.
b. Click UPLOAD. The Upload Successful message is displayed.
c. Click
 to return to the activity block. The uploaded
DLL is selected in the list. The list of all the available classes
is displayed in the list below the selected DLL.
to return to the activity block. The uploaded
DLL is selected in the list. The list of all the available classes
is displayed in the list below the selected DLL.
d. Browse and select the required class as per your requirement.
Create Code Editor DLL in Automation Studio
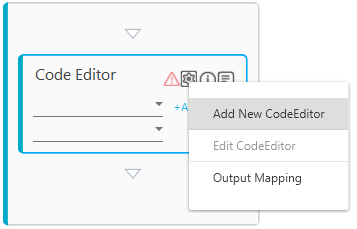
a. Click
the  (Settings)
icon and then click Add New CodeEditor.
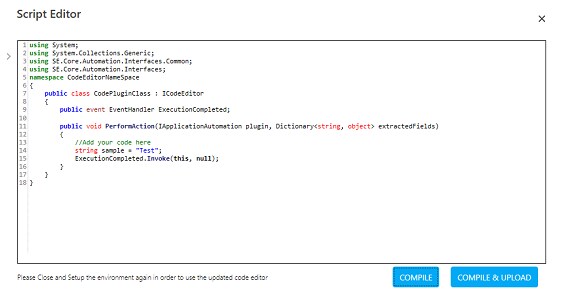
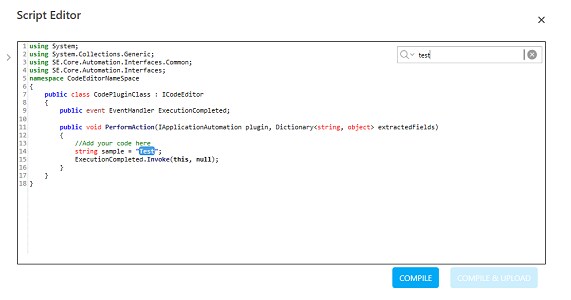
The Script Editor
dialog box appears with the default template and the required
interface already added.
(Settings)
icon and then click Add New CodeEditor.
The Script Editor
dialog box appears with the default template and the required
interface already added.
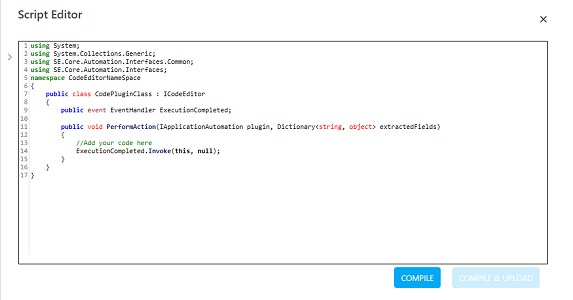
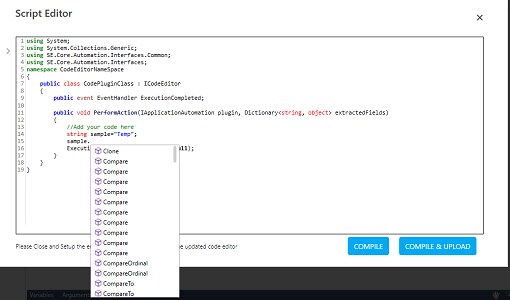
b. Write the required code under the PerformAction method. The in-built script editor provides expression building aid using the IntelliSense feature of Automation Studio.
c. After the code editor operations are completed, raise the ExecutionCompleted event.
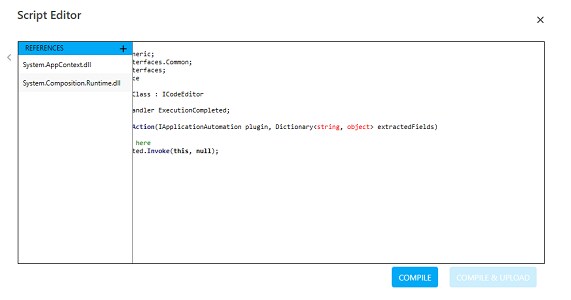
d. Click
the  icon to open the REFERENCES
pane. This lets you add references of third-party DLLs to the
code written.
icon to open the REFERENCES
pane. This lets you add references of third-party DLLs to the
code written.
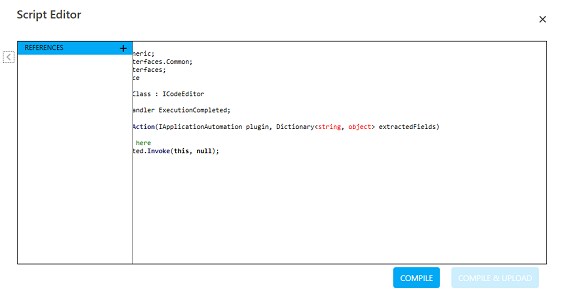
e. Click
the  icon to browse and add the required
external DLL references. The Reference
added successfully message is displayed and the reference
starts appearing in the REFERENCES
pane. Repeat this step to add multiple references to the code.
icon to browse and add the required
external DLL references. The Reference
added successfully message is displayed and the reference
starts appearing in the REFERENCES
pane. Repeat this step to add multiple references to the code.
f. Click COMPILE to check for any compilation error in the code. Errors found are highlighted; else, the No Compilation Errors message is displayed. Close the displayed message.
g. Click COMPILE & UPLOAD to upload and save the code editor DLL in the AssistEdge database. The Save Code Editor dialog box appears.

h. In the CODEEDITOR NAME field, enter a desired name of the code editor, and then click SAVE. The code editor is successfully uploaded and saved in the AssistEdge database.
7. Click
the (Settings)
icon, and then click Output Mapping.
The Output Parameters
dialog box appears. This lets you store the output of the code
editor DLL file (if any) in a parameter of the automation process
workflow.
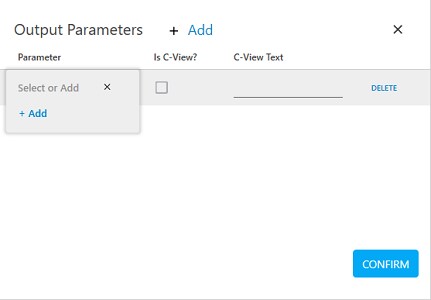
8. Click Add to add a new row for mapping the required parameter to store the output.
9. In the Parameter drop down list, select the parameter you want to map with the corresponding output defined in the code editor DLL. To use this option, the parameter must be pre-defined in the Parameter bar. Alternatively, you can also add a parameter at this point of time. Follow the mentioned to steps to add the parameter:
a. Click Select or Add and then click Add. The Add new Argument dialog box appears.
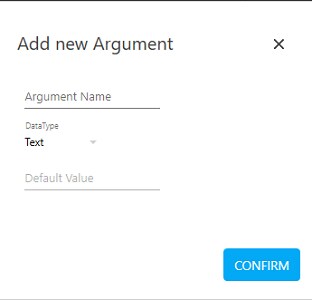
b. In the Argument Name field, enter a desired name.
c. In the DataType list select the type of parameter you want to create. Available options are - Text, Numeric, Decimal, Boolean and DateTime. As this parameter stores the output value, providing default value is not enabled.
d. Click DELETE if you do not want to save the provided details or skip to step v.
e. Click CONFIRM to save the mapping.
10. Repeat step 9 for multiple output received.
11. Select the Is C-View check box if you want to send the received output for customer view (available in the CView tab) in the AE Engage application
12. Enter a desired name in the C-View Text to display the output with the entered name, and then close the Output Parameters dialog box.
The code editor for the required operation is configured.
Editing the Code Editor Created in Automation Studio
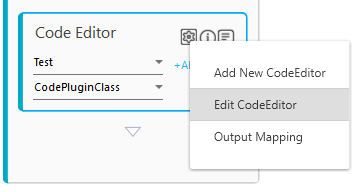
1. Select the required code editor created in Automation Studio.
2. Click
the (Settings)
icon, and then click Edit CodeEditor
to edit the uploaded code editor. The Script
Editor dialog box appears with the selected code editor.
Make the changes as per your requirement. You can find and replace
text in the Script Editor
dialog box. To find and replace the text:
a. Press the Ctrl+F keys from the keyboard to open the Find box.
b. In the Find box, enter the text that you want to find and then press Enter key. the required text gets highlighted.
c. Press the Ctrl+H keys from the keyboard to open the Replace box.
d. In the Replace box, enter the text to replace the exiting text.
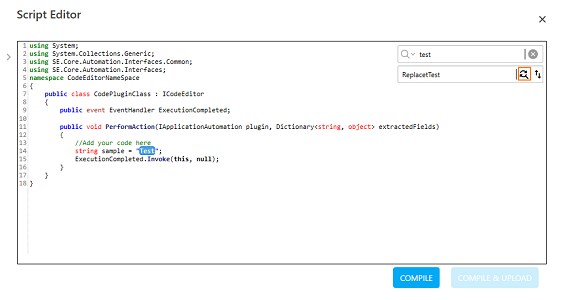
e. Click Replace to replace the text.
f. You can press Ctrl+Z and Ctrl+Y keys respectively to undo and redo any changes if required.
3. Once you have made changes in the code, compile and re-upload the code for the changes to get saved and reflected in the code editor.
The code editor DLL is edited and saved in the AssistEdge database.
Code Editor Activity Properties
The properties of a Code Editor activity are listed in the following table and can be edited in the Properties grid on the right panel.
Property Name |
Usage |
Control Execution |
|
Ignore Error |
When this option is set to Yes, the application ignores any error while executing the activity. If set to NA, it bypasses the exception (if any) to let the automation flow continue; however, it marks the automation status as failure, in case of an exception. By default, this option is set to No. |
Delay |
|
Wait After |
Specify the time delay that must occur after the activity is executed. The value must be in milliseconds. |
Wait Before |
Specify the time delay that must occur before the activity is executed. The value must be in milliseconds. |
Misc |
|
Breakpoint |
Select this option to mark this activity as the pause point while debugging the process. At this point, the process freezes during execution allowing you to examine if the process is functioning as expected. In large or complex processes, breakpoints help in identifying the error, if any. |
Commented |
Select this option to mark this activity as inactive in the entire process. When an activity is commented, it is ignored during the process execution. |
DisplayName |
The display name of the activity in the flowchart designer. By default, the name is set as Code Editor. You can change the name as required. |
DllDisplayName |
The name of the selected code editor DLL. |
On This Page Hide
Related Topics