Step-by-Step Guide to Perform Web Application Automations
Following are some of the examples to demonstrate web application automation.
Automation a Search Process in a Web Application
Let's create a search process for information on a web application and update the search result.
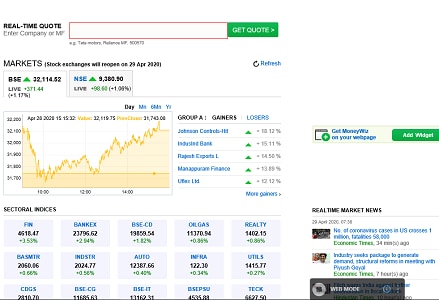
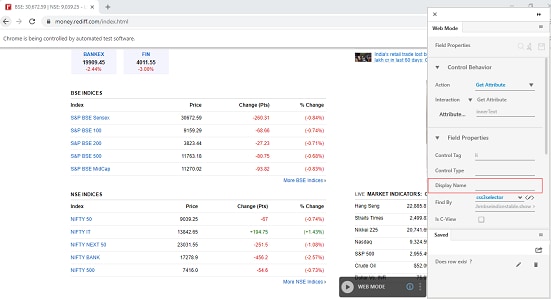
In this example, consider web page of Rediff Money where we automate the process of retrieving the real time stock price of a desired company.
Prerequisite:
1. In the Admin menu, add an application of Application Type- WebApps.
2. In the Application Properties panel:
· Enter the Login URL as https://money.rediff.com/index.html
· Enter the Search URL as https://money.rediff.com/index.html
NOTE: |
Since this application does not require login, hence the login and the search URL remains same. However, it changes if they are different. |
· Enter the Display Name.
3. Click
the  (Save
Properties) icon to save the application details.
(Save
Properties) icon to save the application details.
4. Enter other details as per your requirement.
The WebApps application is created.
To automate the process of retrieving real time stock price of the company:
1. Create a new process.
2. Create string arguments, CompName and StockPrice to enter the name of the company and store the real time stock price of the same.
3. From the Canvas Tools panel, add Application activity to the Flowchart designer on the Canvas.
4. In the Application Type list, select WebApps.
5. In the Select an Application list, select the available web application that you configured.
6. Click
the  (Settings)
icon to launch the WEB MODE of
the Multimodal interface. The
intended web page appears.
(Settings)
icon to launch the WEB MODE of
the Multimodal interface. The
intended web page appears.
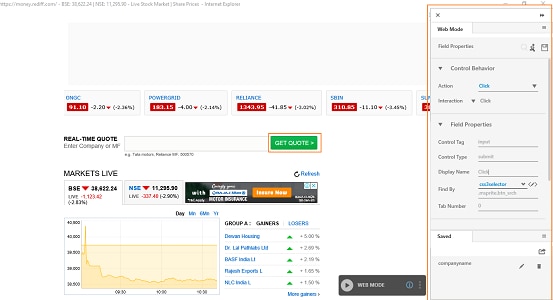
7. Click
the  (Play) icon to capture the
steps of entering the company name on the web page. Hover over
the Enter Company or MF
field. The field gets highlighted with red box.
(Play) icon to capture the
steps of entering the company name on the web page. Hover over
the Enter Company or MF
field. The field gets highlighted with red box.
8. Click the highlighted area. The Field Properties panel of the Web Mode appears. The fields that are mandatory are highlighted with red box.
9. In the Action list, select Set Value.
10. In the Input Source list, select the CompName argument.
11. Enter
a Display Name, and then
click the (Save) icon
to configure the details captured. The saved details start appearing
in the Saved tab of Field Properties bar.
12. Click
the (Play) button to capture
the step of clicking the button to retrieve the real-time stock
price of the entered company name.
13. Hover over the GET QUOTE> field. The field gets highlighted with red box.
14. Click the highlighted area. The Field Properties panel of the Web Mode of the web application appears. The fields that are mandatory are highlighted with red box.
15. In the Action list, select Click.
16. Enter
a Display Name and then
click the  (Save) icon to configure the
details captured. The saved details start appearing in the Saved tab of Field
Properties bar.
(Save) icon to configure the
details captured. The saved details start appearing in the Saved tab of Field
Properties bar.
17. Click
the (Play) button
to capture the step of getting the stock price displayed. Hover
over the stock price displayed. The area gets highlighted with
red box.
18. Click the highlighted area. The Field Properties panel of the Web Mode appears. The fields that are mandatory are highlighted with red box.
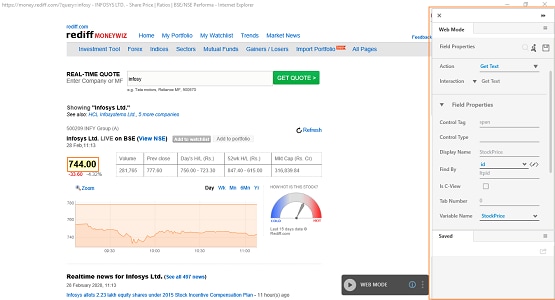
19. In
the Action list, select
Get Text. You can click
the  (Configure)
icon to configure the backup selectors for scenarios where primary
selector does not work.
(Configure)
icon to configure the backup selectors for scenarios where primary
selector does not work.
20. In
the Variable Name list,
select StockPrice and
then click the
(Save) icon to configure
the details captured. The saved details start appearing in the
Saved tab of Field
Properties bar.
21. Click
the (Save configured field and return to
studio) icon to save the field that you configured
and return to the Studio menu. The automation
process workflow to configure the search process is created.
(Save configured field and return to
studio) icon to save the field that you configured
and return to the Studio menu. The automation
process workflow to configure the search process is created.
22. In the Studio menu, setup the environment and then perform the test run.
The process returns the real time stock price of the company entered.
Automating Web Table Extraction Using Loop
In this example, we are extracting the company names and the corresponding % change from the BSE INDICES table available on the Rediff Money web page.
Prerequisite:
1. Goto Admin menu and in the Application tab, add a WebApps application in the Application
2. In the Search Properties panel:
· Enter the Login URL as https://money.rediff.com/index.html
· Enter the Search URL as https://money.rediff.com/index.html
NOTE: |
Since this application does not require login, hence the login and the search URL remains same. |
· Enter the Display Name.
3. Click
the (Save Properties)
icon to save the application details
The WebApps application is created.
To automate retrieving entire data from a table:
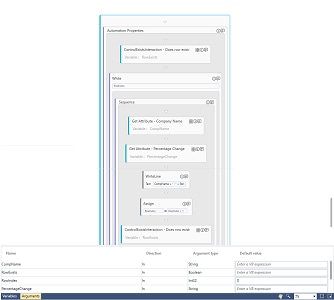
1. Create a new process.
2. Create In arguments, CompName and PercentageChange of String type to store the company name and the corresponding percentage change extracted. Create another argument, RowExists of Boolean type to check if the table row exists, and RowIndex of Int32 type to specify the index of the row to indicate the index of the row where the action must be performed. Set RowIndex as 0 to start data extraction from the first row of the table.
3. From the Canvas Tools panel, add Application activity to the Flowchart designer on the Canvas.
4. In the Application Type list, select WebApps.
5. In the Select an Application list, select the available web application that you configured.
6. Click
the (Settings)
icon to launch the WEB MODE of
the Multimodal interface. The
Rediff Money page opens.
The steps involved in the extraction of data from a web table
are:
a. Indicate the system to check if intended row exists.
b. Verify if intended row exists.
c. Capture the first step of data extraction.
d. Perform iteration over the first step of data extraction using While loop.
Indicate System to Check If Intended Row Exists
a. Locate
the required table and then click the (Play) icon.
b. Press Alt key from the keyboard and select two rows of the table. Click the highlighted area to indicate the column from where you want to check if the row exists for data extraction. The entire column gets highlighted and the Field Properties pane appears.
Verify if Intended Row Exists
a. In the Action list, select Control Exists. This interaction checks if the intended row of the required table exists.

b. In the Display Name field, enter a desired name.
c. In the Variable Name list, select RowExists argument created in the Parameter bar.
d. In the Item Index list, select RowIndex argument created in the Parameter bar. This provides the index of the element for extraction. Other fields are auto filled as per details of the data selected.
e. Click
the (Save)
icon to configure the details captured. The saved details start
appearing in the Saved
tab of Field Properties
bar.
Capture First Step of Data Extraction from Intended Row
a. Click
the (Play) icon to automate the step of extraction
of company name.
b. Press Alt key from the keyboard and select two rows of the Index column. Click the highlighted area to indicate the column to extract data. The entire column gets highlighted and the Field Properties pane appears.
c. In the Action list, select Get Attribute to fetch the name of the company.
d. In the Display Name field, enter a desired name.
e. In the Variable Name list, select CompName argument created in the Parameter bar.
f. In the Item Index list, select RowIndex argument created in the Parameter bar. This provides the index of the element for extraction. Other fields are auto filled as per details of the data selected.
g. Click
the (Save)
icon to configure the details captured. The saved details, of
extracting company name, starts appearing in the Saved
tab of Field Properties
bar.
h. Click
the (Play) icon to capture data extraction of
percentage change.
i. Press Alt key from the keyboard and select two rows of the % Change column. Click the highlighted area to indicate the column to extract data. The entire column gets highlighted and the Field Properties pane appears.
j. In the Action list, select Get Attribute to fetch the name of the company.
k. In the Display Name field, enter a desired name.
l. In the Variable Name list, select PercentageChange argument created in the Parameter bar.
m. In the Item Index list, select RowIndex argument created in the Parameter bar. This provides the index of the element for extraction. Other fields are auto filled as per details of the data selected.
n. Click
the (Save)
icon to configure the details captured. The saved details start
appearing in the Saved
tab of Field Properties
bar.
o. Click
the (Save configured field and return to
Studio) icon to save the field that you configured
and return to the Studio menu.
Perform Iteration Over First Step of Data Extraction Using While Loop
a. Double click the Application activity and drop While activity below ControlExistsInteraction block.
b. Move other blocks inside the When activity to create a loop over the steps captured.
c. Set the While condition that until RowExists argument is true, extract the company name else break the loop. You can set a condition inside the While loop to break the loop if you want to extract data until a specified row.
d. Add Assign activity and increment the value of RowIndex by 1 to let the loop counter move to the next row index for data extraction.
You can store the extracted data
in an excel or use them fr further processing. To view the output
in Automation Studio , let's add WriteLine
activity. You can assign this process to a robot, if you want
to execute this process outside Automation Studio.
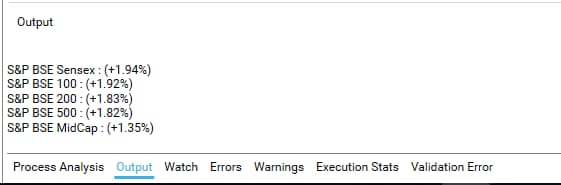
7. Add a WriteLine activity below data extraction block and in the Text field, enter CompName+ " : " +Percenatge to print the company name and their corresponding percentage change.
8. Save the process.
9. Setup the environment and then perform test run. Following is the output displayed in the console:
NOTE: |
If all the elements are not extracted even after successful execution of the process, use any of the available backup selectors to resolve this issue. See Find By field property for more details. |
Automating Smart Google Web Toolkit (GWT) Based applications
In this example we are extracting data from a table that is present in a Smart GWT based application.
Prerequisite:
1. In the Admin menu, add an application of Application Type- WebApps.
2. In the Search Properties panel:
· Enter the Login URL as https://www.smartclient.com/smartclient/showcase/?id=adaptiveFilterFS
· Enter the Search URL as https://www.smartclient.com/smartclient/showcase/?id=adaptiveFilterFS
NOTE: |
Since this application does not require login, hence the login and the search URL remains same. However, it changes if they are different. |
· Enter the Display Name.
3. Click
the (Save
Properties) icon to save the application details.
4. Enter other details as per your requirement.
The WebApps application is created.
To automate retrieving data from an entire table:
1. Create a new process.
2. From the Canvas Tools panel, add Application activity to the Flowchart designer on the Canvas.
3. In the Application Type list, select WebApps.
4. In the Select an Application list, select the available Smart GWT application that you configured.
5. Click
the (Settings)
icon to launch the WEB MODE of
the Multimodal panel. The SmartClient
page opens.
6. Locate
the table and then click the (Play) icon. To loop over the table and
extract each row:
a. Extract the SKU column from the first row.
b. In the Find By list, select sclocator and copy the generated code in a notepad file.
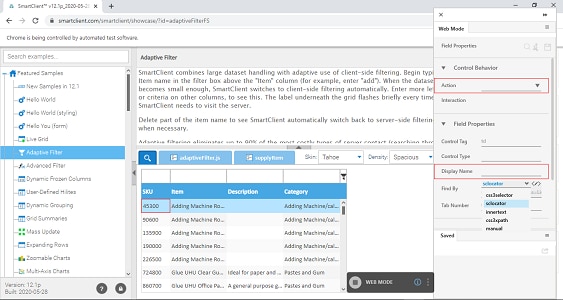
c. Extract the SKU column from the second row.
d. In the Find By list, select sclocator and copy the generated code below the first code in the same notepad file. Following is a sample of the generated values:
[Row - 1] //testRoot[]/child[Class=ListGrid||index=0||length=2||classIndex=0||classLength=1||roleIndex=0||roleLength=1||scRole=list ]/body/row[itemID=1||itemName=Adding%20Machine%20Roll%2057x57mm%20Standard||SKU=45300||0]/col[fieldName=SKU||0]
[Row -2] //testRoot[]/child[Class=ListGrid||index=0||length=2||classIndex=0||classLength=1||roleIndex=0||roleLength=1||scRole=list ]/body/row[itemID=2||itemName=Adding%20Machine%20Roll%2057x64mm%20Standard||SKU=90600||1]/col[fieldName=SKU||0] |
The generated values of the sclocator contains row specific details for the row part, and rest of the details are the same for both the values as shown below:
[Row - 1] row[itemID=1||itemName=Adding%20Machine%20Roll%2057x57mm%20Standard||SKU=45300||0]
[Row -2] row[itemID=2||itemName=Adding%20Machine%20Roll%2057x64mm%20Standard||SKU=90600||1] |
e. Delete the specific details and add a placeholder for loop index to make it as a generic sclocator that is used for looping. In the above example, remove the specific information related to itemName and SKU fields. The itemID field and row identifier after the SKU field can be used for making placeholder for loop index.
f. After deleting the specific information, use either of the following as a value of the sclocator in loop:
[Version - 1]- using itemID column //testRoot[]/child[Class=ListGrid||index=0||length=2||classIndex=0||classLength=1||roleIndex=0||roleLength=1||scRole=list ]/body/row[itemID={0}]/col[fieldName=SKU||0]
[Version - 2]- using row identifier //testRoot[]/child[Class=ListGrid||index=0||length=2||classIndex=0||classLength=1||roleIndex=0||roleLength=1||scRole=list ]/body/row[{0}]/col[fieldName=SKU||0] |
NOTE: |
· For Version 1, loop index must start from 1 or offset must be 1 · For Version 2, loop index must start from 0. |
Automating Web Table Extraction Without Loop
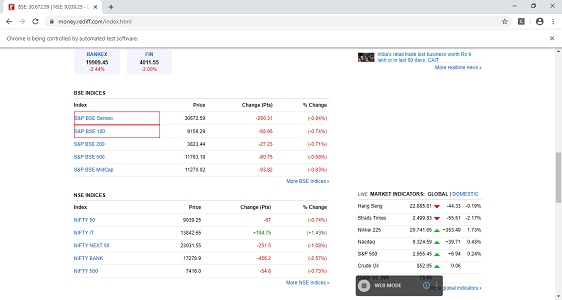
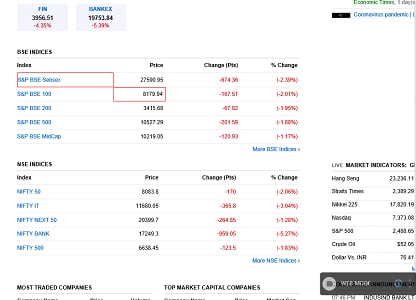
In this example, we are extracting the BSE Sensex details from the BSE INDICES table available on the Rediff Money web page.
NOTE: |
· Only homogenous data cells (rows and columns with same html tagging) can be captured through this process. · Only the entire table or the grid can be extracted. |
Prerequisite:
1. Goto Admin menu and in the Application tab, add a WebApps application in the Application
2. In the Search Properties panel:
· Enter the Login URL as https://money.rediff.com/index.html
· Enter the Search URL as https://money.rediff.com/index.html
NOTE: |
Since this application does not require login, hence the login and the search URL remains same. |
· Enter the Display Name.
3. Click
the (Save
Properties) icon to save the application details
The WebApps application is created.
To automate retrieving details of entire table of BSE indices:
1. Create a new process.
2. Create an Out argument, SensexTable of type DataTable to store the datatable that gets created during the extraction. If you do not create an argument of DataTable type, it gets created at the time of field configuration and you can define the name.
NOTE: |
If the predefined argument of type DataTable is used, its structure is overwritten based on the webtable extracted. Dummy headers are added to the DataTable namely Column1, Column2 and so on. |
3. From the Canvas Tools panel, add Application activity to the Flowchart designer on the Canvas.
4. In the Application Type list, select WebApps.
5. In the Select an Application list, select the available web application that you configured.
6. Click
the (Settings)
icon to launch the WEB MODE of
the Multimodal panel. The Rediff Money
page opens.
7. Click
the (Play) button to capture
the steps to automate the process of fetching the BSE Sensex details.
Locate the required table, press shift and select the table cells
diagonally (in this case header does not get selected as the html
tagging is different for the header and rows/columns), and then
click the highlighted area. The entire table gets highlighted
and the Field Properties
pane opens.
8. In the Action list, Get Table Data is selected by default.
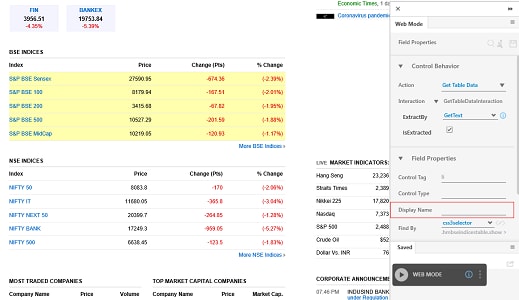
9. In the ExtractBy list, GetText is selected by default. You can change it to InnerText if the datatable is empty. Inner Text option is used when you want to fetch data from the hidden rows of the table. This data is already retrieved when the page loads, however the data is not visible until you click More>>.
10. In the Display Name field, enter a desired name.
11. In the Find By list, css3seelctor is selected by default. Depending on the html tagging, css3xpath can also be available in this list.
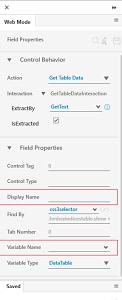
12. In the Variable Name list, select the argument, SensexTable.
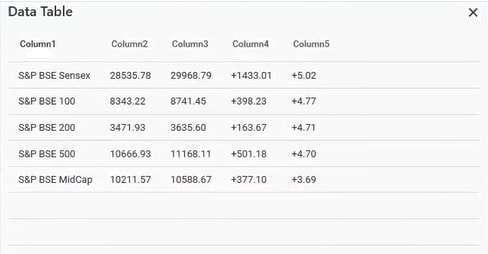
13. Use
 (Run Now)icon,
to see if the intended configuration is done and the preview of
the datable is extracted.
(Run Now)icon,
to see if the intended configuration is done and the preview of
the datable is extracted.
14. Click
the (Save)
icon to configure the details captured. The saved details start
appearing in the Saved
tab of Field Properties
bar.
15. Click
the (Save configured field and return to
studio) icon to save the field that you configured
and return to the Studio menu.
16. Create an In argument, ExcelOutput to read and view the datatable extracted.
17. Double click the Export Data Table activity below the Get Data activity.
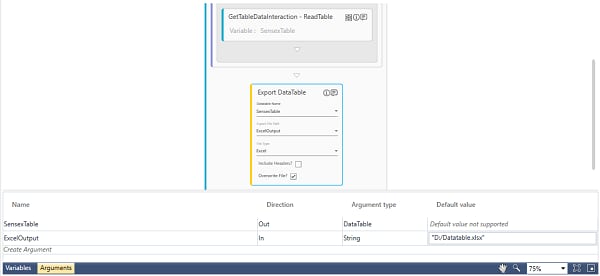
18. In the DataTable Name list, select the SensexTable argument to provide the input to the Export Data Table activity.
19. In the Export File Path list, select the ExcelOutput argument to export the datatable in the excel files saved in your system.
20. In the File Type list, select Excel.
21. In the Studio menu, setup the environment and then perform the test run.
The process returns the excel file containing the BSE Sensex detail.
NOTE: |
In case UI element of the header of the table header is different from other columns, header name does not get captured. this is because only homogeneous cells are captured using this method. The default header names assigned in the DataTable must be used. |