Add New Language in Engage
Engage supports different languages; however, the application is set to English by default. Follow the below steps to customize the language of your choice.
Disclaimer
Before you customize the Engage application for the desired languages, there are few key points to remember.
- Only LTR (Left to Right) languages are supported.
- Single-byte and double-byte languages are supported.
- Any UI distortions because of label and text language change will be handled by the ES teams.
Prerequisite
For the existing UI Customization, first add the UI customization changes in the EngageUI solution provided in the folder AddOns\EngageCustomControlProjects in the build.
Customize New Language
Follow the below mentioned steps for adding new language support.
- Open EngageUI solution in Visual Studio from AddOns\EngageCustomControlProjects folder available in the build.
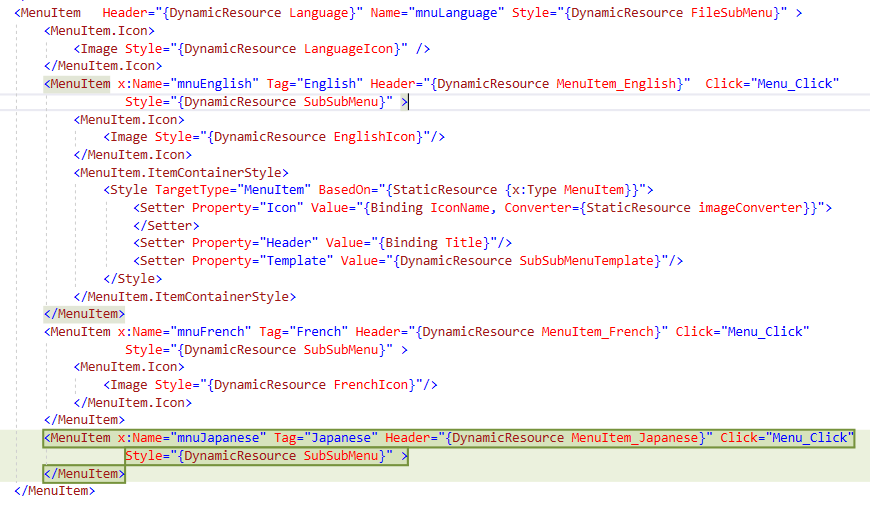
- Open file DefaultMainWindow.xaml from the project DefaultMainWindowView as shown in the below image.
- To add a new language, add a new menu item as highlighted in the below image. Example of adding support for Japanese language is given below.
- Assign Name, Tag and Header to the newly added menu item.
- Tag of the menu item must be the name of language that the user wants to add.
- Add a new resource key of the language name in all language resource files to set the Header of menu item.
- Bind a method Menu_Click to the Click event of the newly added menu item as shown in below image. Ensure that the Method name is Menu_Click.
- Now open DefaultMainWindow.xaml.cs and go to method Menu_Click as shown in the image below.
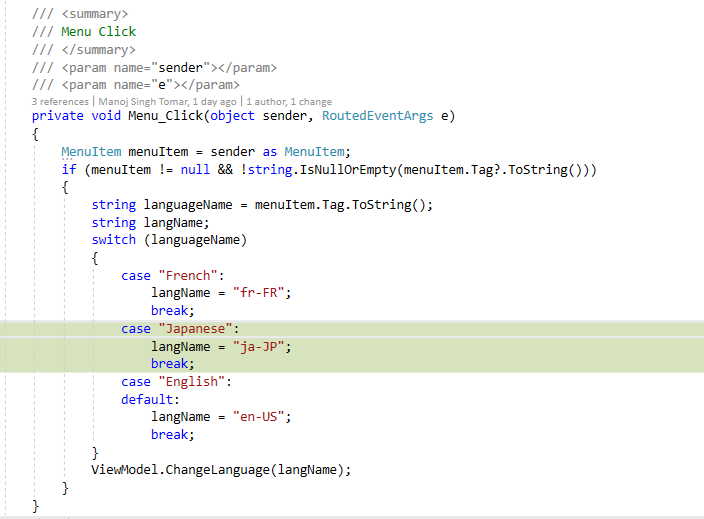
- Add a new Case with the text as language name, i.e. value of the Tag property added in the DefaultMainWindow.xaml inside the Switch statement as shown in the above image.
- Assign culture code of the language to the langName variable. For example, en-US, fr-FR, ja-JP and so on.
- Build the project DefaultMainWindowView and copy and replace the DefaultMainWindowView.dll in the Engage root folder.
- Add a new folder inside the root folder of Engage build with name as culture code.
- Now add a new resource file having name LocalizationDictionary.<language culture code>.xaml inside the folder created above.

- This resource file should contain all the resource keys from en-US\LocalizationDictionary.en-US.xaml resource file with values in the new language.
- Launch Engage. The new language option is available in the Language menu of Engage is now visible.
Labels and Buttons
Once the desired language is added, the labels and buttons available on the Engage UI are translated; however below is the list of labels that will not be translated when the user changes the language. These labels/content always remain the English.
- Engage header shown in the top left corner.
- Text on splash window that comes before data privacy popup.
- All the numbers, for example Applications Count (Number) on Sign in manager.
- All data that comes from other business applications like Automation Studio, Admin Module, and other services and target applications will be visible in the language of those applications and will not be visible in the user selected language. For example, C-View, Application names, Input dialog, Message box configured in Automation Studio while creating a process and so on.
- Guided Scripting Process Data.
- Any data coming from services/database.
- List of shortcuts shown when user clicks Menu > Utilities > Shortcuts. For example, Alt+S.
- Content of CustomSummary and OneClickAutomation as those are templates only.
- Copyright shown on the footer of Engage.
- Custom Authentication window.