Creating Custom Patch
In Update Management, there is a provision for creating custom patches which can be uploaded and used for upgrading the client tools.
For example, if the client components need to be upgraded by placing the latest web driver, then a separate patch can be created and placed in the patch folder, which subsequently gets applied to the respective client components.
|
NOTE: |
|
To create custom patches, you must have the required files to create the patches. The files may be in exe, dll, json, xml formats and so on.
To create a custom patch:
- Create a folder directory structures to place the patch files.
- Folder path structure for Automation Studio:
- Create a folder structure in \client-tools\AutomationStudio, based on where you want to place the patch.
For example, \client-tools\AutomationStudio\bin\SeleniumDrivers\<driver version>. - Place the patch in the above created folder structure.
For example, \client-tools\AutomationStudio\bin\SeleniumDrivers\<driver version>\<Patch>.

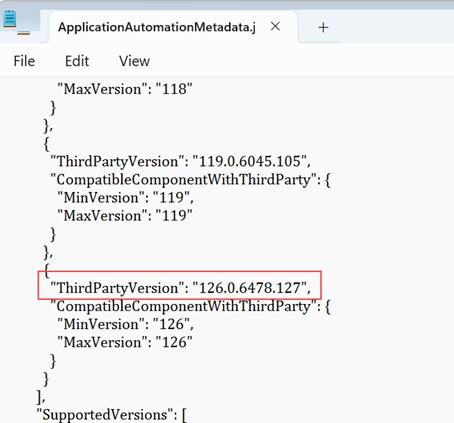
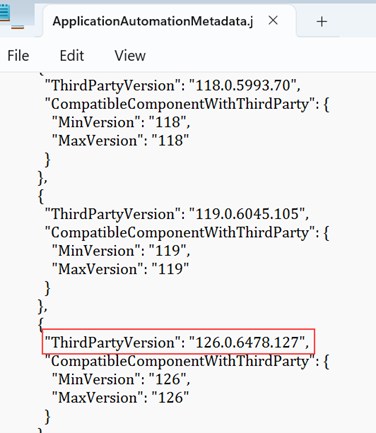
- Place the ApplicationAutomationMetadata.json file in the bin folder and update the same with the latest driver version number.
NOTE:
The ApplicationAutomationMetadata.json file is required to be updated only if you are creating web drivers patch.
- Folder path structure for Robot:
- Create a folder structure in \client-tools\AutomationRuntime\Robot\RobotAgent\RobotSE, based on where you want to place the patch.
For example, \client-tools\AutomationRuntime\Robot\RobotAgent\RobotSE\SeleniumDrivers\<driver version>. - Place the patch in the above created folder structure.
For example, \client-tools\AutomationRuntime\Robot\RobotAgent\RobotSE\SeleniumDrivers\<driver version>\<Patch>.

- Place the ApplicationAutomationMetadata.json file in the RobotSE folder and update the same with the latest driver version number.
- Folder path structure for Robot Agent:
Create a folder structure in \client-tools\AutomationRuntime\Robot\RobotAgent, based on where you want to place the patch.
- Zip the client-tools folder and rename it to PatchFiles.zip.
- Place the PatchMetaData file at the same location as PatchFiles.zip.
- Update the PatchMetaData file as given below.

The following table provides description of the fields in the PatchMetaData file:
Field Description Display Name The patch name of the update that will appear on the Update Management screen Applicable Version Field that contains the same value entered in the product version field Product Version The version of the product to which the patch is being applied.
For example, for this version you must enter 24.2 GAType CustomPatch Service Pack Version Not applicable Patch Version Patch version of the patch being created Description Description of the patch Tenant Info Default Depends On This field is not applicable for custom patch creation and can be left as a blank field. - Zip the PatchMetaData file along with PatchFiles.zip and name the zipped file as 24.2 GA CustomPatch #<version>.zip.
- Upload the patches. For more information about uploading the patches see Uploading Patches.