Appendix
This section explains the following:
Digital Worker Utility
The Digital Worker utility contains the list of commands that allow you to perform various activities related to Digital Worker. For example, install, upgrade, uninstall, status, create DB, create DB tables and so on. This utility reads Digital Worker deployment configuration parameters from the env.json file, which is located in the same directory as dw.sh file.
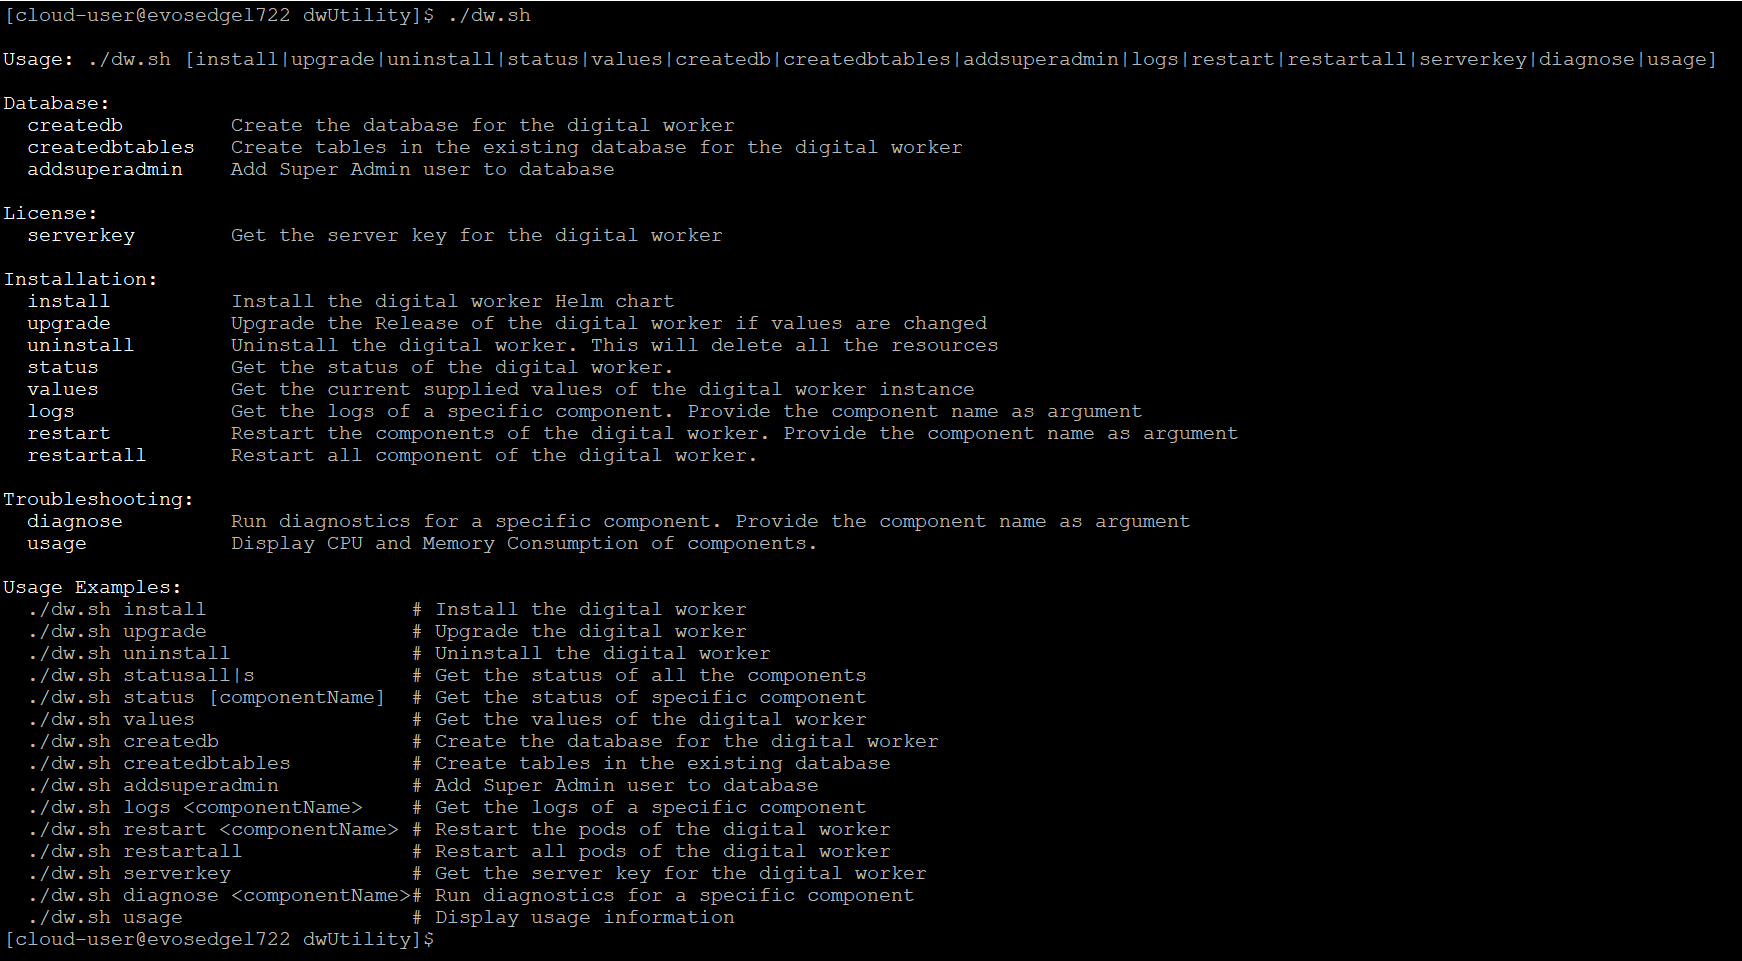
Digital Worker utility commands at glance:
| Linux | ||
|
The entry point of all the supported commands is ./dw.sh
|
||
| Applicable for server-side components. |
Following are the different categories of Digital Worker utility commands:
Prerequisites
Following are the required prerequisites:
- Ensure that Kubectl and Helm are installed on your deployment Linux machine. For installation related information, see the Install Kubectl and Installing Helm sections in the Platform-Installation Guide.pdf.
- Ensure jq is installed on the server machine.
- Use the sudo yum install jq, to install the jq.
- PSQL must be installed on the server machine.
- Ensure to get the Platform provided env.json file.
- Ensure you download and extract the digital-worker.tar.gz utility from the https://${JFROG_USERNAME}:${JFROG_TOKEN}@<jfrog-host/artifactory/<generic-repo-name>digital-worker/24.2.0/digital-worker.tar.gz file.
|
NOTE: |
Use the extract tar-xvf digital-worker.tar.gz command to extract digital-worker folder. |
Database
Following are the database creation and verification commands used in Digital Worker:
|
NOTE: |
When creating the database and database tables, if mutual TLS is enabled, ensure to update the values for db_ssl_cert_path and db_ssl_key_path in the Platform-provided env.json file. |
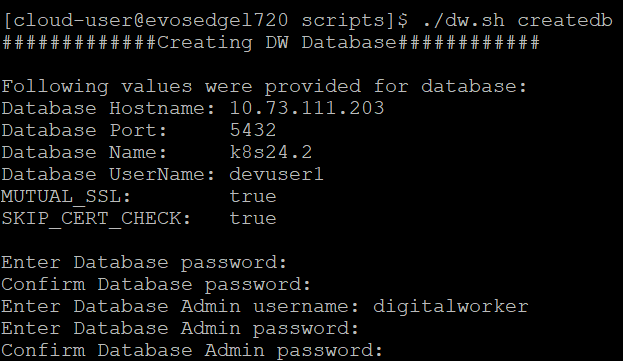
Create DB
This command is used to create the Digital Worker database.
Syntax: ./dw.sh createdb
Prerequisites
Before executing the command:
- You should have the database admin user credentials of the database server.
|
NOTE: |
If this command is repeated, it will not override the current DB and will display Database already exists message. |
Create DB tables
This command is used to create the objects in the existing Digital Worker database.
Syntax: ./dw.sh createdbtables
Prerequisites
Before executing the command:
- You should have the server details and port details in which the database is created.
- Ensure that database is created in the database server.
- You should have the database name, username, and password.
Add super admin
This command is used to add a super admin in the Digital Worker database. This user can then access the Admin module and can add new users to it.
Syntax: ./dw.sh addsuperadmin
Prerequisites
Before executing the command, make sure the database is created.
License
Following is the license generation command used in Digital Worker:
Server key
This command is used to retrieve the server.key files for Digital Worker.
Syntax: ./dw.sh serverkey

|
NOTE: |
You need to share the server key with the admin team to generate the license. |
Installation
Following is the Installation commands used in Digital Worker:
Install
This command is used to install the Digital Worker components in a Kubernetes environment.
Syntax: ./dw.sh install
Prerequisites
- Before executing the command, make sure to update the license_source_dir in the Digital Worker section of the Platform provided env.json file. Every server machine in a cluster setup should have its own license.
Upgrade
The upgrade command upgrades Digital Worker Helm Charts files from its current revision to a new revision. This command opens the <env->values.yaml file. You can update the details, then save and close the file using the :wq command.
Syntax: ./dw.sh upgrade
Uninstall
This command is used to uninstall the Digital Worker components.
Syntax: ./dw.sh uninstall
|
NOTE: |
This command should not be used in production environments after successful installation. |
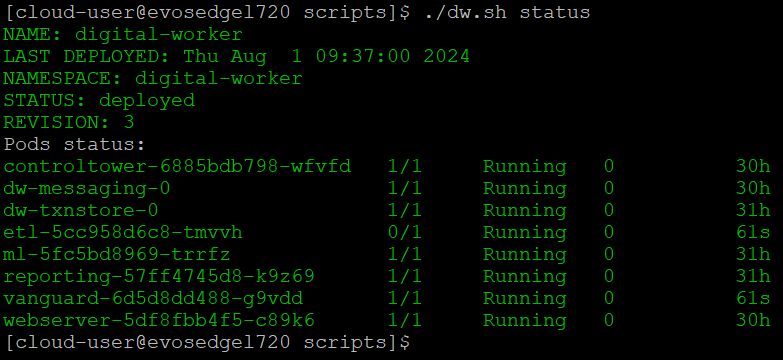
Status
This command is used to get the status of the components, such a last deployed, namespace, revision, pods, and so on across the Digital Worker namespace.
Syntax:
- ./dw.sh status: This command is used to get the status of all the components at once.
- ./dw.sh status <component name>: This command is used to get the status of the component separately.
Values
This command displays the current values present in the running Digital Worker instance.
Syntax: ./dw.sh values
Logs
This command displays the complete list of logs for the Digital Worker components.
Syntax: ./dw.sh logs <component name>

Restart
This command is used to restart the Digital Worker components.
Syntax: ./dw.sh restart <component name>
Prerequisites
- Before executing the command, check the status of the components.
Troubleshooting
Following are the troubleshooting commands used in Digital Worker:
Diagnose
This command is used to diagnose issues of each component of Digital Worker. Using this command, you can access the pods of that component and troubleshoot any issues.
Syntax: ./dw.sh diagnose <component name>
Usage
This command is used to display the CPU and memory consumption details of all the components of Digital Worker.
Syntax: ./dw.sh usage
Other Commonly Used Commands
- vi <file path with file name> - opens the editable file in the editor.
- i – enable editing.
- esc – to come out of the edit mode after editing the file.
- :wq – save and close file.
- :q – close file.
- :q! - close file without saving.
Helm Charts
Helm charts are .tgz files that allows you to install, upgrade, and automate application deployments into the Kubernetes (K8s) environment. These charts create Docker images in the repository during installation. There are two types of Helm charts for Digital Worker, they are:
- Parent Chart
- digital-worker-24.2.0.tgz
- runtime
- dblnstaller
- env.json
- dw.sh
- digital-worker-24.2.0.tgz
- Dependency Charts
- webserver-24.2.0.tgz
- txnstore-24.2.0.tgz
- messaging-24.2.0.tgz
- controltower-24.2.0.tgz
- vanguard-24.2.0.tgz
- etl-24.2.0.tgz
- reporting-24.2.0.tgz
- ml-24.2.0.tgz
env.json File
The env.json file contains Platform installation details and can be obtained from the administrator. You must place this file in the same directory as dw.sh file. During run time, the Digital Worker utility reads DW configuration parameters from this file.
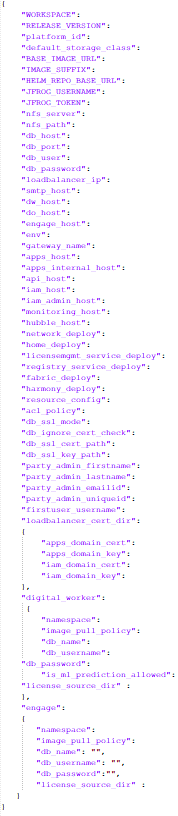
Some parameters need to be updated manually. They are marked below:
To update the file:
- Open the env.json file.
- Update as mentioned below.
| Name of Property | Description | ||
| SSL Details | |||
| db_ssl_mode |
Signifies the ssl mode of dw, such as:
|
||
| db_ignore_cert_check |
Signifies the mutual TLS of dw, such as:
|
||
| db_ssl_cert_path |
Signifies the SSL certificate path.
|
||
| db_ssl_key_path |
Signifies the SSL certificate path.
|
||
| Load balancer details | |||
| apps_domain_cert | Signifies the load balancer SSL certificate for DW components. | ||
| apps_domain_key | Signifies the load balancer SSL key for DW components. | ||
| iam_domain_cer | Signifies the load balancer SSL certificate for IAM. | ||
| iam_domain_key | Signifies the load balancer SSL key for IAM. | ||
|
|||
| dw | |||
| namespace | Signifies the name space for dw. | ||
| image_pull_policy | Signifies the image pull policy for dw. | ||
| db_name | Signifies the DB name for dw. | ||
| db_username | Signifies the DB username for dw. | ||
| db_password | Signifies the DB password for dw. | ||
| license_source_dir | Signifies the license source directory for dw. For more information, see License Placement section. | ||
The configuration of DW in env.json file is completed.
Quick Steps to Deploy Digital Worker
Follow these steps to quickly deploy dw:
- Ensure that DW utility prerequisites are done.
- Update the Platform-provided env.json
file with the respective DW details. For more information see, env.json File section. - Run ./dw.sh createdb command to create the Database, Database user, schema, tables, seed data, and initial superadmin user as per the values provided in the env.json file. For more information, see the Create DB section.
NOTE:
If you want to drop all tables and recreate the schema, tables, seed data, etc., run ./dw.sh createdbtables command. For more information, see the Create DB tables section. - Run ./dw.sh install /y command to install all the DW components.