Auto-Automation
Auto-Automation is a robust capability that collectively simplifies and connects the automation journey starting from Digital Observer to Digital Worker/Engage . This feature creates an automation process in Digital Worker/Engage Automation Studio with minimal manual effort. The process is created from the identified tasks in Digital Observer, which are converted to an automation process with a single click. Tasks involving Web applications, Windows applications, SAP GUI, and Excel can be converted to an automation process. Once the automation process is created, the process configurator can add, modify, or remove the steps to alter the process as required.
Here’s the life cycle of automation process when the process is executed through Auto-Automation:
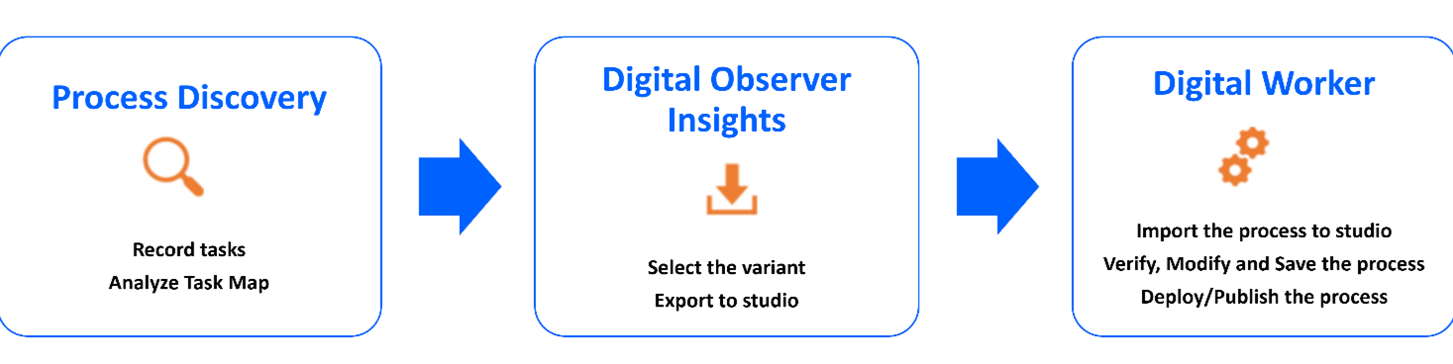
- Digital Observer Phase - It is the first and most crucial phase of process discovery that works in combination with capturing human-machine interactions to leveraging AI to creating actionable process insights. This is the step wherein automating the tasks is taken into consideration for automation by the business analyst. It includes:
- Recording the data on the agent's desktop
- Creating task map
- Performing task analysis
- Exporting the process to Automation Studio
- Automation Studio- In Automation Studio, the Digital Worker/Engage process configurator accesses the imported task map and edits the process as required. You can also create a new process for a automation process if required. It includes:
- Importing the process to Automation Studio
- Performing the required configuration for the selected process in Automation Studio
- Verifying and editing the process
- Deploying the automation process
- Deployment and Execution of Robots- This is the final phase of auto automation wherein once the process is deployed in Automation Studio; you can assign the robot to execute the automation process in the control tower.
Prerequisites
- It is recommended not to run Digital Observer Sensor and Digital Worker/Engage Automation Studio at the same time.
- Export Variant: Ensure that the required variants are exported from Digital Observer to Automation Studio. For more information about Exporting the variants to Automation Studio, see Digital Observer User Guide.
- Multiple variants can be exported at a time, but each variant is added as a different process in Automation Studio. Once all the variants are exported, they can be merged into a single process.
- Once the variant is exported from Digital Observer, it is displayed on the Import from Digital Observer page under Digital Observer tab.
- After exporting the variant to Automation Studio, in case the variant is edited during analysis in Digital Observer and exported again, the changes won’t reflect in the Automation Studio. However, you can make the changes manually while editing the process in Automation Studio.
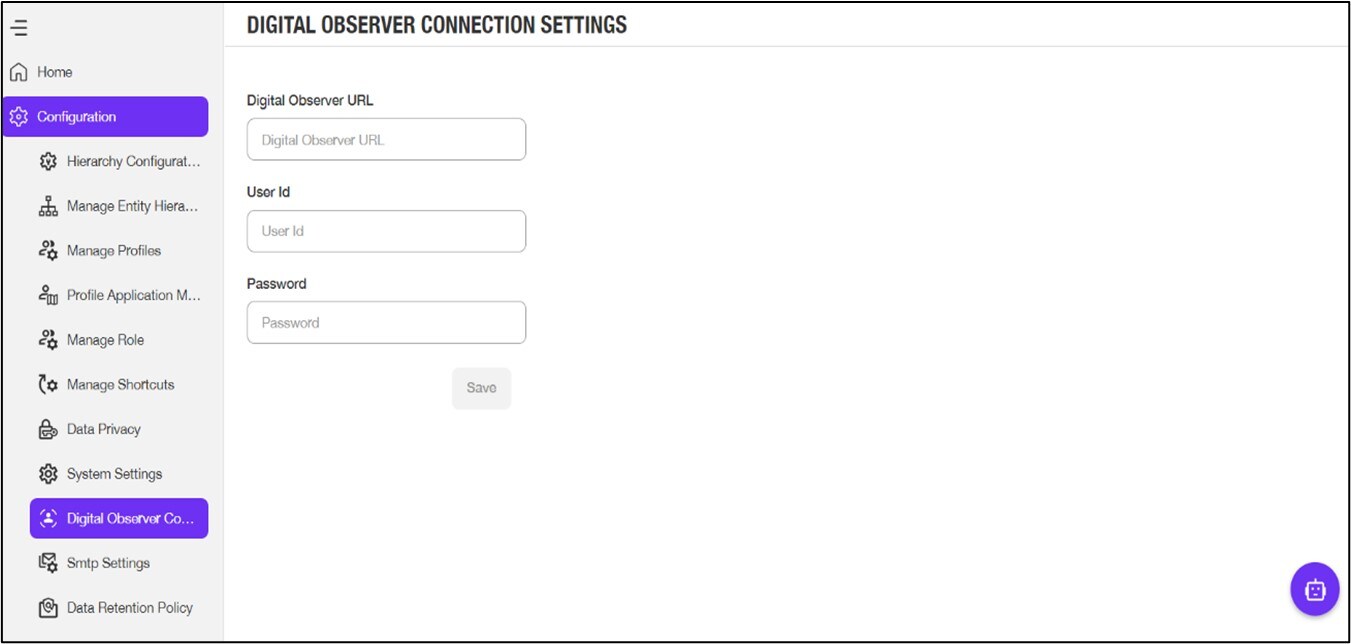
- Digital Observer API URL: In the Digital Observer Connection Settings menu available under the Configuration menu of the Admin module, the administrator must configure the API URL path shared by Digital Observer.
- The Studio users must be added to the Digital Observer application with the same email address as Automation Studio.
- The Studio users must be added to the Digital Observer application with the same email address as Automation Studio.
- Windows and SAP application: In case you are using Windows or SAP application in your Digital Worker/Engage process, ensure that the supporting application is already created in Automation Studio for the execution of the process. For the SAP application, you must enable the scripting. For more information about enabling the script, see SAP Recorder.
- Web Application: If the web application is present in the exported process, based on the application’s URL, it maps and configures an application for the process automatically in Automation Studio. Alternatively, you can create a new application for the process. Currently, only Chrome, Firefox, and Microsoft Edge browser are supported while using Auto Automation. For more information about configuring the web application, see Web Applications.
- Excel: In case you are using Excel recorder in your process, ensure that you have enabled the macros to execute the process successfully. For more information about enabling macros, see Excel Recorder.
For more information about regarding Auto - Automation configuration steps, see Troubleshooting.
Configuration required in Automation Studio
- IDP Login Configuration to Connect with DO:
- Automation Studio internally connects to Digital Observer with the credentials provided by you, by automating the EdgeVerve AI Next Common IAM login window with the WebView. If you want to use a customer IdP you must update the default parameters. To update the default parameters, see Connecting Digital Observer using OIDC Authentication .
- Configure applications:
- For Web application, is automatically created while importing the process. If the application already exists in Automation Studio, the application in the process gets mapped to an existing application with matching URL.
- For Excel application, excel activity block is generated automatically when the process is imported to Automation Studio.
- For Windows and SAP application, must be configured before importing the process. In case the application is not created in Automation Studio before importing the process, when the process is imported, a WriteLine activity block appears as User action required in <<app>>. However, you can go to the Application tab and create the corresponding application and import the process again. If you have used any specific file in the process, you must provide the exe path of the application and additional parameters for Windows applications. For SAP application, you only need to specify the connection name.
- If you import a process containing any non-supported application to Automation Studio, a WriteLine activity appears as User action required in <<app>>. For such non-supported applications, you can configure the steps manually using the PDD.
- Input or Output parameter mapping: If the Complex / Simple Hashing option is enabled while recording the task in the Digital Observer, the manually entered data is hashed accordingly. After importing the process in Automation Studio, the hashed value is displayed in Automation Studio as well. You can correct these values in the parameters bar in Automation Studio. In case Complex/Simple Hashing option is disabled in Digital Observer, the actual data is displayed in Automation Studio. Additionally, if masking policy is applied while recording the task in the Digital Observer application, the data is masked. After importing the process in Automation Studio, the masked value is displayed in Automation Studio as well. You can correct these values in the parameters bar in Automation Studio.
- Sign-in/Reset process creation: In some scenarios, the sign-in steps for applications might get captured while recording the process in Digital Observer. However, it is recommended that you delete the existing sign-in steps from the process in Automation Studio and create a sign-in process for the application.
- Saving/Publishing/Deploying the process: Unless the process is saved in Automation Studio, it appears in the Auto Automation tab in Automation Studio. Once the process is saved, it is displayed in the My Processes tab and you can publish and deploy it.
- Merging multiple variants in one automation process: You can merge multiple variants in one automation process to generate a new combined process in the Automation studio. After merging and testing the process, you can assign it to Robot for execution.
Role Access
Any Digital Worker/Engage user with a Business Analyst or higher role in Digital Observer can access the Digital Observer tab in Automation Studio. The Digital Worker/Engage user should be added to the Digital Observer application using the same email address provided during user creation in Digital Worker/Engage.